background image

23

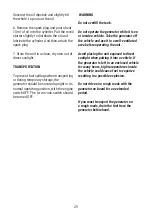
AIR FILTER 

A. Remove the appearance cover.

B. Loosen the filter fix clamp and remove 

the cover of the air filter.

C. Remove the foam filter element.

D. Wash in liquid detergent and warm 

water.

E. Squeeze thoroughly dry in a clean cloth.

F. Saturate in clean engine oil.

G. Squeeze in a clean absorbent cloth to 

remove all excess oil.

H. Assemble the filter element onto the 

filter unit

I. Assemble the filter fix clamp.

J. Reinstall the appearance cover.

WARNING

DO NOT run the engine without the air 

filter, or serious danger can result.

SPARK PLUG

A. Clean any dirt from the spark plug cap 

and spark plug base.

B. Remove the spark plug cap.

C. Using socket wrench to loose and 

remove the spark plug.

D. Inspect the spark plug and spark plug 

washer, if it was broken or worn, replace 

with a new one. Clean the spark plug with 

wire brush if reuse it.

E. Check spark plug gap. Carefully bend 

side electrode to adjust the gap if  

necessary.

SPARK PLUG GAP: 0.6MM-0.8MM

Summary of Contents for BQH2000

Page 1: ...INVERTER GENERATORS SAFETY AND OPERATING MANUAL PLEASE READ THIS MANUAL CAREFULLY BEFORE OPERATING THE UNIT BQH2000 BQH2200 A...

Page 2: ...OR 9 MANUAL START 10 ELECTRIC START 11 WIRELESS REMOTE CONTROL 12 CONNECT TO ELECTRIC DEVICES 13 LOADING CAPACITY 14 WATTAGE REFERENCE CHART 15 STOPPING THE GENERATOR 16 PARALLEL CONNECTION IV MAINTEN...

Page 3: ...t in property damage CAUTION Indicates a hazardous situation which if not strictly complied with could result in property damage or injury The warnings and precautions discussed in this manual cannot...

Page 4: ...g or transporting the generator Keep fire extinguisher handy at all times Battery Lithium battery is maintenance free if you have any question please contact a local authorised dealer Hot Surface Runn...

Page 5: ...n especially if the generator is equipped with a wheel kit Consult an electrician for local grounding requirements Installation should be performed by a certified electrician Improper Installation can...

Page 6: ...6 EnergySavingSwitch 7 V TypeDCOutput 8 GroundTerminal 9 CircuitBreaker 10 EuroReceptacle 11 Parallel KitTerminal 12 Two In OneSwitch EngineStop Fuel Switch 13 PushButtonStart 1 CarryingHandle 2 Fuel...

Page 7: ...power of the connected electric devices to the rated output range of the generator 2 Check the air intake for impurities and check the control parts for any abnormalities handle immediately if necessa...

Page 8: ...tarting currents GROUNDING TERMINAL The grounding terminal is designed to prevent electric shock by connecting it to the grounding wire The generator must be properly grounded before operation TWO IN...

Page 9: ...CAP Remove the fuel tank cap by rotating it anticlockwise VENTILATION KNOB The fuel tank cap is equipped with the ventilation knob to prevent leakage of fuel The ventilation knob must be in ON positi...

Page 10: ...local dealer for high altitude kit information if you intend to operate the unit at altitudes above 5 000 feet 1 500 meters CAUTION Even with carburetor modification generator horsepower will decrease...

Page 11: ...el Level should be between the upper and lower limit Fill to the upper limit of the dipstick with the recommended oil if the oil level is too low Reinstall and fully tighten the dipstick Reinstall the...

Page 12: ...l above the upper limit mark Always allow room for fuel expansion Fuel capacity rated See parameters NEVER use engine or carburetor cleaner products in the fuel tank or permanent damage may occur It i...

Page 13: ...in the generator or in connected electrical devices especially when the unit is equipped with a wheel kit Proper grounding also helps dissipate static electricity which often builds up in ungrounded d...

Page 14: ...the engine grasp the recoil starter handle and pull slowly until resistance is felt Then pull rapidly to start the engine When pulling the recoil starter firmly grasp the carrying handle to avoid tum...

Page 15: ...please release the switch button Do not attempt to start the engine again before figuring out the cause s Modification or using other battery to start the engine is not allowed If the engine speed is...

Page 16: ...generator is connected to an electric device and the electric device is in ON state 12 CONNECT TO ELECTRICAL DEVICES 1 Inspect power cord for damage prior to use A damaged power cord is a hazard and...

Page 17: ...tarting watts necessary for your purposes A Count the electrical devices you will power at the same time B The amount of power you need to run with the devices is the total rated running watts of thes...

Page 18: ...eks please turn the knob to OFF position or the battery will be out of power and the generator can not be started 3 Turn the energy saving switch to the ON position 4 Allow the generator to run at no...

Page 19: ...The total power of electric devices cannot exceed the rated power of the generator The manufacturers of electric devices or tools always list the rated power of similar models or serial numbers IV MAI...

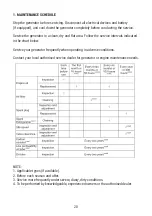
Page 20: ...at area Follow the service intervals indicated in the chart below Service your generator frequently when operating in adverse conditions Contact your local authorised service dealer for generator or e...

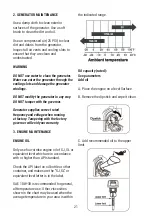
Page 21: ...t rated frequency and voltage when running at factory Tampering with the factory governor will void your warranty 3 ENGINE MAINTENANCE ENGINE OIL Only use four stroke engine oil of SJ SL or equivalent...

Page 22: ...when changing the oil to prevent burns A Place the machine on a level surface which is 300mm higher than the ground B Remove the oil maintenance cover C Place the waste oil box on the ground D Remove...

Page 23: ...er unit I Assemble the filter fix clamp J Reinstall the appearance cover WARNING DO NOT run the engine without the air filter or serious danger can result SPARK PLUG A Clean any dirt from the spark pl...

Page 24: ...k arrester if it is damaged F Reinstall the spark arrester in the muffler and reinstall the muffler blind window V STORAGE TRANSPORTATION STORAGE The generator should be started at least once every 2...

Page 25: ...the engine switch OFF The two in one switch should be turned OFF WARNING Do not overfill the tank Do not operate the generator while it is on or inside a vehicle Take the generator off the vehicle and...

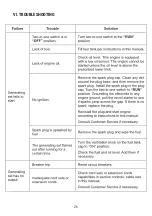
Page 26: ...26 VI TROUBLESHOOTING...

Page 27: ...27 VII SPECIFICATIONS 1 SPECIFICATION PARAMETER TABLE...

Page 28: ...28 VII SPECIFICATIONS Note The generator with different specification and configurations may have different parameters and may change at any time without notice...

Page 29: ...29 VII SPECIFICATIONS 2 WIRING DIAGRAM RECOIL STARTING...

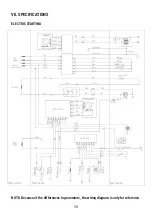
Page 30: ...30 VII SPECIFICATIONS ELECTRIC STARTING NOTE Because of the differences in generators the wiring diagram is only for reference...

Page 31: ...Master Dealers have access to special tools training and genuine parts that are required to maintain your LawnMaster product for peak operating conditions The purchaser must keep an accurate record of...

Page 32: ...faces deterioration of plated surfaces deterioration of rubber and plastics including rusting due to the passage of time Normal phenomena such as noise vibration and or oil are considered by Steelfort...

Page 33: ...etc Any normal wear or deterioration such as that of sliding and or rotating parts caused under normal operating conditions i e normal wear to pistons piston rings cylinder bores piston pins valve sea...

Page 34: ...rivate Bag 11045 Palmerston North 4442 New Zealand 06 350 1350 steelfort co nz steelfortnz SCAN TO VIEW THE LAWNMASTER RANGE Steelfort Auckland 880 Great South Road Penrose Auckland 1061 New Zealand 0...

Reviews: