4
A STEELFORT PRODUCT
•
Keep all safety guards in place and in proper
working order at all times.
•
DO NOT allow any material to block the cooling
slots.
•
DO NOT allow children or untrained people to
operate the unit.
•
Read and follow the instructions to understand
the controls and proper appliance usage.
•
This product has been designed for use in
cutting grass ONLY.
•
Never use while people, especially children, or
pets are nearby.
•
The operator/user is liable for accidents or
damage caused to others or their property.
•
Avoid running the engine indoors. The exhaust
gases contain harmful carbon monoxide.
•
Always store fuel in a properly marked contain-
er that complies with New Zealand standards.
•
Do not smoke while mixing fuel or during filling
the fuel tank.
•
Do not mix fuel in an enclosed room or near an
open flame, ensure adequate ventilation.
•
Never remove the fuel tank cap while the
engine is running.
•
Never attempt to make engine adjustments
while the engine is running and strapped to the
operator.
PREPARATION
•
While cutting, always wear substantial footwear
and long trousers.
•
Do not operate the appliance when barefoot or
wearing open sandals.
•
Inspect and clear the area of any foreign ob-
jects, such as stones, sticks, wires, bones, etc.,
before using the appliance.
•
Before use, check the nylon head and bolts as-
sembly for wear or damage, and replace them
together for balance.
•
Always wear ear and eye protection when
operating the L261 trimmer.
OPERATION
•
Operate only in daylight or in good artificial
light.
•
Avoid operating the appliance in wet grass.
•
Always be sure of your footing on slopes.
•
Exercise extreme caution when changing
direction on slopes.
•
Do not cut on excessively steep slopes.
•
Use extreme caution when reversing or pulling
the appliance towards you.
•
Never operate the appliance with defective
guards or shields, or without safety devices.
GETTING STARTED
The line trimmer is a high-speed and fast cutting
power tool. All safety precaution must be
observed to reduce the risk of personal injury. Please
read this manual carefully and become familiar with
the controls before using the unit. This line trimmer
has been designed for cutting grass. Any other use
is not permitted. The grass trimmer is suitable for
private use in the garden only, not for cutting grass in
public parks, playing fields or on farms or in forest.
ASSEMBLY
When assembling this machine, please follow the
instructions for assembly printed.
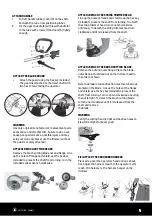
CONNECT THE SHAFTS
1.
Remove the rubber shaft plug and cap.
2.
Pull up the spring-loaded pin (1) and push the
lower shaft (2) into the aluminum coupler until
the spring loaded pin (1) clicks into the hole (3)
of the aluminum coupler.
3.
Once the spring-loaded pin is completely
inserted, tighten the coupler knob (4).
8
SPECIFICATIONS
All speci
fi
.
g
n
i
t
n
ir
p
f
o
e
m
i
t
e
h
t
t
a
e
l
b
a
li
a
v
a
n
o
i
t
a
m
r
o
f
n
i
t
c
u
d
o
r
p
t
s
e
t
a
l
e
h
t
n
o
d
e
s
a
b
e
r
a
s
n
o
i
t
a
c
We reserve the right to make changes at any time without notice.
ASSEMBLY
When assembling this machine, please follow the instructions for assembly steps.
1. Connecting the upper and lower shafts:
Remove the rubber shaft plug and cap. Pull up the spring-loaded pin
(1) and push the lower shaft (2) into the aluminum coupler until the
spring loaded pin (1) clicks into the hole (3) of the aluminum coupler.
Once the spring-loaded pin is completely inserted, tighten the coupler
knob (4).
2. Assemble the handle :
3. Attaching the blade guard:
Attach the guard using the hex key included. The guard is attached to the lower shaft with two hex
screws facing the operator.
Warning!
Use only original manufacturer’s replacement parts, accessories and attachments. Failure
to do so can cause poor performance, possible injury and may void your warranty.
Never use the
trimmer without the guard securely attached!
Model name . . . . . . . . . . . . . . . . . .BCI26
Engine type. . . . . . . . . . Air-Cooled, 2-Cycle
Engine displacement . . . . . .. . . . .. . . 25.4cc
Rated motor power . . . . . . . . . . . . . . 0.7kw
Lubrication . . . . . . . . . . . . Fuel/Oil Mixture
Fuel/Oil ratio. . . . . . . . . . . . . . . . . . . 25:1
Volumes of fuel tank . . . . . . . . 20 oz. (600ml)
Trimmer mechanism . . . . . . . . . Bump Head
Cutting path diameter . . . . . . . .17in (430mm)
Trimming line. . . . . . . . . . . 0.095 in. (2.4mm)
Max. engine speed (with cutting
attachment, no-load) . . . . . . . . . . 11500/min
Put left handle rubber cover(3) on the shaft between
the two arrow positioning label, fix the upper handle (2)
with lower handle (4) to the tube with screws (1) and nuts
(5) tightly enough.
•
Switch on the motor according to instructions
and with feet well away from the cutter.
•
Tilt the appliance minimally and lift only the
part away from the operator. Always have both
hands in the operating position when lowering
it back down.
•
Do not put hands or feet near or under rotating
parts.
•
Pull the spark from the socket:· before clearing
a blockage; before checking, cleaning or
working on the appliance.
•
Inspect the appliance for damage and make
repairs as necessary.
•
If the appliance starts to vibrate abnormally
(check immediately).
•
Do not operate when tired, ill, or under the
influence of drugs, alcohol or medication.
•
Stop the engine and let it cool before refueling.
Never refuel while the engine is running or hot.
•
When refuelling , be sure to stop the engine
and allow the engine to cool down. Never refuel
when the engine is running or hot.


