background image

23

1

2

3

GENERAL TROUBLESHOOTING

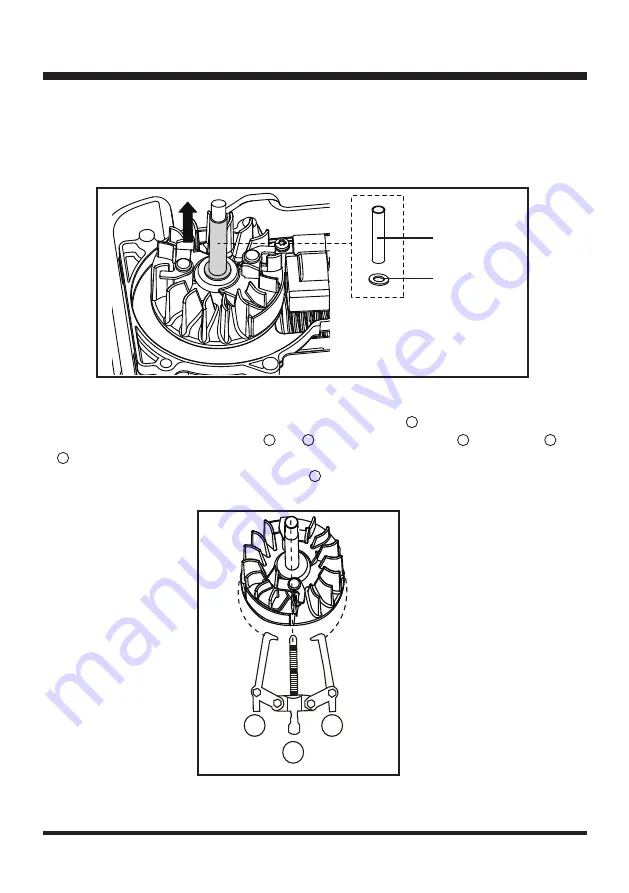
■  The flywheel can be removed by a puller with hooks (Fig. 22). Choose an appropriate puller to 

remove the flywheel. Before using the puller, rotate the screw rod 

1

 counter-clockwise until it is 1/4 

to 1/2 its original length. Ensure hooks

2

 and 

3

 are longer than screw rod 

1

. Insert hooks

2

 and 

3

 onto both sides of flywheel as shown in Fig. 22. Make sure the hooks are level and with the same 

length. Then use a spanner to rotate screw rod 

1

 clockwise until the flywheel is removed. Rotate 

the screw rod counter-clockwise to remove the puller from the flywheel.

Fig. 21

Fig. 22


Flywheel (Rotor) Replacement 

(See Figs. 21-25)

■  Remove the rear engine cover, connection cover and front engine cover referring to steps 5 – 9 in 

Ignition System section.

■  Remove the flywheel cover assembly and washer (Fig. 21).

Flywheel Cover 
Assembly

Washer

Summary of Contents for NPTGSP2517A

Page 1: ...SERVICE MANUAL 25cc 2 Cycle Grass Trimmer NPTGSP2517A NPTGCP2517B Read all safety rules and instructions carefully before servicing this tool 601 Regent Park Court Greenville SC 29607 1 866 384 8432...

Page 2: ...RULES 5 PARTS AND FEATURES 6 12 WIRING DIAGRAM AND MANAGEMENT 13 GENERAL TROUBLESHOOTING 14 24 AIR FUEL SYSTEM 25 34 THROTTLE AND STARTER SYSTEM 35 39 NOPULL STARTER SYSTEM 40 43 25CC 2 CYCLE ENGINE...

Page 3: ...IN LBS N m Cylinder to crankcase Use 3 hexalobular socket screws M6X20 with thread glue to secure the cylinder to crankcase 71 80 8 9 Crankcase rear cover to crankcase Use 4 hexalobular socket screws...

Page 4: ...tor to the front engine cover with a torque spanner 4 5 0 5 0 6 Upper engine cover to front engine cover Make 4 self tapping screws ST3 9X16F pass through the upper engine cover and dust filter then s...

Page 5: ...with a damaged guard or without the guard in place Avoid getting into direct contact with the line Always remember to keep both hands on the control handles when the engine is running Do not operate t...

Page 6: ...6 PARTS AND FEATURES NPTGSP2517A EXPLODED VIEW...

Page 7: ...7 321008103 Assist Handle Assembly 1 8 321008104 Aluminum Connector Assembly 1 9 321008105 Aluminum Lower Shaft 1 10 321008106 Debris Guard 1 10 1 321008107 Small Debris Guard Assembly 1 10 2 3210081...

Page 8: ...8 PARTS AND FEATURES NPTGCP2517B EXPLODED VIEW...

Page 9: ...Set 1 2 2 4 321007107 PCB Assembly 1 3 321007108 Connection Cover Assembly 1 4 321007109 Aluminum Upper Shaft 1 4 1 321007110 Shaft Connection Sleeve 1 5 141004102 Cable Clamp 2 6 321007111 Handle Sp...

Page 10: ...10 PARTS AND FEATURES EXPLODED VIEW 25CC 2 CYCLE ENGINE...

Page 11: ...7131 Cables 2 14 321007132 Clutch 1 15 321007133 Clutch Cover Assembly 1 16 321007134 Connection Cover 1 17 321007135 Electric Start Motor 1 18 321007136 Front Engine Cover 1 19 321007137 Gear 1 20 32...

Page 12: ...4 Fuel Tank Assembly 1 46 1 321007165 Protective Film 1 47 321007166 Fuel Tube 1 48 321007167 Fuel Cap 1 49 321007168 Clutch Washer 1 50 321007169 Gasket 1 51 321007170 Washer 1 52 321007171 Gasket 2...

Page 13: ...Switch Self reset 3 5 Bullet 3 5 Bullet Terminal lgnition Coil Spark Plug 3 5 Bullet Terminal 2S Battery Pack Starter Switch Self reset NTC NTC RD RD BK BK RD Bullet Terminal BL Bullet Terminal BL Ele...

Page 14: ...othly referring to page 41 The motor does not start and the battery indicator LED is continuously on There is an open circuit from the PCB output to the motor connecting line Check if there is an open...

Page 15: ...5 0 30 0 40mm The engine is flooded Remove the spark plug Clip the fuel tube for fuel entering Press the start button to remove the fuel inside the cylinder The engine has less power The choke lever i...

Page 16: ...oor contact of the high voltage line and the jump ring Repair Spark plug cap is broken Replace Engine will not start but spark plug fires Excess fuel inside spark plug Remove the spark plug Clip the f...

Page 17: ...Crankcase washer has air leakage Replace Fuel seal has air leakage Replace After releasing the throttle lever the trimmer head continues to rotate Idle speed is too high Adjust the engine Clutch spri...

Page 18: ...he aluminum part Fig 4 5 0 30 60 90 120 150 180 210 240 270 300 Fig 2 Fig 1 Engine Compression See Figs 1 2 Low compression will cause erratic idling low power and hard starting when hot To test the e...

Page 19: ...move the rear engine cover Fig 6 Rotate the socket wrench counter clockwise to remove the 4 screws on the connection cover Then remove the connection cover Fig 7 Use the socket wrench to hold against...

Page 20: ...ise to remove the 4 screws on the front engine cover Fig 14 Release the stop switch cables from the notch as shown in Fig 15 Then carefully remove the front engine cover assembly to show the flywheel...

Page 21: ...cover Refer to step 5 9 in Ignition System section Remove the spark plug cover Rotate the quincunx wrench counter clockwise to remove the 2 screws marked as 1 2 screw 1 with a connector on the igniti...

Page 22: ...ge Tighten the screws to fix the ignition coil Rotate the flywheel counter clockwise to remove the feeler gauge Recheck to ensure the gap is 0 012 0 015 in 0 30 0 40 mm Fig 17 Fig 19 Fig 18 Clutch Rep...

Page 23: ...onto both sides of flywheel as shown in Fig 22 Make sure the hooks are level and with the same length Then use a spanner to rotate screw rod 1 clockwise until the flywheel is removed Rotate the screw...

Page 24: ...rotor magnets meet the requirements Check that the fins are in good condition Replace with a new flywheel if necessary Align the positioning tab on the flywheel with the positioning groove on the sha...

Page 25: ...rew together with the L screw L screw adjust the low speed flow rate and assist the T screw to adjust the idle speed H screw adjust the high speed flow rate and maximum no load speed NOTE Inspect the...

Page 26: ...Start the trimmer and run at half or low throttle for about 2 minutes to warm the engine Once the engine warms up run the trimmer at full throttle and bump the trimmer head on the grass or ground 2 t...

Page 27: ...speed could be greater than or less than 4000 RPM Adjust the T screw If the max speed adjusted in previous step is greater than 4000 RPM turn the T screw counter clockwise using the screwdriver Obser...

Page 28: ...the 2 screws on the air filter base and remove the air filter base Fig 37 38 The choke lever is installed on the air filter base Inspect the lever for signs of wear or damage and replace if needed Pre...

Page 29: ...e if necessary Fig 41 42 NOTE Make sure the new carburetor and washer should be placed in the exact order in which they were removed If the carburetor mount assembly needs to be replaced remove the 2...

Page 30: ...xact order in which they were removed Fuel Tank Replacement Remove the rear engine cover referring to step 5 in Ignition System section Unplug the 2 fuel tubes Fig 45 Remove the 4 screws on the crankc...

Page 31: ...transparent is for fuel return The fuel tubes should be connected to the turning position as shown Fig 49 NOTE Do not damage or fold the fuel tubes Fig 48 Fig 49 Exhaust System Service See Figs 50 52...

Page 32: ...up NOTE Do not allow the carbon deposit to fall into the cylinder when removing the buildup Fig 52 Fig 51 Fig 52 Electric Starter Replacement See Figs 53 59 Remove the rear engine cover connection co...

Page 33: ...emove the gear assembly with volute spring and ratchet wheel and replace each of them if needed Fig 56 Fig 56 Remove the dual gear dual gear shaft and gaskets and replace if needed Fig 57 Fig 57 Volut...

Page 34: ...ectric start motor Fig 58 Fig 58 Remove the electric start motor Open the corrugated pipe and separate the stop switch cables and motor drive lines then remove and replace the electric start motor if...

Page 35: ...the main handle Fig 60 61 Disconnect the LED light cable from the electric starter cover plate and then remove the electric starter cover plate Then remove the throttle safety and the torsional spring...

Page 36: ...ndle part from the corrugated pipe Remove the PCB assembly by pulling it out of its slot Fig 65 66 Microswitch Wiring Harness Motor Drive Lines of Handle Fig 65 Fig 66 Replace with a new PCB assembly...

Page 37: ...cable are connected in place Fig 70 Fig 69 Fig 70 Arrange the wirings inside the handle cover to make them straight Then align the two ends of the handle cover with the slots of the two rubbers on th...

Page 38: ...Restore the right cover of the main handle by tightening the 8 screws Power Line Connection Align and connect the male and female terminals of the wiring harness of the main handle to the male and fe...

Page 39: ...into the engine cover Wrap the connected terminals of the wiring harness with the corrugated pipe and tighten with the tie Fig 78 79 Recheck to ensure that all the insulation covering outside the wiri...

Page 40: ...ccurs release the start button and press it again to re start the electric motor Troubleshooting The electric motor does not start when pressing the start button According to LED indictors the possibl...

Page 41: ...such as metal magnetized on the flywheel E If the battery indicator LED is continuously on check that if an open circuit occurs from the PCB output to the motor connecting line When pressing the start...

Page 42: ...g of the battery indicator LED indicates an overcurrent in the electric starter Check if the engine is stuck and cannot be rotated smoothly The electric motor starts normally but the LED does not turn...

Page 43: ...fails the possible causes are 1 An open circuit in the connection position between the wiring harness of the engine and the ignition coil 2 An open circuit in in the connection position between the wi...

Page 44: ...is lower than 4200 RPM and the trimmer head rotates rapidly the clutch needs to be replaced Electric starter assembly If the electric starter malfunctions disassemble it to check if the electric moto...

Page 45: ...Insert the provided hex wrench into the hole on the flange to lock the spindle Then rotate the trimmer head clockwise to remove Fig 89 To install the new trimmer head hold the hex wrench to lock the...

Page 46: ...remove the trimmer head housing from the drive shaft Insert the new spool into the spool cover Release both trimmer lines from the parking slot and guide the lines into both eyelets Fig 94 To reinstal...

Page 47: ...ty spool from the spool cover Then remove the spring Fig 97 Install the spring to the new spool Insert the new spool with spring into the spool cover Release both trimming lines from the parking slot...

Page 48: ...move any remaining cutting line from the spool NOTE Use only round monofilament line with the recommended diameter Ensure that the new cutting line is sufficiently long approximately 13 ft 4 m Fold th...

Page 49: ...he spool leaving some of the line out Fig 105 NOTE Always clean the main spool cover and trimmer head housing before reassembling the trimmer head NOTE Always clean the trimmer head before replacing t...

Page 50: ...ty 1 Any part that has become inoperative due to alteration misuse commercial use abuse neglect accident or improper storage or maintenance 2 The unit if it has not been operated and or maintained in...

Reviews: