IT
ALIANO
POLSKI
ESP
AÑOL
FRANCAIS
DEUTSCH
ENGLISH
7
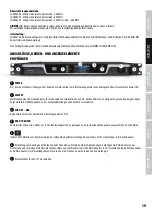
MICROPHONE STATION
16
MICROPHONE INPUT
Microphone input with lockable 3-pin XLR socket and 28 V phantom power. A gooseneck microphone is included in the delivery. Insert the
gooseneck microphone and point it at a distance of approximately 10 to 20 cm towards the signal source.
17
DISPLAY
Multi-functional OLED graphics display for displaying the radio frequency, the frequency group and channel, the microphone number
(= microphone station number) and battery status. After switching on the microphone station, "WELCOME" appears as a welcome message
for a short time. As soon as the mute button on the transmitter is activated, the information appears in the display as "MUTE", at the same
time the symbol of a crossed-out microphone appears in the microphone station status display of the receiver. When disabling mute, the
display is switched back to the main screen. As soon as the charge status of the batteries is low, the display shows "LOW BATTERY”; after
switching off the receiver, "POWER OFF” is displayed for a short period of time.
18
Infrared interface for synchronising the relevant system settings of the transmitter with the receiver (e.g. transmission frequency).
19
POWER / MUTE
Dual function switch:
1. To turn the transmitter on, press the switch briefly, to turn it off, press and hold for approx. 3 seconds.
2. When turned on, press the switch briefly to activate or deactivate the mute function. The illuminated
microphone symbol in the switch changes its colour to orange when muted, when deactivating the mute function, it turns green.
20
ATTN (Attenuator)
Attenuation of the microphone level. Turning it to the right increases the attenuation and the microphone volume is lowered. Turning it to the
left decreases the attenuation and the microphone volume is increased. Upon delivery, the potentiometer is set to the default setting in the
latch point (centre position).
21
LOW CUT
Low-cut filter for the microphone signal (frequency 130 Hz, switch in position
= low-cut filter is activated).
22
BATTERY COMPARTMENT
To replace the batteries, open the battery compartment by pressing the lock lever of the cover towards the battery compartment and pulling
it upwards. Remove the used batteries and insert new batteries (AA, Mignon) as shown on the illustration inside the battery compartment.
Now, replace the battery compartment cover onto the battery compartment and push it downwards until the lock lever clicks into place. If
the microphone station is not in use for a long period of time, remove the batteries to avoid damage caused by leaking batteries.
20
22
21
16
17
18
19


