background image


20 


Position the safety bar in the holes of the lower rails of the table  

7.4  Lift table maintenance (option) 


Frequency:

 Every 100 hours or every 6 months. 


  Put the table in the upper stop. 

  Lift the bellow and hold it in place by using the straps (not included). 

  Positioning the safety bar (supplied with the device) 


  Lubricate the lower and upper rails to the right and to the left with graphite grease.  


Check the oil level in the pump reservoir. It must contain at least 2cm of oil when the table is at the 

upper stop, complete with hydraulic oil if necessary. 


2cm minimum  

Upper rail to be greased


Lower rail


Filler plug


Adjusting the lowering speed: 
Loosen to increase the speed 
 

Adjusting the pressure: 
Loosen to increase pressure (150bar max) 


Lower rail to be greased


Safety bar


Pump tank


Bellow


Straps


Summary of Contents for EASY 2000

Page 1: ...EASY 2000...

Page 2: ......

Page 3: ...N TRAILER 1200 MM LIFT I60 30 123 EASY 2000 ON TRAILER 600 MM LIFT I60 30 124 EASY 2000 ON TRAILER WITHOUT LIFT I60 30 126 EASY 2000 ON SKID 1200 MM LIFT I60 30 125 EASY 2000 ON SKID 600 MM LIFT I60 3...

Page 4: ...fan 14 6 4 Gasoline failure 15 6 5 Recharging the battery 15 6 6 Misting 15 6 7 Suction duct Option 16 6 8 Supply duct Option 16 6 9 Trailer Option 16 7 MAINTENANCE OPERATIONS 17 7 1 Replacing the ba...

Page 5: ...he lift when the fan is running at full speed Always replace a defective part by an original part provided by LEADER No disassembly must be performed before the battery is disconnected the emergency s...

Page 6: ...6 ATTENTION ATTENTION ATTENTION Area of occasional presence R 15m m Wear protective equipment...

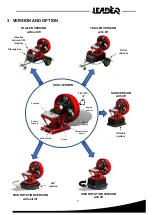
Page 7: ...lift Trailer Option TRAILER VERSION without lift Storage box Gasoline Jerrican 20L Option SKID ROTATION VERSION without lift 360 rotation option SKID VERSION Tilt 20 10 Fuel tank Circuit breaker Remot...

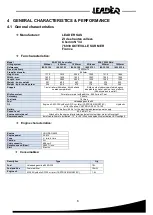
Page 8: ...ight mm 1715 1915 2050 1250 1510 1645 Width mm 1430 1430 1430 1060 1060 1060 Length mm 2800 2800 2800 1205 1205 1205 Weight kg dry weight 301 402 447 158 275 320 Weight kg in running order 324 425 470...

Page 9: ...ential parts of the carburettor To keep the fuel in good condition use a fuel stabilizer Use Ethanol Free gasoline where possible When you add a fuel stabilizer fill the fuel tank with fresh gasoline...

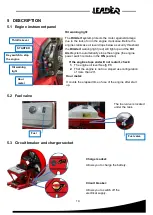
Page 10: ...stops and will not restart check 1 The engine oil level See 7 3 2 That the engine is not in a sloped use configuration of more than 20 Hour meter It counts the elapsed time of use of the engine after...

Page 11: ...indicates that the LED headlight is in operation The LED light is available as an optional However the green LED indicator light is functional and will light up if the joystick is ON even if the ligh...

Page 12: ...s firmly applied on the trailer versions 2 Pull the red handle the strut will rotate toward the ground 3 Stabilize the fan by adjusting the strut by using the crank provided in the box 6 2 Starting th...

Page 13: ...s position until the engine starts At the first start up or following a fuel failure it is normal that the engine does not start after 5 seconds this is due to priming the fuel pump In other cases if...

Page 14: ...speed to the minimum by placing the gas control lever on the MIN position Using the key place the engine switch on the OFF position the engine must stop Close the valve of the fuel tank Bring the tilt...

Page 15: ...5 Recharging the battery The EASY2000 is fitted with a socket for recharging the battery In order to ensure a sufficient charge level it is recommended to recharge the battery once a month A charger i...

Page 16: ...nting it near the rear grid 6 9 Trailer Option When towing the EASY2000 the following precautions must be taken The stabilization strut must be raised The hand brake released The jockey wheel must be...

Page 17: ...inspection without disassembly On trailer version Make sure the crank is present Check the condition of the strut Check signalling Lighting brake lights Tire pressure X 1 Change the engine oil X X Cf...

Page 18: ...and the ignition turned off All interventions must be performed on a cold engine Before any intervention on the lift table install the security mechanism as described in paragraph cf 6 4 Remove the b...

Page 19: ...ne the higher the level will be Add oil if necessary Never open the engine oil tank cap when the engine is hot Wait at least 25 min after stopping the engine Place a suitable container under the engin...

Page 20: ...the device Lubricate the lower and upper rails to the right and to the left with graphite grease Check the oil level in the pump reservoir It must contain at least 2cm of oil when the table is at the...

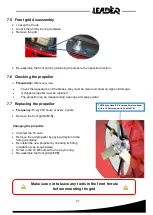
Page 21: ...aned using a sponge and soapy water 7 7 Replacing the propeller Frequency Every 200 hours or every 2 years Remove the front grid cf 7 5 Changing the propeller Unscrew the 10 nuts Remove the old propel...

Page 22: ...e the air filter after you have removed the cover The use of chemical products is not recommended for cleaning the filter 7 10 Replacing the spark plugs Frequency Every 200 hours Only change spark plu...

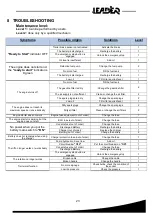
Page 23: ...speed or runs erratically Dirty spark plugs Change the spark plugs 2 Dirty air filter Clean or change the air filters 2 Engine starter does not work Engine fuse equipment out of order Change the fuse...

Page 24: ...Filter 2007510 Oil filter Oil filter 2007511 Fuel filter Fuel filter 2007513 Spark plug Spark plug 2007512 Battery Battery 2007439 10A Fuse 10A Fuse 2004630 Propeller Propeller 2007401 Female Connecto...

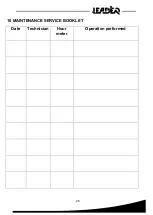
Page 25: ...25 10 MAINTENANCE SERVICE BOOKLET Date Technician Hour meter Operation performed...

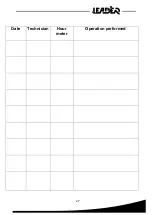
Page 26: ...26 Date Technician Hour meter Operation performed...

Page 27: ...27 Date Technician Hour meter Operation performed...

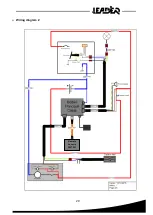
Page 28: ...28 11 ANNEX Wiring diagram 1...

Page 29: ...29 Wiring diagram 2 Remote console 2007267...

Page 30: ...cluding shipping and travelling fees If the defect is not attributable to LEADER see the procedures laid down in the out of warranty Defect paragraph This warranty does not commit LEADER in the follow...

Page 31: ...31...

Page 32: ...32 Package leaflet Code EASY2000 0 ZN3 67 EN 0...

Reviews: