background image

Care Of Your Machine

26

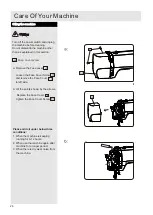
Turn off the power switch and unplug 
the machine before cleaning.
Do not dismantle the machine other 
than as explained in this section.

Oiling the machine

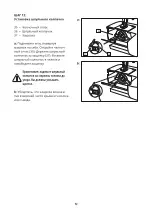
a: Remove the Face cover        .

    Loosen the Face Cover Screw        

and remove the Face Cover         
to left side.

b: Oil the points shown by the arrows.

     Replace the Face Cover        ,   

tighten the Face Cover Screw       .

Please add oil under below three 
conditions:

1. When the machine is keeping 

running for 8-12 hours;

2. When use the machine again after 

machine for a longer period;

3. When there is dry wear noise from 

the machine.

Face cover screw

Summary of Contents for Like Me

Page 1: ......

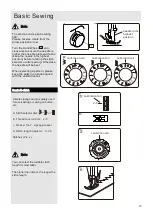
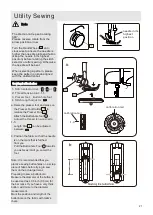
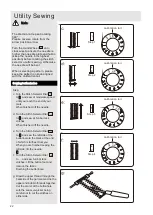
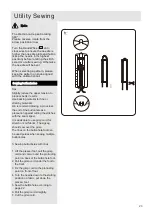
Page 2: ...lation of lint dust and loose cloth 6 Never drop or insert any object into any opening 7 Do not use outdoors 8 Do not operate where aerosol spray products are being used or where oxygen is being admin...

Page 3: ...upper thread 9 Threading the bobbin case 10 Drawing up the bobbin thread 11 Seam guide line 11 Thread tension 12 Basic Sewing Selecting stitch sewing 13 Changing sewing directions 14 Reverse sewing 14...

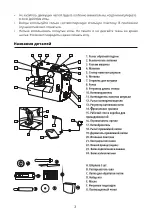
Page 4: ...bbin winder spindle Spool pins Carry handle Stitch length adjustor Thread guide Bobbin winding thread guide Thread take up lever Thread tension dial Face plate Sewing table accessory box Stitch select...

Page 5: ...Machine Plug into the Machine Socket c Insert the Power Supply Plug into the Wall socket d Turn on the Power Switch to turn on the power and the sewing light will also automatically turn on Please re...

Page 6: ...the hem of pant legs or sleeves To remove hold the end of the sewing table and pull away from the sewing machine To replace push the sewing table until it fits into the machine Accessory storage Sewi...

Page 7: ...ts highest position Raise the Presser foot arm Press the Press Foot Holder on the back of the foot holder the Presser Foot will release b To attach Place the Presser Foot on the Needle Plate and align...

Page 8: ...h the Flat Side to the rear Then tighten the Needle Clamp Screw b To check if a needle is bent Place the Flat Side of the needle onto something flat e g needle plate or glass The gap between the needl...

Page 9: ...hread 40 to 50 synthetic cotton covered polyester 7 Note The dial can not repeat rotating 360 Please reverse rotate in the position shown arrow Please keep the calibration tails and the pattern on lin...

Page 10: ...clockwise direction d Place the Bobbin on the Bobbin Winder Spindle and push it the right to the bobbin winding position e Turn on the power switch Press the Foot Controller gently The bobbin will st...

Page 11: ...Thread guide c Hold the end of the thread and carefully draw the thread down and up around the Check Spring Holder d Carefully draw the thread up and through the Thread Take up Lever threading from r...

Page 12: ...pull straight out of the shuttle c Place a Bobbin in the Bobbin Case making sure the thread feeds clockwise from the bobbin d Draw the thread through the slot in the case Continue to draw the thread u...

Page 13: ...needle thread c Pull both thread 6 15cm under and behind the presser foot Make sure you have correctly completed step 9 before staring this step Must rotate the hand wheel anticlockwise toward you Ot...

Page 14: ...d tension remove the bobbin case with the bobbin from the machine and hold the bobbin case suspended by the thread Shake it once or twice If the tension is correct the thread will unwind by about an i...

Page 15: ...suitable stitch length for most fabtic The higher the number the longer the stitch length Note calibration tail calibration tail 3 6 1 2 3 0 2 6 calibration tail calibration tail The dial can not rep...

Page 16: ...in the fabric Raise the presser foot and turn the fabric to line up to its new direction using the needle as a turning point Lower the presser foot and continue sewing in the new direction Note The d...

Page 17: ...ength Note calibration tail calibration tail calibration tail 3 6 1 2 3 0 calibration tail 2 5 calibration tail The dial can not repeat rotating 360 Please reverse rotate from the arrow position arrow...

Page 18: ...e slit in the Thread Cutter and press down The dial can not repeat rotating 360 Please reverse rotate from the arrow position arrow Turn the Hand Wheel anti clockwise to ensure the needle is higher th...

Page 19: ...ot zigzag presser d Stitch length adjustor 0 3 6 Stitches Pic e Note You can select the suitable stitch length for most fabtic The higher the number the longer the stitch length Note 3 6 1 2 3 0 calib...

Page 20: ...ic The higher the number the longer the stitch length When cutting take care not to cut the stitches Note calibration tail 1 4 calibration tail 3 6 1 2 3 0 calibration tail The dial can not repeat rot...

Page 21: ...an select the suitable stitch length for most fabtic The higher the number the longer the stitch length Note calibration tail calibration tail 1 4 calibration tail 3 6 1 2 3 0 calibration tail The dia...

Page 22: ...titch length for most fabtic The higher the number the longer the stitch length Note calibration tail calibration tail calibration tail calibration tail 3 6 1 2 3 0 calibration tail 6 8 6 7 8 calibrat...

Page 23: ...and ass 1 8 inch 0 3cm for the bar tacks If you have a very thick button add more to the diameter measurement Mark the position and length of the buttonhole on the fabric with tailor s chalk Note 1 S...

Page 24: ...he fabric Finishing the buttonhole g Draw the upper thread through the backside of the garment and tie the upper and bobbin threads together Cut the center of the buttonhole with the seam un picker be...

Page 25: ...oint on back of the buttonhole foot 2 Pull the gimp cord under the foot to the front 3 Fix the gimp cord to the protruding point on front of foot 4 Turn the needle down to the starting position on fab...

Page 26: ...hinged Latch of the Bobbin Case and take it out of the machine c Open the Shuttle Race Cover Holder d Remove the Shuttle Race Cover e Remove the Shuttle f Clean the Shuttle Race with a brush and soft...

Page 27: ...ders back into position until heared a click sound k Insert the Bobbin Case until heared a click sound a Remove the needle and the presser foot Remove the Needle Plate Screws and remove the Needle pla...

Page 28: ...ace cover Loosen the Face Cover Screw and remove the Face Cover to left side b Oil the points shown by the arrows Replace the Face Cover tighten the Face Cover Screw Please add oil under below three c...

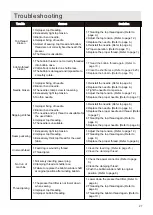
Page 29: ...4 Adjust the top tension Refer to page 12 5 Replace the proper needle Refer to page 7 1 Improper xing of needle 2 Blunt or bend needle 3 The needle and or thread is unsuitable for the used fabric 4 I...

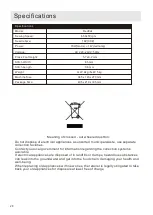
Page 30: ...iances as unsorted municipal waste use separate collection facilities Contact you local government for information regarding the collection systems available If electrical appliances are disposed of i...

Page 31: ...1 2 3 4 4 5 6 7 8 8 9 10 11 12 15 14 13 18 18 17 16 16 22 21 21 20 19 19 24 30 28 27 18 25 25...

Page 32: ...1 2 1 2 3 4 14 5 6 7 9 10 11 12 13 14 15 16 4C 333B 17 18 19 20...

Page 33: ......

Page 34: ......

Page 35: ......

Page 36: ......

Page 37: ...19 26...

Page 38: ......

Page 39: ......

Page 40: ......

Page 41: ......

Page 42: ...38...

Page 43: ...35...

Page 44: ......

Page 45: ......

Page 46: ......

Page 47: ......

Page 48: ......

Page 49: ......

Page 50: ......

Page 51: ......

Page 52: ......

Page 53: ......

Page 54: ......

Page 55: ......

Page 56: ......

Page 57: ......

Page 58: ......

Page 59: ......

Page 60: ......

Page 61: ...ZHEJIANG HENGQIANG SEWING MACHINE GROUP CO LTD CHINA 123308 2 3 1 19 1 220136 12 90 1 04071 29 58 98 2006000001 20 2020 06 000001 8 6 5...

Reviews: