13. SNMP
72
4. On the SNMP manager, set the IP address of the trap transmission destination.
OID: 1.3.6.1.4.1.leader(20111).lt4600(28).trap(100).target(1).managerIp(1).0
You can also set it from the LT 4600A menu.
5. On the SNMP manager, set trap transmission to enable(1).
OID: 1.3.6.1.4.1.leader(20111).lt4600(28).trap(100).target(1).trapAction(2).0
You can also set it from the LT 4600A menu.
6. Restart the LT 4600A.
7. When the LT 4600A restarts, check that the standard trap "ColdStart" is received by the
SNMP manager.
13.4 Enterprise MIB
●
Retrieving the MIB File
Copy the file from the LT 4600A to a USB memory device.
Connect a USB memory device to the LT 4600A, and from the menu, select UTILITY
SETTING > ETHERNET > GET MIB FILE > OK. The file LT4600-MIB.mib will be copied to
the USB memory device.
For details on how to use the MIB file, see the instruction manual for the SNMP manager.
Reference Section 6.5.5, “Retrieving the MIB File”
●
Enterprise Number
Leader’s enterprise number is 20111.
iso(1).org(3).dod(6).internet(1).private(4).enterprises(1).leader(20111)
●
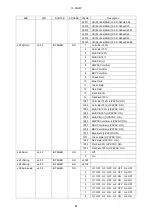
MIB Structure
lt4600
OBJECT IDENTIFIER ::= { leader 28 }
standard
OBJECT IDENTIFIER ::= { lt4600 1 }
status
OBJECT IDENTIFIER ::= { standard 1 }
fanUnit
OBJECT IDENTIFIER ::= { status 1 }
genlockSts
OBJECT IDENTIFIER ::= { status 2 }
reference
OBJECT IDENTIFIER ::= { standard 2 }
analogBlack
OBJECT IDENTIFIER ::= { standard 3 }
output1
OBJECT IDENTIFIER ::= { analogBlack 1 }
output2
OBJECT IDENTIFIER ::= { analogBlack 2 }
output3
OBJECT IDENTIFIER ::= { analogBlack 3 }
serialDigital
OBJECT IDENTIFIER ::= { standard 4 }
sdi1
OBJECT IDENTIFIER ::= { serialDigital 1 }
sdi2
OBJECT IDENTIFIER ::= { serialDigital 2 }
trap
OBJECT IDENTIFIER ::= { lt4600 100 }
target
OBJECT IDENTIFIER ::= { trap 1 }
●
ACCESS
In the tables, "ACCESS" indicates the following:
Summary of Contents for LT 4600A
Page 1: ...LT 4600A MULTIFORMAT VIDEO GENERATOR INSTRUCTION MANUAL MAIN...
Page 83: ...13 SNMP 73 RO Read only R W Read and write...
Page 99: ...14 APPENDIX 89 14 2 MENU TREE The screen shows the initial settings 14 2 1 STATUS MENU...
Page 100: ...14 APPENDIX 90 14 2 2 UTILITY MENU...
Page 101: ...14 APPENDIX 91...
Page 102: ...14 APPENDIX 92 14 2 3 REFERENCE MENU INTERNAL STAY IN SYNC STAY IN SYNC STAY IN SYNC 20...
Page 104: ...14 APPENDIX 94 14 2 5 BLACK MENU 5 1124 4124 NTSC 525i 59 94 PAL 625i 50 63 9814 BLACK1 BLACK1...
Page 107: ...14 APPENDIX 97 GROUP 1 GROUP 1 GROUP 1...
Page 108: ...14 APPENDIX 98 0 256 1 9 1 9 0 1079 0 1919...
Page 109: ...14 APPENDIX 99 SDI 1 100h EB0h 100h EB0h 100h EB0h 100h EB0h 0 1079 INT_1 INT_4 1 99 0 1919...


