background image

5. SPECIFICATIONS 

48


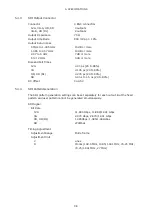
5.8


LT 4611SER23 (AUDIO OUTPUT) 

Software option for the LT 4611 only. It is a standard feature on the LT 4610. 


5.8.1


Compliant Standards 

AES/EBU 

ANSI S4.40, AES3-2009, AES11-2009, 
SMPTE ST 276 

 
5.8.2


Output Connectors 

AES/EBU Digital Audio Output Connector 

Connector 

1 BNC connector 

Output Amplitude 

1Vp-p±0.1V 

Output Impedance 

75 

Ω unbalanced


AES/EBU Silence Output Connector 

Connector 

1 BNC connector 

Output Amplitude 

1Vp-p±0.1V 

Output Impedance 

75 Ω unbalanced


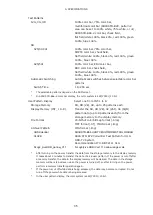
5.8.3


AES/EBU Digital Audio Output 

Timing Adjustment 

Adjustment Range 

±1 AES/EBU frame 

Adjustment Unit 

512 fs (24.576 MHz) 

Sampling Frequency 

48 kHz sampling (synced with the video signal) 

Resolution 

20 bits, 24 bits 

Pre-emphasis 

OFF, 50/15, CCITT (only the CS bit is switched) 

Frequency 

SILENCE / 400Hz / 800Hz / 1kHz 

Level 

-60 to 0 dBFS (1 dBFS steps) 

Audio Click 

OFF, 1 / 2 / 4 sec 

Lip Sync 

Synchronization with SDI1 

Sampling Clock Accuracy 

Grade 2 (±10 ppm) 


The frequency, level, and audio click can be set for each channel. 

Turn off all channels to output a digital audio reference signal (DARS). 

 
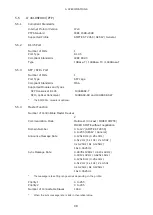
5.8.4


AES/EBU Silence Output 

Timing Adjustment 

Adjustment Range 

±1 AES/EBU frame 

Adjustment Unit 

512 fs (24.576 MHz) 

Sampling Frequency 

48 kHz sampling (synced with the video signal) 

Resolution 

20 bits, 24 bits 

Pre-emphasis 

OFF 

Frequency 

SILENCE 

Level 

MUTE 

Sampling Clock Accuracy 

Grade 2 (±10 ppm) 


Summary of Contents for LT 4610

Page 1: ...SER03 PTP LT 4610SER24 8K LT 4611SER21 SYNC 3 OUT ADD LT 4611SER22 SDI OUTPUT LT 4611SER23 AUDIO OUTPUT LT 4611SER24 8K Instruction Manual Thank you for purchasing Please carefully read this instructi...

Page 2: ...Software Options 4 3 GENERAL 1 4 FEATURES 2 4 1 LT 4610 Main Unit 2 4 2 LT 4611 Main Unit 4 4 3 LT 4610SER01 GPS TC 5 4 4 LT 4610SER02 12G SDI 6 4 5 LT 4610SER03 PTP 7 4 6 LT 4610SER24 8K 7 4 7 LT 46...

Page 3: ...Reference Generator 24 5 2 11 Internal Clock 25 5 2 12 General Specifications 25 5 3 LT 4610SER01 GPS TC 26 5 3 1 GPS Lock 26 5 3 2 CW I O 26 5 3 3 LTC I O 26 5 3 4 Time Code 27 5 4 LT 4610SER02 12G S...

Page 4: ...RATION 54 7 1 Turning the Power On 54 7 2 Attaching the Cover Inlet Stopper 56 7 3 Alarm Indications 57 7 4 Connecting a USB Memory Device 57 7 5 Installing the SFP SFP Transceiver Module SER03 58 7 6...

Page 5: ...he Genlock Mode 86 10 2 Selecting the Genlock Format 87 10 3 Adjusting the Timing 88 10 3 1 Adjusting the Timing Frame 88 10 3 2 Adjusting the Timing Line 88 10 3 3 Adjusting the Timing Dot 89 10 3 4...

Page 6: ...2 8 1 Turning ID Characters On and Off 109 12 8 2 Recalling ID Characters 110 12 8 3 Creating ID Characters 110 12 8 4 Setting the Vertical Position of ID Characters 111 12 8 5 Setting the Horizontal...

Page 7: ...io Output On and Off 135 13 1 2 Selecting the Frequency 135 13 1 3 Setting the Level 136 13 1 4 Setting Clicks 136 13 1 5 Settings Shared by Channels 136 13 1 6 Selecting the Resolution 137 13 1 7 Sel...

Page 8: ...n to a USB Memory Device 160 17 3 9 Copying Patterns from the Archive 161 17 4 Turning YCbCr On and Off 163 17 5 Turning Safety Area Markers On and Off 163 17 6 Configuring the Pattern Scroll Feature...

Page 9: ...3 Setting the Profile Type 183 19 1 4 Profile Default Settings 183 19 1 5 Setting the Domain 183 19 1 6 Setting the Communication Mode 184 19 1 7 Setting the Announce Interval 185 19 1 8 Setting the...

Page 10: ...wing the MAC Address 201 20 4 3 Turning TRAP Transmission On and Off 201 20 4 4 Setting the Trap Transmission Destination 202 20 4 5 Copying MIB Files to a USB Memory Device 202 20 4 6 Setting READ CO...

Page 11: ...20 11 2 Factory Default Initialization 219 20 11 3 Selecting the Format 219 20 12 Viewing the Serial Numbers 220 20 13 Viewing and Installing Software Options 221 20 13 1 Viewing Software Options 221...

Page 12: ...ming Group 250 23 4 21 sdi12g Pattern Group 250 23 4 22 sdi12g Component Group 250 23 4 23 sdi12g SafetyArea Group 251 23 4 24 sdi12g Scroll Group 251 23 4 25 sdi12g PatternChange Group 251 23 4 26 sd...

Page 13: ...yMsgDesirInt Group 260 23 4 61 ptp DlyMsgReqdInt Group 261 23 4 62 ptp Bmca Group 261 23 4 63 ptpSystemIpAddress Group 261 23 4 64 ptpSystemSubnetMask Group 261 23 4 65 ptpSystemGateway Group 261 23 4...

Page 14: ...24 2 10 12G OPTION Menu 282 24 2 11 PTP OPTION Menu 288 24 2 12 SYSTEM menu 293 24 3 Firmware Update History 298...

Page 15: ...tand If you have any questions about the contents of this manual please contact your local LEADER agent Symbols and Terms The following symbols and terms are used in this instruction manual and on the...

Page 16: ...the instrument has condensation within it wait for approximately 30 minutes before turning on the power Operating Humidity Range Use this instrument in an environment whose relative humidity is 85 or...

Page 17: ...that does not meet the standards could lead to fire If the power cord is damaged stop using it and contact your local LEADER agent Using a damaged power cord could lead to electrical shock or fire Wh...

Page 18: ...tput connectors Doing so could damage the instrument If You Will Not Use the Instrument for an Extended Period of Time If you will not use the instrument for an extended period of time remove the powe...

Page 19: ...h with mild detergent and wipe gently While cleaning make sure that foreign materials such as water and detergent do not enter the product If liquid or a metal object enters into the instrument fire o...

Page 20: ...nt has been manufactured under the strictest quality control guidelines LEADER shall not be obligated to furnish the following free services during the warranty period 1 Repair of malfunction or damag...

Page 21: ...r lead to injury Input Connector Maximum Allowable Voltage GENLOCK IN 5 V DC peak AC GPS IN SER01 3 3 Vp p CW IN OUT SER01 2 Vp p LTC IN OUT SER01 4 Vp p 1 3 3 Mechanical Shock This instrument contain...

Page 22: ...ult values Logo App Logo App refers to a software application for converting bitmap data bmp into 4 level monochrome data lg that can be used on the LT 4610 and LT 4611 It is included in the CD ROM In...

Page 23: ...oftware Options The following software options sold separately can be installed in the LT 4610 If you want to obtain a software option provide your local LEADER agent with the LT 4611 s MAC address se...

Page 24: ...that maintains the phase when an error occurs in the input analog video sync signal The dual power supply unit provides redundant operation These features make it possible to configure a highly reliab...

Page 25: ...y NTSC PAL black burst signal with field reference pulse and NTSC black burst signal with 10 field IDs are also supported Word Clock Signal Output The LT 4610 can output a 48 kHz word clock signal syn...

Page 26: ...or 3G SDI and HD SDI a 4 3 aspect marker can be overlaid Pattern Scrolling Equipped with a function for scrolling patterns in eight directions The speed can also be adjusted Audio Embedding The LT 461...

Page 27: ...ependently NTSC PAL black burst signal with field reference pulse and NTSC black burst signal with 10 field IDs are also supported Word Clock Signal Output The LT 4611 can output a 48 kHz word clock s...

Page 28: ...l output or VITC in analog video sync signal output based on a GPS LTC or VITC time information It also features a holdover function which retains the phase and frequency of the output signal when GPS...

Page 29: ...n the display For 12G SDI 3G SDI and HD SDI a 4 3 aspect marker can be overlaid Pattern Scrolling This option is equipped with a function for scrolling patterns in eight directions The moving speed ca...

Page 30: ...12G SDI connectors when the LT 4610 is equipped with the hardware option LT 4610SER02 12G SDI 8K QUAD LINK 12G SDI 8K 7680 x 4320 can be output User Pattern Output User pattern can be output in addit...

Page 31: ...ever only a single output is available for 3G SDI level B and HD dual link ID Character Overlay ID characters can be overlaid at any position on the display In addition ID characters can be scrolled h...

Page 32: ...4611 that adds the ability to output the 8K patterns from the 12G SDI connectors when the LT 4611 is equipped with the hardware option LT 4610SER02 12G SDI 8K QUAD LINK 12G SDI 8K 7680 x 4320 can be...

Page 33: ...Scanning Compliant Standards YCBCR 4 2 2 10 bit 1280 720 60 59 94 50 30 29 97 25 24 23 98 P SMPTE ST 292 SMPTE ST 296 1920 1080 60 59 94 50 I SMPTE ST 292 SMPTE ST 274 30 29 97 25 24 23 98 P 24 23 98...

Page 34: ...0 29 97 25 24 23 98 P SMPTE ST 296 SMPTE ST 425 1920 1080 60 59 94 50 I SMPTE ST 274 SMPTE ST 425 30 29 97 25 24 23 98 P 30 29 97 25 24 23 98 PsF 12 bit 1920 1080 60 59 94 50 I 30 29 97 25 24 23 98 P...

Page 35: ...onent sync signal Format Loop through Input Impedance 15 k Maximum Input Voltage 5 V DC peak AC Operating Input Level Range 6 dB External Lock Range 5 ppm Jitter 1 ns when genlock is in use Analog Vid...

Page 36: ...ransmission Transmission of operation status e g genlock synchronization status HTTP Remote monitoring and control from a Web browser Connector RJ 45 Type 10BASE T 100BASE TX auto switching USB Port S...

Page 37: ...9 94I 100 color bar 75 color bar SMPTE color bar check field flat field white 100 black 0 red 100 green 100 blue 100 625 50I 100 color bar EBU color bar BBC color bar check field flat field white 100...

Page 38: ...ck only for the background color Display Position Anywhere on the display Display Position Adjustment Resolution V 1 line H 1 dot Blinking Display 1 ON OFF ON TIME 1 to 9 sec in 1 sec step OFF TIME 1...

Page 39: ...nverts 256 level monochrome data Y to 4 levels levels 0 to 3 using specified thresholds Conversion Method Using the logo application Logo Mark Data Transfer Save the data to a USB memory device and tr...

Page 40: ...ut at 24 bit resolution 5 1 7 Genlock Function Signal Formats NTSC BB NTSC BB REF NTSC BB ID NTSC BB REF ID PAL BB PAL BB REF 525 59 94I 525 59 94P 625 50I 625 50P 1125 60I 1125 59 94I 1125 50I 1125 3...

Page 41: ...ormats Each of the 6 outputs can be set separately NTSC BB NTSC BB REF NTSC BB ID NTSC BB REF ID NTSC BB SETUP NTSC BB S REF NTSC BB S ID NTSC BB S R ID PAL BB PAL BB REF 525 59 94I 525 59 94P 625 50I...

Page 42: ...a digital audio reference signal DARS 5 1 10 AES EBU Silence Output Timing Adjustment Adjustment Range 1 AES EBU frame Adjustment Unit 512 fs 24 576 MHz Sampling Frequency 48 kHz sampling synced with...

Page 43: ...ternal Clock Power Supply Primary lithium battery Battery Operation Period Approx 3 years depending on the storage and operating environments 5 1 17 General Specifications Environmental Conditions Ope...

Page 44: ...nalog component sync signal Format Loop through Input Impedance 15 k Maximum Input Voltage 5 V DC peak AC Operating Input Level Range 6 dB External Lock Range 5 ppm Jitter 1 ns when genlock is in use...

Page 45: ...nization status HTTP Remote monitoring and control from a Web browser Connector RJ 45 Type 10BASE T 100BASE TX auto switching USB Port Specifications USB 2 0 Supported Media USB memory device Function...

Page 46: ...ference signal EXTERNAL Operates using an external reference signal GL FMT AUTO GL FMT MANUAL GPS SER01 10MHz CW SER01 PTP SER03 Recovery Mode AUTO Resynchronizes according to the auto setting when th...

Page 47: ...HD Tri Level Sync Signal 1 frame entire frame Adjustment Unit NTSC PAL Black Burst Signal In units of 0 0185 s 54 MHz clock unit HD Tri Level Sync Signal In units of 0 0135 s 74 25 1 001 MHz clock uni...

Page 48: ...ing Humidity Range 85 RH or less no condensation Optimal Temperature 10 to 35 C Operating Environment Indoors Elevation Up to 2 000 m Overvoltage Category Pollution Degree 2 Power Requirements Voltage...

Page 49: ...S function has been tested to work with a Furuno Electric AU 117A GPS antenna 5 3 2 CW I O CW I O Connector Connector 1 BNC connector shared input and output Input Impedance 50 Input Signal Level 0 5...

Page 50: ...1 LTC OUT Dropped Frame Mode On Off ATC Setting LTC Insertion Setting On Off LTC Setting Output Setting On Off AES EBU Time Code Insertion Setting On Off Leap Second Application Setting Set the applic...

Page 51: ...s and Standards Color System Quantization Image Field Frequency Scanning Compliant Standards YCBCR 4 2 2 10 bit 720 487 59 94 I SMPTE ST 259 720 576 50 I HD Video Signal Formats and Standards Color Sy...

Page 52: ...0 I SMPTE ST 274 SMPTE ST 425 1 30 29 97 25 24 23 98 P 30 29 97 25 24 23 98 PsF 2048 1080 30 29 97 25 24 23 98 P SMPTE ST 425 1 SMPTE ST 2048 2 30 29 97 25 24 23 98 PsF 12 bit 1920 1080 60 59 94 50 I...

Page 53: ...425 1 30 29 97 25 24 23 98 P 30 29 97 25 24 23 98 PsF 2048 1080 30 29 97 25 24 23 98 P SMPTE ST 372 SMPTE ST 425 1 SMPTE ST 2048 2 30 29 97 25 24 23 98 PsF RGB 4 4 4 10 bit 1920 1080 60 59 94 50 I SM...

Page 54: ...t 1920 1080 60 59 94 50 P SMPTE ST 274 SMPTE ST 425 3 2048 1080 60 59 94 50 48 47 95 P SMPTE ST 2048 2 SMPTE ST 425 3 3G DL 4K Video Signal Formats and Standards Division Transmission System Color Sys...

Page 55: ...24 23 98 P SMPTE ST 425 5 SMPTE ST 2048 1 12 bit 3840 2160 30 29 97 25 24 23 98 P SMPTE ST 425 5 SMPTE ST 2036 1 4096 2160 30 29 97 25 24 23 98 P SMPTE ST 425 5 SMPTE ST 2048 1 2 sample interleave YCB...

Page 56: ...24 23 98 P SMPTE ST 2082 10 SMPTE ST 2036 1 YCBCR 4 4 4 10 bit 3840 2160 30 29 97 25 24 23 98 P SMPTE ST 2082 10 SMPTE ST 2036 1 4096 2160 30 29 97 25 24 23 98 P SMPTE ST 2082 10 SMPTE ST 2036 1 12 bi...

Page 57: ...80 3G 135 ps 20 to 80 HD HD DL 270 ps 20 to 80 SD 0 4 ns to 1 5 ns 20 to 80 DC Offset 0 0 5 V 5 4 4 SDI Pattern Generation The SDI pattern generation settings can be set separately for each output But...

Page 58: ...fer the SD HD 2K 4K 2SI 4K SQD pattern data up to 8 patterns each from the storage memory to the display memory File Format 24 bit full color bitmap format bmp TIFF format tif IMG format img Archiver...

Page 59: ...the check field pattern or user pattern is selected Moving Box Box Color Select from white yellow cyan green blue red magenta black Speed Setting V H LOW MIDDLE HIGH Size Setting V H SIZE 1 to 5 Not...

Page 60: ...ble when the check field pattern is selected 1 The blinking display and scrolling can be used simultaneously Logo Mark Logo Mark Data 4 level monochrome data from level 0 to 3 Maximum Size 320 dots 24...

Page 61: ...CS bit is switched Frequency SILENCE 400Hz 800Hz 1kHz Level 60 to 0 dBFS 1 dBFS steps Audio Click OFF 1 2 4 sec Audio including packets cannot be embedded when the check field pattern is selected The...

Page 62: ...W The SFP SFP module is optional 5 5 4 Master Function Number of Controllable Master Devices 2 Communication Mode Multicast Unicast MIXED SMPTE MIXED SMPTE without negotiation Domain Number 0 to 127 S...

Page 63: ...D SMPTE MIXED SMPTE without negotiation Domain Number 0 to 127 SMPTE ST 2059 0 to 255 AES67 General Delay Message Rate 0 0078s 128Hz 0 015s 64Hz 0 0312s 32Hz 0 0625s 16Hz 0 125s 8Hz 0 25s 4Hz 0 5s 2Hz...

Page 64: ...g 0 15mV 5 6 3 Analog Video Sync Signal Output Signal Formats Each of the 3 outputs can be set separately NTSC BB NTSC BB REF NTSC BB ID NTSC BB REF ID NTSC BB SETUP NTSC BB S REF NTSC BB S ID NTSC BB...

Page 65: ...SMPTE ST 292 SMPTE ST 296 1920 1080 60 59 94 50 I SMPTE ST 292 SMPTE ST 274 30 29 97 25 24 23 98 P 24 23 98 PsF SMPTE ST 292 SMPTE RP 211 720 487 59 94 I SMPTE ST 259 SMPTE ST 125 720 576 50 I HD DL V...

Page 66: ...0 29 97 25 24 23 98 P SMPTE ST 296 SMPTE ST 425 1920 1080 60 59 94 50 I SMPTE ST 274 SMPTE ST 425 30 29 97 25 24 23 98 P 30 29 97 25 24 23 98 PsF 12 bit 1920 1080 60 59 94 50 I 30 29 97 25 24 23 98 P...

Page 67: ...bps 2 970 1 001Gbps HD HD DL 1 485Gbps 1 485 1 001Gbps SD 270Mbps Timing Adjustment Adjustment Range Entire frame Adjustment Unit V Lines H Clocks 148 5 MHz 148 5 1 001 MHz 74 25 MHz 74 25 1 001 MHz 2...

Page 68: ...90 Title safe area 80 can be turned on and off separately Not available when the check field pattern is selected ID Characters Number of Characters Up to 20 characters Size Dots 32 32 64 64 128 128 2...

Page 69: ...nverts 256 level monochrome data Y to 4 levels levels 0 to 3 using specified thresholds Conversion Method Using the logo application Logo Mark Data Transfer Save the data to a USB memory device and tr...

Page 70: ...4 sec Audio including packets cannot be embedded when the check field pattern is selected The frequency level and audio click can be set for each channel The following limitations apply for SD 525 59...

Page 71: ...ent Unit 512 fs 24 576 MHz Sampling Frequency 48 kHz sampling synced with the video signal Resolution 20 bits 24 bits Pre emphasis OFF 50 15 CCITT only the CS bit is switched Frequency SILENCE 400Hz 8...

Page 72: ...299 SDI Payload ID SMPTE ST 352 5 9 2 SDI Formats and Standards 12G QL 8K Video Signal Formats and Standards Division Transmission System Color System Quantization Image Frame Frequency Scanning Compl...

Page 73: ...fer the data of an 8K user pattern If the power is cut off after a memory transfer the data in the display memory will be cleared The data in the storage memory will be retained even when the power is...

Page 74: ...5 CCITT only the CS bit is switched Frequency SILENCE 400Hz 800Hz 1kHz Level 60 to 0 dBFS 1 dBFS steps Audio Click OFF 1 2 4 sec The frequency level and audio click can be set for each channel 5 9 4 L...

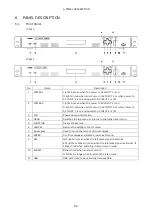
Page 75: ...INPUT 2 is off 3 LCD Shows various information 4 MENU Switches the top menu or returns to the higher level menu 5 FUNCTION Clears the key lock 6 CANCEL Returns the setting to the its value 7 Arrow ke...

Page 76: ...input connectors They are loop through connectors They receive HD tri level sync or NTSC PAL black burst signals 11 ANALOG BLACK OUT 1 to 3 Black output connectors They output HD tri level sync or NT...

Page 77: ...upplies fail operation can continue with the other power supply POWER 1 and POWER 2 on the front panel light in green when the power is on and in red when it is not When one of the power supplies is n...

Page 78: ...menu SER22 Y P ID CHARACTER INT_1 to INT_4 Y Y LOGO INT_1 to INT_4 Y Y AES EBU menu SER23 Y P WCLK menu Y P ETC menu Y P GPS OPTION menu SER01 Y P CW IN OUT N P 12G OPTION menu SER02 Y P USER PATTERN...

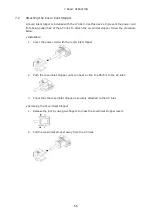
Page 79: ...pper follow the procedure below Installation 1 Cover the power cord with the cover inlet stopper 2 Push the cover inlet stopper until you hear a click to attach it to the AC inlet 3 Check that the cov...

Page 80: ...01 on the STATUS menu See 8 3 Alarm Display You can check the attention details with ATTENTION GPS SAT SER01 or ATTENTION SER01 on the STATUS menu See 8 4 Attention Display SER01 7 4 Connecting a USB...

Page 81: ...ct and disconnect an SFP SFP transceiver module with the power turned on To install it follow the procedure below Installation 1 Pay attention to the orientation of the SFP SFP module and insert the m...

Page 82: ...the SER21 is installed three analog video sync signals synchronized to the reference signal are also output from the ANALOG BLACK OUT 4 to 6 connectors You can set the output signals on the BLACK men...

Page 83: ...U Menu LT 4611 If the SER23 is installed an AES EBU signal synchronized to the reference signal is output from the AES EBU connector on the rear panel In addition a muted AES EBU signal is output from...

Page 84: ...ods Input Method 1 Apply to one input and terminate the other at 75 Input Method 2 Apply to one input and connect the other to another device Terminate the device at the end of the chain at 75 7 6 6 G...

Page 85: ...RM2 O 4 LTC3 O 9 LTC2 O 14 OPEN 5 GND 10 LTC3 O 15 SHIELD GND The LTC IN OUT connector on the rear panel sends and receives time codes and outputs alarms On the LT 4610 input time codes are called LTC...

Page 86: ...de is set to 10MHzCW and CW signals are not being received LTC0 SIGNAL When TIMECODE SOURCE is set to LTC0 but LTC signals are not being received VITC SIGNAL When TIMECODE SOURCE is set to VITC but VI...

Page 87: ...PTP IEEE 1588 It provides an RJ 45 port and SFP SFP port The SFP SFP port is used by connecting a separately sold LC2141 SFP RJ 45 LC2144 SFP MULTI MODE or LC2145 SFP SINGLE MODE You can set PTP sett...

Page 88: ...he settings entered in the LT 4610 Chapter 9 3 GENLOCK menu Set the genlock Chapter 10 4 BLACK menu Set the black signal Chapter 11 5 SDI menu Set the SDI signal Chapter 12 6 AES EBU menu Set the AES...

Page 89: ...ove the cursor and the and keys to change the value Hold down a key to change the value quickly Value modifications are applied immediately but the value is not confirmed until you press the ENTER key...

Page 90: ...mode External HD tri level sync signal or NTSC PAL black burst signal An external reference signal received through GENLOCK IN on the rear panel is used Set the reference signal format manually GPS mo...

Page 91: ...PAL black burst signal See also 7 6 5 Genlock Signal Input When you apply the reference signal TRACKING appears under GENLOCK on the STATUS menu and EXT on the front panel blinks slowly in green This...

Page 92: ...the reference signal recovers varies depending on the RECOVERY MODE setting on the GENLOCK menu If RECOVERY MODE is set to AUTO the LT 4610 automatically locks when the reference signal recovers If R...

Page 93: ...d to GENLOCK IN on the rear panel See also 10 2 Selecting the Genlock Format 3 Apply a reference signal to GENLOCK IN on the rear panel Apply an HD tri level sync or NTSC PAL black burst signal See al...

Page 94: ...e GPS alarm and attention disappear and under GENLOCK on the STATUS menu an asterisk appears next to GPS ALARM indicator on the front panel keeps blinking in red or orange until the PLL alarm and leap...

Page 95: ...he GPS OPTION menu to INPUT See also 16 1 7 Selecting Input or Output 3 Apply a 10MHz CW signal to CW IN OUT on the rear panel To avoid damaging the instrument do not apply a 10 MHz CW signal when OUT...

Page 96: ...packets are received frequency adjustment is performed followed by phase adjustment During this period the ALARM indicator on the front panel blinks in red 3 After the phase adjustment time informatio...

Page 97: ...4610 status This menu is only for viewing you cannot change the settings To display the STATUS menu press MENU several times until the following menu appears On the STATUS menu you can use the and key...

Page 98: ...green GL FMT AUTO GL FMT MANUAL GPS SER01 10MHzCW SER01 EXT Blinking green fast When the input signal cannot be detected EXT Blinking green slow Tracking EXT Lit in green Locked EXT Blinking red When...

Page 99: ...ENLOCK FORMAT item displays the genlock format when the genlock mode is not INTERNAL When the genlock mode is set to GL FMT AUTO or GL FMT MANUAL the format of the signal received through GENLOCK IN o...

Page 100: ...The following table lists the alarms related to the LT 4610 Alarm Display condition Corrective action FAN When a fan error occurs Contact your nearest LEADER agent PWR1 When power to AC INPUT 2 is on...

Page 101: ...ignals are being applied to LTC IN OUT on the rear panel VITC When TIMECODE SOURCE on the SYSTEM menu is set to VITC but VITC signals are not being received Check that VITC signals are being applied t...

Page 102: ...n the LT 4610 is configured to use GPS signals 1 but leap second information cannot be received It may take up to 12 minutes for the leap second information to be received after applying the GPS signa...

Page 103: ...inking orange PLL adjustment in progress Blinking orange Time setting in progress PTPx in the display examples is either PTP1 or PTP2 8 8 PTP PHASE Display SER03 When the GENOCK mode is PTP the time d...

Page 104: ...8 STATUS MENU 81...

Page 105: ...ings entered in the LT 4610 This menu is only for viewing you cannot change the settings To display the INFO menu press MENU several times until the following menu appears On the INFO menu you can use...

Page 106: ...e Auto Setting is displayed GENLOCK FORMAT When the genlock mode is set to GL FMT AUTO or GL FMT MANUAL the genlock format of the signal input to GENLOCK IN is displayed When the signal format cannot...

Page 107: ...Format is displayed The same holds true for BLK2 FORMAT to BLK6 FORMAT For the LT 4611 BLK4 FORMAT to BLK6 FORMAT is displayed when SER21 is installed BLK1 TIMING The Black 1 timing selected in 11 2...

Page 108: ...2 Adjusting the Timing is displayed The same hold true for SDI2 TIMING 9 4 GPS Setting Display SER01 The GPS item displays the voltage supplied to the GPS antenna selected in 20 8 2 Setting the Power...

Page 109: ...gnal received through GENLOCK IN on the rear panel is used The LT 4610 automatically selects the format GL FMT MANUAL An external reference signal received through GENLOCK IN on the rear panel is used...

Page 110: ...s not the number of effective lines Procedure GENLOCK FORMAT Parameters NTSC NTSC BB NTSC BB REF NTSC BB ID NTSC BB REF ID PAL PAL BB PAL BB REF COMPONENT 525 59 94I 525 59 94P 625 50I 625 50P 1125 HD...

Page 111: ...g situations When the genlock mode is set to GL FMT AUTO and the format of the signal applied to GENLOCK IN on the rear panel is NTSC or PAL When the genlock mode is set to GL FMT MANUAL and the forma...

Page 112: ...converting dots into time is displayed The variable range varies depending on the format Procedure GENLOCK TIMING HORIZONTAL Parameters 432 to 0 to 432 10 3 4 Finely Adjusting the Timing To finely adj...

Page 113: ...follow the procedure below Procedure GENLOCK RECOVERY MODE Parameters AUTO The LT 4610 quickly relocks onto the reference signal MANUAL Stay in sync operation is held 10 4 2 Selecting the Auto Setting...

Page 114: ...T 4610 immediately relocks onto the reference signal FAST The LT 4610 quickly relocks onto the reference signal SLOW The LT 4610 slowly relocks onto the reference signal 10 4 4 Setting the Relock To m...

Page 115: ...The genlock log is not cleared when the settings are initialized but is cleared when the power is turned off Procedure GENLOCK LOG LIST 10 5 2 Adding DETAIL and ALARM To turn on and off DETAIL and AL...

Page 116: ...LT 4610_USER LOG YYYYMMDDhhmmss txt Example of YYYYMMDDhhmmss txt 00 2016 04 07 13 33 01 MODE INTERNAL 01 2016 04 07 13 33 01 FORMAT NTSC BB 02 2016 04 07 13 33 01 EPOCH SMPTE 03 2016 04 07 13 33 01...

Page 117: ...genlock mode is set to GPS SER01 or 10MHzCW SER01 for Black 1 only the following message will appear if the value is changed If OK is selected the LT 4610 unlocks from the signal if it is locked and...

Page 118: ...black signal relative to the reference signal at the frame level follow the procedure below Procedure BLACK BLK1 TIMING FRAME Parameters NTSC 5 to 0 to 5 PAL 2 to 0 to 2 11 2 2 Adjusting the Timing Li...

Page 119: ...or PAL to turn on or off the time code insertion selected in 20 7 1 Selecting the Time Code follow the procedure below Black 2 to 6 can be turned on or off when the format is the same type as Black 1...

Page 120: ...2 cannot be set because only one output is available 12 1 Setting the SDI Format Under SDI SDI1 FORMAT you can set the SDI signal format For the available combinations of IMAGE STRUCTURE and RATE see...

Page 121: ...rs 422 YCbCr 10 bit 422 YCbCr 12 bit 444 YCbCr 10 bit 444 YCbCr 12 bit 444 RGB 10 bit 444 RGB 12 bit 12 1 3 Selecting the Frame Frequency To select the SDI signal frame field frequency follow the proc...

Page 122: ...enu item is not displayed If is fixed at SERIAL Procedure SDI SDI1 TIMING 0H TIMING Parameters SERIAL Signals are output at the timing defined in the signal standard LEGACY Signals are output at the s...

Page 123: ...ollow the procedure below To the right of DOT the value obtained by converting dots into time is displayed The variable range varies depending on the format When IMAGE is 1920x1080 3G B DL and STRUCTU...

Page 124: ...T FIELD 100 FLAT FIELD 0 RED FIELD 100 GREEN FILED 100 BLUE FIELD 100 SDI CHECK FIELD The selectable patterns depend on the SDI format as shown below Pattern SDI format Other than those on the right 7...

Page 125: ...12 SDI MENU 102 100 75 MULTI 100 MULTI 75 MULTI I SMPTE EBU BBC...

Page 126: ...12 SDI MENU 103 FLAT FIELD 100 FLAT FIELD 0 RED FIELD 100 GREEN FILED 100 BLUE FIELD 100 CHECK FIELD...

Page 127: ...nents in a YCbCr or GBR signal on and off follow the procedure below This is invalid when the pattern is check field SDI OUTPUT option 12G option Procedure SDI OUTPUT option SDI SDI1 VIDEO COMPONENT P...

Page 128: ...displayed at the outer frame of the picture If it is on the 4 3 marker is assumed to be 100 For SD you cannot set the 4 3 marker Moreover this is invalid when the pattern is check field or when LIPSYN...

Page 129: ...procedure shown below Procedure SDI OUTPUT option SDI SDI1 VIDEO SCROLL ON OFF Procedure 12G option 12G OPTION SDI 1 VIDEO SCROLL ON OFF Parameters ON OFF 12 6 2 Setting the Vertical Scroll Speed To s...

Page 130: ...s dot field frame Setting a positive value scrolls to the right and a negative value to the left You can set the value in 2 dot steps You can set the value in 4 dot steps for 4K and 8 dot steps for 8K...

Page 131: ...nge on and off follow the procedure shown below If set to ON the pattern is switched automatically between the available color bar patterns for the current format Procedure SDI OUTPUT option SDI SDI1...

Page 132: ...g that you created on the LT 4610 can be displayed in a pattern This is invalid when the pattern is check field or when LIPSYNC is set to ON on the SDI OUTPUT option SDI OUTPUT option 12G option 12 8...

Page 133: ...nter up to 20 characters The ID character background is displayed in black for 20 characters worth If you enter at the end of the ID character string only the background of the entered characters will...

Page 134: ...V POSI Procedure 12G option 12G OPTION SDI 1 VIDEO ID CHARACTER V POSI Parameters 0 to 4319 12 8 5 Setting the Horizontal Position of ID Characters To set the horizontal position of the ID characters...

Page 135: ...VIDEO ID CHARACTER SIZE Procedure 12G option 12G OPTION SDI 1 VIDEO ID CHARACTER SIZE Parameters x1 x2 x4 x8 12 8 7 Selecting the Level of ID Characters To set the intensity level of ID characters fo...

Page 136: ...To set the on time of ID character blinking follow the procedure below Procedure SDI OUTPUT option SDI SDI1 VIDEO ID CHARACTER BLINK ON TIME Procedure 12G option 12G OPTION SDI 1 VIDEO ID CHARACTER B...

Page 137: ...SCROLL ON OFF Parameters ON OFF 12 8 12 Setting ID Character Scroll Speed To set the ID character scroll speed and direction follow the procedure below The unit is dot field frame Setting a positive...

Page 138: ...rocedure below 1 Enter a file name Select STORE The file name input menu appears This is the name assigned to the ID characters and is also the file name when the ID characters are copied to a USB mem...

Page 139: ...COPY USB INT To copy ID characters follow the procedure below 1 Select the copy destination in the LT 4610 Select from INT_1 to INT_4 If there are already ID characters stored in the LT 4610 they are...

Page 140: ...10 Select ALL or from INT_1 to INT_4 2 Select the OK If there are already ID characters with the same file names stored in the USB memory device they will be overwritten If ALL is selected and ID char...

Page 141: ...he STORE menu follow the procedure below Procedure SDI OUTPUT option SDI SDI1 VIDEO ID CHARACTER DELETE Procedure 12G option 12G OPTION SDI 1 VIDEO ID CHARACTER DELETE To clear ID characters follow th...

Page 142: ...VIDEO LOGO With the 12G option you can set it under 12G OPTION SDI 1 VIDEO LOGO A 4 level monochrome image that you created on your PC can be displayed in a pattern This is invalid when the pattern i...

Page 143: ...excluding the extension consisting of alphanumeric characters or underscore File format 24 bits 256 colors or 16 colors File size Up to 320 dots 240 lines width height LEADER bmp 2 Using the accompan...

Page 144: ...e LT 4610 5 On the SELECT menu select the logo See also 12 9 3 Selecting a Logo 6 On the ON OFF menu select ON See also 12 9 2 Turning the Logo On and Off 12 9 2 Turning the Logo On and Off To turn th...

Page 145: ...12G option 12G OPTION SDI 1 VIDEO LOGO SELECT Parameters INT_1 to INT_4 12 9 4 Setting the Vertical Logo Position To set the vertical logo position follow the procedure below The value represents the...

Page 146: ...I Parameters 0 to 7679 12 9 6 Setting the Logo Level To set the logo intensity level follow the procedure below Logos are made of 4 level monochrome data LEVEL0 LEVEL1 LEVEL2 LEVEL3 You can set the di...

Page 147: ...area set to LEVEL0 transparent follow the procedure below Procedure SDI OUTPUT option SDI SDI1 VIDEO LOGO BACKGND Procedure 12G option 12G OPTION SDI 1 VIDEO LOGO BACKGND Parameters ON The area is mad...

Page 148: ...ocedure below 1 Select the copy destination in the LT 4610 Select from INT_1 to INT_4 If there are already logos stored at the destination they are overwritten 2 Select the copy source in the USB memo...

Page 149: ..._4 2 Select the OK If there are already logos with the same file names stored in the USB memory device they will be overwritten If ALL is selected and logos with the same file name are saved in INT_1...

Page 150: ...ing the COPY USB INT menu follow the procedure below Procedure SDI OUTPUT option SDI SDI1 VIDEO LOGO DELETE Procedure 12G option 12G OPTION SDI 1 VIDEO LOGO DELETE To clear logos follow the procedure...

Page 151: ...y need to set group 1 and the group 2 settings will automatically be set to the same values as group 1 SDI Signal Link A HD DL 3G B only Group 1 1ch Ch2 Ch1 also possible Ch3 Ch1 also possible Ch4 Ch1...

Page 152: ...SDI 1 AUDIO LINK A LINK B ON OFF Parameters ON OFF 12 10 2 Selecting the Resolution To select the resolution for the selected group follow the procedure below If the output signal is 525 59 94I not al...

Page 153: ...S Parameters 50 15 CCITT OFF 12 10 4 Selecting the Frequency To select the frequency of the selected channel follow the procedure below Procedure SDI OUTPUT option SDI SDI1 AUDIO LINK A LINK B G1 CH1...

Page 154: ...CH13 CH14 CH15 CH16 LEVEL Parameters 60 to 20 to 0 12 10 6 Setting Clicks You can insert click sounds into the selected channel Follow the procedure below to set the insertion interval to a value oth...

Page 155: ...I 1 AUDIO LINK B EQUAL TO LINK A Parameters ON OFF 12 10 8 Settings Shared by Groups You can link the group 2 settings to the group 1 settings by following the procedure below to set G2 EQUAL TO G1 to...

Page 156: ...e same holds true for the other similar settings Procedure SDI OUTPUT option SDI SDI1 AUDIO LINK A LINK B G1 CH2 CH3 CH4 EQUAL TO CH1 G2 CH6 CH7 CH8 EQUAL TO CH5 G3 CH10 CH11 CH12 EQUAL TO CH9 G4 CH14...

Page 157: ...electing the Time Code follow the procedure below Procedure SDI SDI1 ANC ATC LTC ON OFF Parameters ON OFF 12 12 Common SDI Signal Settings You can link the SDI2 setting to the SDI1 setting by followin...

Page 158: ...e following menu appears 13 1 Setting the AES EBU Output Under AES EBU AES EBU you can set the AES EBU output 13 1 1 Turning the Audio Output On and Off To turn the audio output on or off follow the p...

Page 159: ...e procedure below to set the insertion interval to a value other than OFF This is invalid when LIPSYNC SDI1 AES on the ETC menu is set to ON Procedure AES EBU AES EBU SETTING CH1 CH2 CLICK Parameters...

Page 160: ...7 Selecting the Pre emphasis Mode To select the pre emphasis mode follow the procedure below Procedure AES EBU AES EBU SETTING EMPHASIS Parameters 50 15 CCITT OFF 13 1 8 Turing the Time Code On and O...

Page 161: ...ting the Silence Output Under AES EBU SILENCE you can set the silence output 13 2 1 Selecting the Resolution To select the resolution follow the procedure below Procedure AES EBU SILENCE SETTING RESOL...

Page 162: ...output To display the WCLK menu press MENU several times until the following menu appears 14 1 Adjusting the Timing To adjust the word clock signal relative to the reference signal in the range of 1A...

Page 163: ...ith our lip sync compatible waveform monitor makes it possible to measure the offset between the video signal and the audio signal that occurs in the transfer route for each channel For details see th...

Page 164: ...ty area markers ID characters and logo are not displayed even if they are set to ON Raster If the scale slide bar is between 0 and 15 frames a white raster is displayed If not a black raster is displa...

Page 165: ...ON LTC you can set the LTC output 16 1 1 Turing the Time Code Output On and Off To turn the time code outputs LTC1 to LTC3 on and off follow the procedure below The time code selected in 20 7 1 Select...

Page 166: ...displayed Procedure GPS OPTION LTC TIMING BIT Parameters 39 to 0 to 39 16 1 4 Adjusting the LTC2 Offset To adjust the LTC2 offset relative to LTC1 follow the procedure below Procedure GPS OPTION LTC L...

Page 167: ...re below This setting is not saved in the last memory Even if output is selected it will be set to input the next time you start the LT 4610 When POWER ON RECALL on the SYSTEM menu is set to OFF Proce...

Page 168: ...t SDI1 to SDI4 Common settings can be specified on SDI1 On SDI2 to SDI4 different settings can be specified for groups of channels Note that for DUAL LINK SDI2 and SDI4 cannot be set because only two...

Page 169: ...x1080 HD DL HD QL 3840x2160 Square 4096x2160 Square 3G A 1280x 720 3G A 1920x1080 3G A 2048x1080 3G A 3G B DL 1920x1080 3G B DL 2048x1080 3G B DL 3G B DS Dual 1280x 720 3G B DS 1920x1080 3G B DS 3G DL...

Page 170: ...dure 12G OPTION SDI 1 FORMAT STRUCTURE Parameters 422 YCbCr 10 bit 422 YCbCr 12 bit 444 YCbCr 10 bit 444 YCbCr 12 bit 444 RGB 10 bit 444 RGB 12 bit 17 1 3 Selecting the Frame Frequency To select the S...

Page 171: ...he line level follow the procedure below The variable range depends on the format Procedure 12G OPTION SDI 1 TIMING VERTICAL Parameters 1124 to 0 to 1124 17 2 2 Adjusting the Timing Dot To adjust the...

Page 172: ...keys The SDI pattern generation settings can be set separately for each output But the fixed pattern and user pattern cannot be generated simultaneously 17 3 1 Switching between Fixed Pattern and User...

Page 173: ...Pattern SDI format Other than those on the right 720x487 SD 720x576 SD 3840x2160 4096x2160 COLOR BAR 100 Y Y Y Y Y 75 Y Y N Y Y MULTI 100 Y N N Y Y MULTI 75 Y N N Y Y MULTI I Y N N Y Y SMPTE N Y N N...

Page 174: ...17 12G OPTION MENU SER02 151 100 75 MULTI 100 MULTI 75 MULTI I SMPTE EBU BBC...

Page 175: ...17 12G OPTION MENU SER02 152 FLAT FIELD 100 FLAT FIELD 0 RED FIELD 100 GREEN FILED 100 BLUE FIELD 100 CHECK FIELD...

Page 176: ...om the Archive See 17 3 7 Copying a User Pattern to the LT 4610 See 17 3 8 Copying a User Pattern to a USB Memory Device Storage memory Can be set from 001 to 025 for SD HD 2K and 4K respectively See...

Page 177: ...is automatically set to SD HD 2K 4K 2SI or 4K SQD according to the selected SDI format The format is displayed as SD 2K 2SI or SQD at the upper right of the USER PATTERN menu Therefore you need to sel...

Page 178: ...power on load set to on Example When power on load is set to on 4 When the file in the selected display memory does not match that in the storage memory Set whether to automatically transfer the sele...

Page 179: ...atically displayed To display a user pattern the pattern must first be transferred from the storage memory to the display memory Procedure 12G OPTION SDI 1 PATTERN PATTERN SELECT USER PATTERN The powe...

Page 180: ...n select any of the folders regardless of the current SDI format In this example the user pattern file name is LEADER bmp and the format is 4K Procedure 12G OPTION SDI 1 PATTERN DELETE To clear a user...

Page 181: ...ory device LT4610_USER USER_PATTERN 4K HD SD Procedure 12G OPTION SDI 1 PATTERN COPY USB INT To copy a user pattern follow the procedure below 1 Select the format Select SD HD 2K or 4K 2 Select the co...

Page 182: ...about 7 minutes Do not turn the power off or remove the USB memory device while copying USB Memory Device File Structure User patterns are copied from the USER_PATTERN folder of the USB memory device...

Page 183: ...a USB memory device with the following folder structure is connected USB memory device LT4610_USER USER_PATTERN 4K HD SD Procedure 12G OPTION SDI 1 PATTERN COPY INT USB To copy a user pattern follow t...

Page 184: ...atterns to the LT 4610 s storage memory follow the procedure below You cannot write to the archive In this example the archive pattern file name is UHDColorBar img and the format is 4K This menu appea...

Page 185: ...o not turn the power off or remove the USB memory device while copying The following patterns can be selected in the archive Pattern SDI format SD HD 2K 4K SQD 4K 2SI 8K UHDColorBar N N N HLGCB N N N...

Page 186: ...ern Scroll Feature Under 12G OPTION SDI 1 VIDEO SCROLL you can configure pattern scrolling For the setting procedure see 12 6 Configuring the Pattern Scroll Feature 17 7 Setting the Pattern Change Und...

Page 187: ...follow the procedure below Procedure 12G OPTION SDI 1 VIDEO MOVING BOX ON OFF Parameters ON OFF 17 10 2 Setting the Box Color To set the moving box color follow the procedure below Procedure 12G OPTIO...

Page 188: ...ize of the box follow the procedure below When the image size is 1280x720 you cannot select SIZE4 and SIZE5 Procedure 12G OPTION SDI 1 VIDEO MOVING BOX V SIZE Parameters SIZE1 SIZE2 SIZE3 SIZE4 SIZE5...

Page 189: ...occurs in the transfer route for each channel For details see the instruction manual of the waveform monitor For details on lip sync patterns see 15 2 Description of Lip Sync Patterns This is invalid...

Page 190: ...USER PAYLAD ON OFF Parameters ON OFF 17 13 Configuring Embedded Audio 16 HD DL audio channels 32 channels for 3G B can be embedded in an SDI signal For the setting procedure see 12 10 Configuring Emb...

Page 191: ...inations of SYSTEM STRUCTURE and RATE see 5 9 2 SDI Formats and Standards 18 1 1 Selecting the System To select the 8K 12G SDI signal system follow the procedure below Changing this setting also chang...

Page 192: ...R24 169 18 1 3 Selecting the Frame Frequency To select the SDI signal frame field frequency follow the procedure below Procedure 12G OPTION SDI 1 FORMAT RATE Parameters 60P 59 94P 50P 48P 47 95P 30P 2...

Page 193: ...ed pattern and user pattern cannot be generated simultaneously 18 3 1 Switching between Fixed Pattern and User Pattern To switch between fixed pattern and user pattern follow the procedure below Proce...

Page 194: ...18 8K OPTION MENU SER24 171 100 75 FLAT FIELD 100 FLAT FIELD 0 RED FIELD 100 GREEN FILED 100 BLUE FIELD 100...

Page 195: ...ple the user pattern file name is LEADER bmp and the format is 4K 1 Select the display memory from INT_1 to INT_8 If a user pattern has already been transferred to the display memory the selected user...

Page 196: ...to the selected SDI format The format is displayed as SD 2K 4K 2SI 4K SQD or 8K at the upper right of the USER PATTERN menu 3 When the file in the selected display memory matches that in the storage m...

Page 197: ...tern stored in the LT 4610 s internal display memory follow the procedure below User patterns are stored in separate folders SD HD 2K 4K 2SI 4K SQD and 8K according to the SDI format The data in the f...

Page 198: ...select any of the folders regardless of the current SDI format In this example the user pattern file name is LEADER bmp and the format is 8K Procedure 12G OPTION SDI 1 PATTERN DELETE To clear a user p...

Page 199: ...device LT4610_USER USER_PATTERN 8K 4K HD SD Procedure 12G OPTION SDI 1 PATTERN COPY USB INT To copy a user pattern follow the procedure below 1 Select the format Select SD HD 2K 4K or 8K 2 Select the...

Page 200: ...remove the USB memory device while copying USB Memory Device File Structure User patterns are copied from the USER_PATTERN folder of the USB memory device USB memory device LT4610_USER USER_PATTERN 8K...

Page 201: ...The following menu appears when a USB memory device with the following folder structure is connected USB memory device LT4610_USER USER_PATTERN 8K 4K HD SD Procedure 12G OPTION SDI 1 PATTERN COPY INT...

Page 202: ...Archive To copy archived patterns to the LT 4610 s storage memory follow the procedure below You cannot write to the archive In this example the archive pattern file name is UHDColorBar img and the f...

Page 203: ...1 VIDEO SAFETY AREA you can turn on and off the 90 marker 80 marker and 4 3 marker separately For the setting procedure see 12 5 Turning Safety Area Markers On and Off 18 6 Configuring the Pattern Sc...

Page 204: ...11 Turning Lip Sync On and Off 18 10 Turning User Payload ID On and Off Under 12G OPTION SDI 1 VIDEO USER PAYLAD you can turn the user payload ID on and off For the setting procedure see 17 12 Turnin...

Page 205: ...to a value other than PTP See also 10 GENLOCK MENU When configuring PTP2 for parameters without descriptions for PTP2 set them the same as PTP1 19 1 1 Setting the Mode Under PTP OPTION PTP1 MODE you...

Page 206: ...ettings to the default values of the selected profile Procedure PTP OPTION PTP1 DETAIL SETTING PROFILE SET DEFAULT 19 1 5 Setting the Domain Under PTP OPTION PTP1 DETAIL SETTING DOMAIN you can set the...

Page 207: ...ICATION MODE you can set the communication mode Procedure PTP OPTION PTP1 DETAIL SETTING COMMUNICATION MODE Parameters when PROFILE TYPE is ST2059 MIXED SMPTE MIXED SMPTE w o NE UNICAST MULTICAST Para...

Page 208: ...PROFILE TYPE is GENERAL 0 125s 8Hz 0 25s 4Hz 0 5s 2Hz 1s 1Hz 2s 0 5Hz 4s 0 25Hz 8s 0 125Hz 16s 0 0625Hz 19 1 8 Setting the Sync Interval Under PTP OPTION PTP1 DETAIL SETTING SYNC INTERVAL you can set...

Page 209: ...y 2 Under PTP OPTION PTP1 DETAIL SETTING PRIORITY2 you can set the master priority 2 Procedure PTP OPTION PTP1 DETAIL SETTING PRIORITY2 Parameters 0 to 128 to 255 19 1 11 Setting the Step Under PTP OP...

Page 210: ...ST2059 DEFAULT FRAME Parameters 23 98 24 25 29 97 30 47 95 48 50 59 94 60 71 92 72 100 119 9 120 Setting the Dropped Frame Flag Under PTP OPTION PTP1 DETAIL SETTING ST2059 DROP FRAME FLAG you can set...

Page 211: ...nsecutively at the interval specified by the master reaches this count a timeout occurs Procedure PTP OPTION PTP1 DETAIL SETTING ANNOUNCE TIMEOUT Parameters 2 to 3 to 10 19 1 14 Setting the Propagatio...

Page 212: ...TP1 MODE Parameters when the genlock mode is PTP SLAVE 19 2 2 Setting the Profile Type Under PTP OPTION PTP1 PROFILE TYPE you can select the profile Procedure PTP OPTION PTP1 PROFILE TYPE Parameters S...

Page 213: ...AES67 0 to 255 Parameters when PROFILE TYPE is GENERAL 0 to 255 19 2 5 Setting the Communication Mode Under PTP OPTION PTP1 DETAIL SETTING COMMUNICATION MODE you can set the communication mode Proced...

Page 214: ...is GENERAL 0 125s 8Hz 0 25s 4Hz 0 5s 2Hz 1s 1Hz 2s 0 5Hz 4s 0 25Hz 8s 0 125Hz 16s 0 0625Hz Set a shorter interval than ANC REQD INT 19 2 7 19 2 7 Setting the Minimum Interval for Receiving Announce M...

Page 215: ...0312s 32Hz 0 0625s 16Hz 0 125s 8Hz 0 25s 4Hz 0 5s 2Hz 1s 1Hz 2s 0 5Hz 4s 0 25Hz 8s 0 125Hz Set a shorter interval than SYNC REQD INT 19 2 9 19 2 9 Setting the Minimum Interval for Receiving Sync Messa...

Page 216: ...32Hz 0 0625s 16Hz 0 125s 8Hz 0 25s 4Hz 0 5s 2Hz 1s 1Hz 2s 0 5Hz 4s 0 25Hz 8s 0 125Hz 16s 0 0625Hz 19 2 11 Setting the Desired Delay Response Transmission Interval Mixed SMPTE UNICAST PTP OPTION PTP1...

Page 217: ...PROFILE TYPE is AES67 0 125s 8Hz 0 25s 4Hz 0 5s 2Hz 1s 1Hz 2s 0 5Hz 4s 0 25Hz 8s 0 125Hz 16s 0 0625Hz Parameters when PROFILE TYPE is GENERAL 0 0078s 128Hz 0 015s 64Hz 0 0312s 32Hz 0 0625s 16Hz 0 125...

Page 218: ...ddress of the Master to Connect To Mixed SMPTE w o Negotiation UNICAST PTP OPTION PTP1 DETAIL SETTING AMT CONFIGURATION can be used to set the IP address of the master to connect to Procedure PTP OPTI...

Page 219: ...ters ON The backlight is on at all times AUTO OFF The backlight turns off if none of the keys are used for 30 seconds It turns back on when a key is used OFF The backlight is off at all times 20 2 Tur...

Page 220: ...U menu Y WCLK menu Y ETC Menu Y GPS OPTION menu SER01 Y 12G OPTION menu SER02 Y USER PATTERN INT1 to INT8 N 1 ID CHARACTER INT_1 to INT_4 N LOGO INT_1 to INT_4 N PTP OPTION menu SER03 Y SYSTEM menu N...

Page 221: ...UMBER 9 20 3 3 Power on Settings To select the preset to use for starting the LT 4610 follow the procedure below For details see 7 1 Turning the Power On Procedure SYSTEM PRESET POWER ON RECALL Parame...

Page 222: ...ets to the USB memory device in advance by using the COPY INT USB menu If there is already a preset stored in the LT 4610 it will be overwritten This setting appears when a USB memory device is connec...

Page 223: ...in the USB memory device it will be overwritten This setting appears when a USB memory device is connected Procedure SYSTEM PRESET COPY INT USB Parameters ALL NUMBER 0 to NUMBER 9 USB Memory Device Fi...

Page 224: ...00 000 000 000 to 255 255 255 255 IP ADDRESS default value 192 168 000 001 SUBNET MASK default value 255 255 255 000 DEFAULT GATEWAY default value 000 000 000 000 20 4 2 Viewing the MAC Address To vie...

Page 225: ...o a USB Memory Device To copy an MIB file which is used for SNMP from the LT 4610 to a USB memory device select OK by following the procedure below If there is already a MIB file stored in the USB mem...

Page 226: ...value LDRUser Changes to COMMUNITY is applied when SNMP is restarted or the next time the power is turned on 20 4 7 Setting WRITE COMMUNITY To change the SNMP WRITE COMMUNITY name follow the procedure...

Page 227: ...NMP COMMUNITY TRAP COMMUNITY Parameters 0123456789 ABCDEFGHIJKLMNOPQRSTUVWXYZ abcdefghijklmnopqrstuvwxyz Default value LDRUser Changes to COMMUNITY is applied when SNMP is restarted or the next time t...

Page 228: ...IP ADDRESS Parameters 000 000 000 000 to 192 168 000 001 to 255 255 255 255 20 5 2 Setting the PTP Subnet Mask To set the subnet mask follow the procedure below Procedure SYSTEM PTP ETHERNET PTP SUBN...

Page 229: ...PTP CLOCK IDENTITY of the LT 4610 follow the procedure below Procedure SYSTEM PTP ETHERNET CLOCK IDENTITY 20 5 6 Setting SFP SFP To select between SFP and SFP follow the procedure below Procedure SYS...

Page 230: ...ocedure below Procedure SYSTEM PTP ETHERNET PORT RELATION Parameters FULLY CROSS LINK There is packet communication between RJ45 and SFP ISOLATED There is no packet communication between RJ45 and SFP...

Page 231: ...rough GPS IN on the rear panel are used You can select this option when SER01 is installed PTP The date and time in the PTP signal received through PTP on the rear panel are used You can select this o...

Page 232: ...20 6 2 Adjusting the Date and Time When DATE TIME SOURCE is set to INTERNAL to adjust the date and time follow the procedure below Procedure SYSTEM DATA TIME ADJUST Parameters 2000 01 01 00 00 00 to 2...

Page 233: ...rear panel are used SER01 INTERNAL The date and time selected in 20 6 1 Selecting the Date and Time are used LTC0 The date and time in the LTC signal received through LTC IN OUT on the rear panel are...

Page 234: ...ng Dropped Frames To select the dropped frame setting follow the procedure below For time codes inserted into SDI signals this setting is valid when the SDI signal frame field frequency is 59 94 or 29...

Page 235: ...Daylight Savings Time On and Off When TIMECODE SOURCE is set to GPS to set whether to apply Daylight Savings Time follow the procedure below Procedure SYSTEM TIMECODE DAYLIGHT SAVING ON OFF Parameters...

Page 236: ...to set the Daylight Saving Time end date follow the procedure below You cannot set seconds Procedure SYSTEM TIMECODE DAYLIGHT SAVING RETURN DAY Parameters 01 01 00 00 00 to 12 31 23 59 00 20 7 9 Setti...

Page 237: ...1 Selecting the Time Zone To select the time zone follow the procedure below Select it according to your region Procedure SYSTEM GPS PTP TIMEZONE OFFSET Parameters UTC 12 00 to UTC 09 00 to UTC 12 00...

Page 238: ...SYSTEM GPS PTP PLATFORM MODE Parameters STATIONARY Stationary environment such as in a room AUTOMOTIVE Mobile environment such as in an outside broadcast van 20 8 4 Selecting the Epoch To select the s...

Page 239: ...TOR 1 and INDICATOR 2 correspond to alarm output 1 and alarm output 2 respectively See also 7 6 8 LTC Signal I O SER01 20 9 1 Selecting the Polarity To select the polarity of the alarm output from the...

Page 240: ...NA GPS PLL GPS SIGNAL CW SIGNAL LTC0 SIGNAL VITC SIGNAL PTP1 PORT STATUS PTP2 PORT STATUS PTP1 LOCK PTP2 LOCK ATTENTION Parameters ENABLE An alarm is output when an alarm occurs DISABLE Alarms are not...

Page 241: ...LOG LIST 00 to 99 No No BLACK menu including SER21 Yes Yes SDI menu SER22 Yes Yes ID CHARACTER INT_1 to INT_4 No Yes LOGO INT_1 to INT_4 No Yes AES EBU menu SER23 Yes Yes WCLK menu Yes Yes ETC Menu Ye...

Page 242: ...electing the Format To select the format that is applied when CLEAR SETTING or DEFAULT SETTING is used to initialize the instrument follow the procedure below Procedure SYSTEM INITIALIZE FORMAT SETTIN...

Page 243: ...of the main unit and SER01 to SER03 follow the procedure below To switch menus use the and keys You can also view the serial number of the main unit on the rear panel The serial number is displayed w...

Page 244: ...e below Only the software options that are installed are displayed For the LT 4610 SER21 SER22 and SER23 are not displayed Procedure SYSTEM LICENSE INFO 20 13 2 Installing Software Options To install...

Page 245: ...20 SYSTEM MENU 222 20 14 Viewing the Version Information To view the firmware version and FPGA version follow the procedure below To switch menus use the and keys Procedure SYSTEM VERSION DISPLAY...

Page 246: ...be used with the LT 4610 and LT 4611 without any problems See also 12 9 Setting Logos and 17 9 Setting Logos 21 1 Installation Follow the procedure below to install Logo App in your PC The required PC...

Page 247: ...21 LOGO APP 224 3 When the following window appears select the installation folder and click Next 4 When the following window appears click Next...

Page 248: ...5 When the following window appears the installation is complete Click Close 21 2 Uninstallation To uninstall the software select LT4600 LOGO Application in Programs and Features of Control Panel and...

Page 249: ...ktop 2 Click Select File 3 Select a bitmap file bmp Select a file that meets the following conditions You cannot select a file lg that has already been converted File name Up to eight characters exclu...

Page 250: ...heck that the colors have been separated into four grayscale levels The intensity used to display the data on the actual LT 4610 can be adjusted from the menu so it will be different from what appears...

Page 251: ...nverted to level 2 and displayed at intensity 191 Intensities 192 to 255 are converted to level 3 and displayed at intensity 255 Conversion Example Description of the Level Threshold Settings Dialog B...

Page 252: ...t and Save to covert and save the data The data saved in the same location as the original data with the same name but with a different extension Example test bmp test lg 8 When the following confirma...

Page 253: ...e IP Address 2 On the LT 4610 set HTTP to ON Set it under SYSTEM WEB BROWSER See also 20 10 Turning the Web Browser On and Off 3 Connect the LT 4610 s ETHERNET CONTROL connector to the external networ...

Page 254: ...SER22 is installed For the settings see 12 SDI MENU 22 2 5 AES EBU tab The AES EBU tab is used to specify settings related to AES EBU output and silence output For the LT 4611 the settings are reflect...

Page 255: ...related to SDI output When SER01 is installed the settings are reflected When SER24 is installed the 8K setting also are reflected For editing the user payload ID see 22 2 11 Editing User Payload ID...

Page 256: ...window 1 USER PAYLOAD If you select ON you can edit the user payload ID Parameters ON OFF 2 INTERFACE LINE NO Set the interface line number In case of interlace set the line number of the second fiel...

Page 257: ...22 2 12 Uploading User Pattern Upload the user pattern in the DATA UPLOAD under 100MByte window on the 12G SDI tab Figure 22 4 DATA UPLOAD under 100MByte window 1 SYSTEM Select the SYSTEM Parameters...

Page 258: ...KNOWN UNKNOWN UNKNOWN 0 0 SDR 013 NO_DATA UNKNOWN UNKNOWN UNKNOWN 0 0 SDR 014 NO_DATA UNKNOWN UNKNOWN UNKNOWN 0 0 SDR 015 NO_DATA UNKNOWN UNKNOWN UNKNOWN 0 0 SDR 016 NO_DATA UNKNOWN UNKNOWN UNKNOWN 0...

Page 259: ...o SDR OFF HLG Set to HLG HDR PQ Set to PQ HDR Unspcified Set to Unspcified 7 Select the file Select the user pattern file 8 UPLOAD Upload the user pattern to the LT 4610 9 Progress Shows the upload pr...

Page 260: ...NMPv2 SMI DisplayString FROM SNMPv2 TC OBJECT GROUP MODULE COMPLIANCE FROM SNMPv2 CONF 23 3 How to Use 1 On the LT 4610 set the IP address Set it under SYSTEM ETHERNET IP ADDRESS 2 Connect the LT 4610...

Page 261: ...et 1 private 4 enterprises 1 leader 20111 MIB Structure lt4610 OBJECT IDENTIFIER leader 36 notification OBJECT IDENTIFIER lt4610 0 trapContent OBJECT IDENTIFIER notification 1 error OBJECT IDENTIFIER...

Page 262: ...NTIFIER system 1 sdi12g OBJECT IDENTIFIER lt4610 4 sdi12g1Ref OBJECT IDENTIFIER sdi12g 1 sdi12g1Format OBJECT IDENTIFIER sdi12g1Ref 1 sdi12g1Timing OBJECT IDENTIFIER sdi12g1Ref 2 sdi12g1Pattern OBJECT...

Page 263: ...FIER ptp1Ref 8 ptp1Priority1 OBJECT IDENTIFIER ptp1Ref 9 ptp1Priority2 OBJECT IDENTIFIER ptp1Ref 10 ptp1Step OBJECT IDENTIFIER ptp1Ref 11 ptp1DefaultFrame OBJECT IDENTIFIER ptp1Ref 12 ptp1DropFrameFla...

Page 264: ...ptp2Ref 10 ptp2Step OBJECT IDENTIFIER ptp2Ref 11 ptp2DefaultFrame OBJECT IDENTIFIER ptp2Ref 12 ptp2DropFrameFlag OBJECT IDENTIFIER ptp2Ref 13 ptp2ColorFrameId OBJECT IDENTIFIER ptp2Ref 14 ptp2DelayMe...

Page 265: ...2 ON genlockFormatStat status 5 INTEGER R O 1 1125 60I 2 1125 59 94I 3 1125 50I 7 1125 30P 8 1125 29 97P 9 1125 25P 10 1125 24P 11 1125 23 98P 15 1125 24PsF 16 1125 23 98PsF 21 750 60P 22 750 59 94P...

Page 266: ...atRef genlockRef 2 INTEGER R W 1 1125 60I 2 1125 59 94I 3 1125 50I 7 1125 30P 8 1125 29 97P 9 1125 25P 10 1125 24P 11 1125 23 98P 15 1125 24PsF 16 1125 23 98PsF 21 750 60P 22 750 59 94P 23 750 50P 24...

Page 267: ...1125 24P 11 1125 23 98P 15 1125 24PsF 16 1125 23 98PsF 21 750 60P 22 750 59 94P 23 750 50P 24 750 30P 25 750 29 97P 26 750 25P 27 750 24P 28 750 23 98P 41 NTSC BB 42 NTSC BB REF 43 NTSC BB ID 44 NTSC...

Page 268: ...R R W 1 422 YCbCr 10 bit 2 422 YCbCr 12 bit 3 444 YCbCr 10 bit 4 444 YCbCr 12 bit 5 444 RGB 10 bit 6 444 RGB 12 bit sdi1FramerateRef sdi2FramerateRef sdi1Format 3 sdi2Format 3 INTEGER R W 1 1080 60I 2...

Page 269: ...100 20 BLUE FIELD 100 23 CHECK FIELD 27 OTHER1 1 28 OTHER2 1 29 OTHER3 1 30 OTHER4 1 31 OTHER5 1 1 Cannot be set because it is reserved 23 4 7 sdi Component Group MIB OID SYNTAX ACCESS VALUE Descripti...

Page 270: ...o 1 INTEGER R W 1 OFF 2 ON 23 4 13 sdi Audio Group MIB OID SYNTAX ACCESS VALUE Description sdi1AudioG1Ref sdi2AudioG1Ref sdi1Audio 1 sdi2Audio 1 INTEGER R W 1 OFF 2 ON sdi1AudioG2Ref sdi2AudioG2Ref sd...

Page 271: ...ayString R O Number of used satellites number of satellites in the line of view satCnValue gpsRef 2 DisplayString R O MAX CN MIN CN gpsAntennaPower gpsRef 3 INTEGER R W 1 OFF 2 3 3V 3 5V gpsPlatformMo...

Page 272: ...4K DS 2SI 20 4096x2160 3G 4K DS SQD 21 4096x2160 3G 4K DS 2SI 22 3840x2160 HD QL SQD 24 4096x2160 HD QL SQD 26 3840x2160 3G QL A SQD 27 3840x2160 3G QL A 2SI 28 4096x2160 3G QL A SQD 29 4096x2160 3G Q...

Page 273: ...MIB OID SYNTAX ACCESS VALUE Description sdi12g1PtnFixRef sdi12g2PtnFixRef sdi12g3PtnFixRef sdi12g4PtnFixRef sdi12g1Pattern 1 sdi12g2Pattern 1 sdi12g3Pattern 1 sdi12g4Pattern 1 INTEGER R W 1 COLOR BAR...

Page 274: ...3 INTEGER R W 1 OFF 2 ON 23 4 24 sdi12g Scroll Group MIB OID SYNTAX ACCESS VALUE Description sdi12g1ScrollRef sdi12g1Scroll 1 INTEGER R W 1 OFF 2 ON Sdi12g1ScrollVspdRef sdi12g1Scroll 2 INTEGER R W 25...

Page 275: ...di12g1Id 6 sdi12g2Id 6 sdi12g3Id 6 sdi12g4Id 6 Aggregate sdi12g1BlinkRef sdi12g2BlinkRef sdi12g3BlinkRef sdi12g4BlinkRef sdi12g1IdBlink 1 sdi12g2IdBlink 1 sdi12g3IdBlink 1 sdi12g4IdBlink 1 INTEGER R W...

Page 276: ...Ref sdi12g1LogoLevel 2 sdi12g2LogoLevel 2 sdi12g3LogoLevel 2 sdi12g4LogoLevel 2 INTEGER R W 100h EB0h sdi12g1LogoLevelLv2Ref sdi12g2LogoLevelLv2Ref sdi12g3LogoLevelLv2Ref sdi12g4LogoLevelLv2Ref sdi12g...

Page 277: ...HITE 2 YELLOW 3 CYAN 4 GREEN 5 BLUE 6 RED 7 MAGENTA 8 BLACK sdi12g1MvBoxVspdRef sdi12g1MvBox 3 INTEGER R W 1 LOW 2 MIDDLE 3 HIGH sdi12g1MvBoxHspdRef sdi12g1MvBox 4 INTEGER R W 1 LOW 2 MIDDLE 3 HIGH sd...

Page 278: ...sdi12g3AudioG5Ref sdi12g1Audio 5 sdi12g3Audio 5 INTEGER R W 1 OFF 2 ON sdi12g1AudioG6Ref sdi12g3AudioG6Ref sdi12g1Audio 6 sdi12g3Audio 6 INTEGER R W 1 OFF 2 ON sdi12g1AudioG7Ref sdi12g3AudioG7Ref sdi...

Page 279: ...T 4 MULTICAST 23 4 36 ptp AnnoumceInterval Group MIB OID SYNTAX ACCESS VALUE Description ptp1AnnoumceIntervalRef ptp2AnnoumceIntervalRef ptp1AnnoumceInterval 1 ptp2AnnoumceInterval 1 INTEGER R W 1 0 1...

Page 280: ...ltFrameRef ptp2DefaultFrameRef ptp1DefaultFrame 1 ptp2DefaultFrame 1 INTEGER R W 2 23 98 3 24 4 25 5 29 97 6 30 7 47 95 8 48 9 50 10 59 94 11 60 12 71 92 13 72 14 100 15 119 9 16 120 23 4 43 ptp DropF...

Page 281: ...R W Setting the Address 23 4 50 ptp AmtConfigration5 Group MIB OID SYNTAX ACCESS VALUE Description ptp1AmtConfigration5Ip ptp1AmtConfigration5 1 IpAddress R W Setting the Address 23 4 51 ptp AmtConfi...

Page 282: ...0 125Hz 12 16s 0 0625Hz 23 4 56 ptp AnnounceDesirInt Group MIB OID SYNTAX ACCESS VALUE Description ptp1AnnounceDesirIntRef ptp1AnnounceDesirInt 1 INTEGER R W 1 0 125s 8Hz 2 0 25s 4Hz 3 0 5s 2Hz 4 1s 1...

Page 283: ...D SYNTAX ACCESS VALUE Description ptp1SyncReqdIntRef ptp1SyncReqdInt 1 INTEGER R W 1 0 0078s 128Hz 2 0 015s 64Hz 3 0 0312s 32Hz 4 0 0625s 16Hz 5 0 125s 8Hz 6 0 25s 4Hz 7 0 5s 2Hz 8 1s 1Hz 9 2s 0 5Hz 1...

Page 284: ...escription ptpSystemIpAddressRef ptpSystemIpAddress 1 IpAddress R W PTP ETHERNET IP address 23 4 64 ptpSystemSubnetMask Group MIB OID SYNTAX ACCESS VALUE Description ptpSystemSubnetMaskRef ptpSystemSu...

Page 285: ...1 20 Range Up to 20 characters Description Date and time of error occurrence index 5 OID leader 20111 lt4610 36 notification 0 trapContent 1 error 1 X leader 20111 lt4610 36 notification 0 trapContent...

Page 286: ...750 23 98P GENLOCK TIMING F 5 0 GENLOCK TIMING V 1125 0 GENLOCK TIMING H 432 0 GENLOCK TIMING FN 100 0 RECOVERY MODE AUTO MANUAL AUTO AUTO SETTING IMMEDIATE FAST SLOW FAST MANUAL SETTING IMMEDIATE FA...

Page 287: ...ON OFF All ON SDI1 SAFETY AREA ON OFF All OFF SCROLL ON OFF OFF SCROLL V SPEED 256 0 SCROLL H SPEED 256 0 PATTERN CHANGE ON OFF OFF PATTERN CHG SPEED 1 to 255 1 ID CHARACTER ON OFF OFF ID SET LT4610...

Page 288: ...F SDI2 settings are similar to the SDI1 settings 24 1 4 AES EBU menu Setting Value Factory Default Value AES EBU ON OFF ON AES EBU CH FREQ SILENCE 400Hz 800Hz 1kHz 1kHz AES EBU CH LEVEL 60 to 0 20 AES...

Page 289: ...Sample 3G QL B DL 3840x2160 Square 3840x2160 2Sample 4096x2160 Square 4096x2160 2Sample HD 1280x 720 HD 1920x1080 HD HD DL 1920x1080 HD 2048x1080 HD HD QL 3840x2160 Square 4096x2160 Square SD 720x 487...

Page 290: ...4 SIZE5 SIZE2 MOVING BOX H SIZE SIZE1 SIZE2 SIZE3 SIZE4 SIZE5 SIZE2 SDI 1 LIPSYNC ON OFF OFF SDI USER PAYLOAD ON OFF OFF SDI AUDIO ON OFF ON OFF All ON L AUDIO ON OFF ON OFF All ON G RESOLUTION 20BIT...

Page 291: ...67 1s 1Hz 2s 0 5Hz 4s 0 25Hz 8s 0 125Hz 16s 0 0625Hz 2s 0 5Hz GENER AL 0 125s 8Hz 0 25s 4Hz 0 5s 2Hz 1s 1Hz 2s 0 5Hz 4s 0 25Hz 8s 0 125Hz 16s 0 0625Hz 2s 0 5Hz SYNC INTERVAL ST2059 0 0078s 128Hz 0 015...

Page 292: ...125s 8Hz 0 25s 4Hz 0 5s 2Hz 1s 1Hz 2s 0 5Hz 4s 0 25Hz 8s 0 125Hz 2s 0 5Hz SYNC REQD INT UNICAST ST2059 0 0078s 128Hz 0 015s 64Hz 0 0312s 32Hz 0 0625s 16Hz 0 125s 8Hz 0 25s 4Hz 0 5s 2Hz 0 5s 2Hz AES67...

Page 293: ...z 0 0312s 32Hz 0 0625s 16Hz 0 125s 8Hz 0 25s 4Hz 0 5s 2Hz 1s 1Hz 2s 0 5Hz 4s 0 25Hz 8s 0 125Hz 16s 0 0625Hz 8s 0 125Hz ANNOUNCE TIMEOUT 2 to 10 3 DELAY MECHANISM END TO END PEER TO PEER END TO END AMT...

Page 294: ...9 59 Current time TIMECODE SOURCE GPS INTERNAL LTC0 VITC SMPTE ST309 PTP INTERNAL DROP FRAME ON OFF ON JAM SYNC ON OFF ON JAM SYNC ADJUST 00 00 00 to 23 59 59 00 00 00 DAYLIGHT SAVING ON OFF OFF CHANG...

Page 295: ...24 APPENDIX 272 24 2 Menu Tree Menus may not be displayed depending on other settings or options For details see the LT 4610 LT 4611 instruction manual 24 2 1 STATUS Menu...

Page 296: ...24 APPENDIX 273 24 2 2 INFO Menu...

Page 297: ...24 APPENDIX 274...

Page 298: ...24 APPENDIX 275 24 2 3 GENLOCK Menu...

Page 299: ...24 APPENDIX 276 24 2 4 BLACK Menu...

Page 300: ...24 APPENDIX 277 24 2 5 SDI Menu...

Page 301: ...24 APPENDIX 278...

Page 302: ...24 APPENDIX 279...

Page 303: ...24 APPENDIX 280 24 2 6 AES EBU Menu 24 2 7 WCLK Menu 24 2 8 ETC Menu...

Page 304: ...24 APPENDIX 281 24 2 9 GPS OPTION Menu...

Page 305: ...24 APPENDIX 282 24 2 10 12G OPTION Menu LT...

Page 306: ...24 APPENDIX 283...

Page 307: ...24 APPENDIX 284...

Page 308: ...24 APPENDIX 285...

Page 309: ...24 APPENDIX 286...

Page 310: ...24 APPENDIX 287...

Page 311: ...24 APPENDIX 288 24 2 11 PTP OPTION Menu PTP master...

Page 312: ...24 APPENDIX 289 PTP slave MIXED SMPTE...

Page 313: ...24 APPENDIX 290 PTP slave MIXED SMPTE WITHOUT NEGOTIATION...

Page 314: ...24 APPENDIX 291 PTP slave UNICAST...

Page 315: ...24 APPENDIX 292 PTP slave MULTICAST...

Page 316: ...24 APPENDIX 293 24 2 12 SYSTEM menu...

Page 317: ...24 APPENDIX 294...

Page 318: ...24 APPENDIX 295...

Page 319: ...24 APPENDIX 296...

Page 320: ...24 APPENDIX 297...

Page 321: ...is analog video sync signal the function to select PTP as the time code source was added Ver 3 9 SER02 HDR SDR selection and USER PAYLOAD function were added to the 12G OPTION menu SER24 LT 4610SER24...

Page 322: ...ported SER01 CW output and 1PPS output is now supported SER01 The alarms output from LTC IN OUT is now supported SER01 VITC is now supported LT 4611 Ver 2 1 LT 4611 A function to record power failure...

Page 323: ...4 APPENDIX 300 LT 4610 2006 2 28 SJ T11364 2006 Hazardous Substances in each Part Parts Pb Hg Cd Cr PBB PBDE 4610SER01 SJ T11363 2006 SJ T11363 2006 Ver 1 Following information is for Chinese RoHS onl...

Page 324: ...301 LT 4611 2006 2 28 SJ T11364 2006 Hazardous Substances in each Part Parts Pb Hg Cd Cr PBB PBDE 4610SER01 4610SER02 4610SER03 SJ T11363 2006 SJ T11363 2006 Ver 2 Following information is for Chines...

Page 325: ...epartment Tel 81 45 541 2123 Fax 81 45 541 2823 Email sales leader co jp 2 6 33 Tsunashimahigashi Kohoku ku Yokohama shi Kanagawa 223 8505 Japan www leader co jp Jul 30 2020 Ver 6 LT 4610 Firmware Ver...

Reviews: