background image


13 

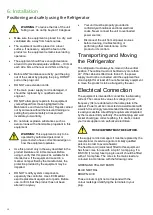
6: Installation 

Positioning and safely using the Refrigerator 


WARNING: 

To reduce the risk of the unit 

falling over, do not tip beyond 10 degrees


Make sure the equipment is placed in a dry, well 
ventilated site, away from heat sources. 


The equipment must be placed on a level 
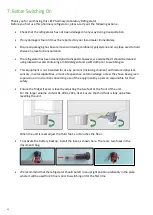
surface. If necessary, adjust the feet on the 
product so the equipment remains level during 
operation. 


The equipment should have enough clearance 
around it to provide adequate ventilation 

– 10cm at 

each side, 6cm at the rear and 2.5cm at the top. 


Before ANY maintenance activity, pull the plug 
out of the socket by gripping the plug, DO NOT 
pull on the plug cord. 


DO NOT use extension cords. 


If the main power supply cord is damaged, it 
should be replaced by a qualified service 
engineer.  


DO NOT attempt any repairs to the equipment 
yourself (apart from those highlighted in the 
Maintenance and Service Section). Repairs carried 
out by someone without the relevant training are 
putting their personal safety at risk and will 
invalidate your warranty.  


Do not store explosive substances such as 
aerosol cans with a flammable propellant in this 
equipment. 


WARNING: 

This equipment is only to be 

operated by authorized personnel or 
personnel who have correct knowledge on 
how the equipment operates.


Use this product only in the way described in the 
product literature and in this manual. Before 
using it, verify that this product is suitable for its 
intended use. If the equipment is used in a 
manner not specified by the manufacturer, the 
protection provided by the equipment may be 
impaired. 


DO NOT modify system components, 
especially the controller. Use LEC Medical 
exact replacement equipment or parts. Before 
use, confirm that the product has not been 
altered in anyway 


Your unit must be properly grounded in 
conformity with national and local electrical 
codes. Never connect the unit to overloaded 
power sources. 


Disconnect the unit from all power sources 
before cleaning, troubleshooting, or 
performing other maintenance on the 
product or its controls. 


Transporting and Moving 
the Refrigerator 


The refrigerator must always be moved in the vertical 
position. The cabinet must not be tilted any more than 
40°. If the cabinet is tilted more than 40°, the power 
supply must not be connected until the equipment has 
stood upright for at least 24 hours. Necessary equipment 
to move the product is to be arranged by the user. 


Electrical Connection 


The equipment is intended for connection to alternating 
current. The connection values for voltage (V) and 
frequency (Hz) are declared on the name plate in the 
cabinet. Power must be connected via a wall socket with 
a switch. It is strongly recommended that the wall socket 
is easily accessible. All earthing requirements stipulated 
by the local electricity authority. The cabinet plug and wall 
socket should give correct earthing. If in doubt, contact 
your local supplier or an authorized electrician. 


THIS EQUIPMENT MUST BE EARTHED.


If the supply cord is damaged, it must be replaced by the 
manufacturer, its service agent or similarly qualified 
persons in order to avoid a hazard. 
The flexible cord (mains lead) fitted to this equipment 
has three cores for use with a 3-pin 13-amp plug. If a 
BS 1363 (13-amp) fused plug is used it should be fitted 
with a 13-amp fuse. The cores in the mains lead are 
coloured in accordance with the following code: 


GREEN AND YELLOW: EARTH 

BLUE: NEUTRAL 

BROWN: LIVE


These colours might not correspond with the 
colour markings identifying the terminals in your 
plug. 

Summary of Contents for 444411305

Page 1: ...0 083870100 Rev05 27 07 22 www lec medical co uk USER MANUAL The Experts in Medical Refrigeration Pharmacy Plus Laboratory Plus Pharmacy Connect Operating Instructions...

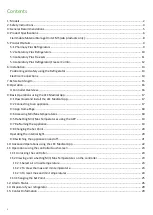
Page 2: ...tall the LEC Medical App 17 9 2 Connecting to an appliance 17 9 3 App Home Page 18 9 6 Accessing Min Max temperatures 18 9 5 Re Setting Min Max Temperatures using the APP 19 9 7 Re Naming the Applianc...

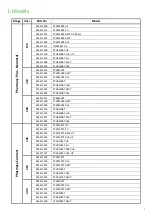
Page 3: ...2 PPGR310BT DLK 400 444411317 PPSR400BT 444411398 PPSR400BT DWP 444411396 PPSR400BT DLK 444411316 PPGR400BT 444411318 PPGR400BT LHH 444411397 PPGR400BT DWP 444411395 PPGR400BT DLK Pharmacy Connect 158...

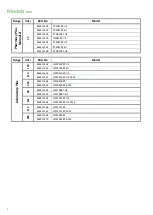
Page 4: ...T UK Range Vol L SKU No Model Laboratory Plus 158 444411358 LSFSR158BT UK 444411359 LSFSR158BT EU 310 444411360 LSFSR310BT UK 444411361 LSFSR310BT UK ATEX 400 444411364 LSFSR400BT 444411365 LSFSR400BT...

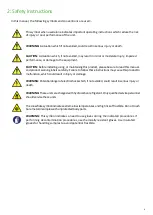
Page 5: ...warning labels carefully Failure to follow these instructions may cause this product to malfunction which could result in injury or damage WARNING Potentialdanger of electric shock which if not avoid...

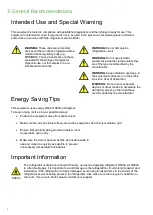
Page 6: ...ot use mechanical devices or other means to accelerate the defrosting process other than those recommended by the manufacturer Energy Saving Tips This equipment uses energy efficient R600a refrigerant...

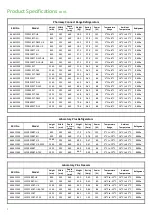
Page 7: ...1 2 C to 8 C 16 C to 32 C R600a 444411310 PPGR158BT LHH UK 850 595 645 36 3 0 78 101 2 C to 8 C 16 C to 32 C R600a 444411312 PPGR158BT EU 850 595 645 36 3 0 78 101 2 C to 8 C 16 C to 32 C R600a 444411...

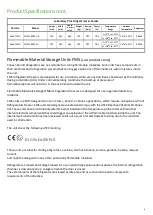
Page 8: ...CSR400CT DLK 1925 595 660 62 8 0 65 88 2 C to 8 C 16 C to 32 C R600a 444411339 PCSR400CT DWP 1925 595 660 75 8 0 65 88 2 C to 8 C 16 C to 32 C R600a 444411334 PCGR400CT 1925 595 645 70 6 0 65 88 2 C t...

Page 9: ...efrigerators freezers are designed for use in general laboratory locations FMS units are NOT designed for use in Class I Zone 0 or Zone1 applications which require an Explosion Proof Refrigerator Free...

Page 10: ...9 5 Product Details 5 1 Pharmacy Plus Refrigerators...

Page 11: ...10 Product Details cont 5 2 Laboratory Plus Refrigerators...

Page 12: ...11 Product Details cont 5 3 Laboratory Plus Freezers...

Page 13: ...12 Product Details cont 5 4 Laboratory Plus Refrigerator Freezer Combi...

Page 14: ...ent equipment or parts Before use confirm that the product has not been altered in anyway Your unit must be properly grounded in conformity with national and local electrical codes Never connect the u...

Page 15: ...he alarm is signalized by a sound signal and Hi caption on the display To mute the alarm touch anywhere on the front surface of the controller Until the moment of cooling the alarm is repeated every 1...

Page 16: ...to switching on This equipment is not intended for use by persons including children with reduced physical sensory mental capabilities or lack of experience and knowledge unless they have been given s...

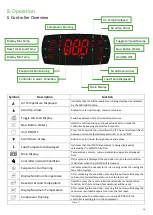
Page 17: ...on If this symbol is displayed the controller is in an alarm condition It will clear when the alarm fault is cleared Evaporator Fan Running Indicates when the evaporator fan is running under the intel...

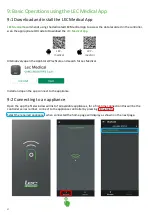
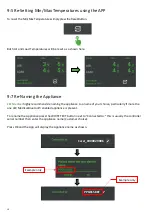
Page 18: ...natively open the App Store Play Store and search for Lec Medical Install and open the app connect to the appliance 9 2 Connecting to an appliance Open the app the first window will list of all availa...

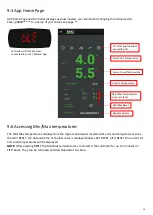
Page 19: ...d time of the last reset is displayed below LAST RESET after RESET the current Air and Load temperatures will be displayed NOTE After pressing RESET the Min Max temperatures are stored in the controll...

Page 20: ...hly recommends renaming the appliance to a name of your choice particularly if more the one LEC Medical Bluetooth enabled appliance is present To rename the Appliance press the WHITE TEXT button next...

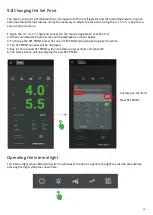
Page 21: ...2 2 When connected the home screen will be displayed as shown below 3 To change the SET POINT press the current SET POINT temperature displayed in white 4 The SET POINT window will be displayed 5 Key...

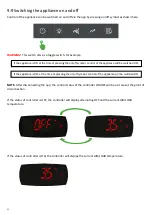
Page 22: ...ill be as it was at the point of disconnection If the status of controller is OFF the controller will display alternating OFF and the current AIR LOAD temperature If the status of controller is ON the...

Page 23: ...22 10 Advanced Operations using the LEC Medical App...

Page 24: ...iew the max and min temperature Press to display the max temperature press again to return to current temperature Press to display the min temperature press again to return to current temperature 3 Se...

Page 25: ...S Press Navi button to confirm RESET Controller returns to LOC Status Both air and load maximum and minimum temperatures will be RESET Please note The Minimum and Maximum temperatures are stored in th...

Page 26: ...on Press Navi button Press or to enter USER PASSWORD 11 Press Navi button Press Navi button Press Navi button Press or to change to set point Press Press Navi button Press Navi button return to LOC St...

Page 27: ...26 12 Alarm Status...

Page 28: ...27 13 Trouble Shooting...

Page 29: ...al laws of that State at the time of disposal As this item is designed for medical use before presenting for collection and disposal it will be necessary for the user to provide documentary evidence o...

Page 30: ...ies Email marketing gdpa co uk Tel 0344 815 3742 Spares and After Sales Service Email info gdha com Tel 0344 815 3742 Fax 0844 248 4123 Address Lec Medical Stoney Lane Prescot Merseyside L35 2XW Warra...

Reviews: