background image

4

Installation & start-up

Before installing and using your new appliance please read through the instructions supplied with
your appliance - failure to install or use this appliance in accordance with the instruction book may
invalidate your warranty.

REMOVE ALL PACKAGING

external and internal from the appliance including any strips of adhesive tape,

plastic bags and pieces of packing foam from inside the cabinet.

INSTALL

the appliance in a well ventilated room and

DO NOT

place your appliance in direct sunlight or

close to a heat source such as radiators or heaters. The appliance should

NOT

be placed in an unheated

room where the ambient temperature is above or below that for which the product was designed to
operate in as this will affect the performance of the appliance. This can be checked by looking at the
data plate, located inside the cabinet.

ENSURE

there is adequate ventilation all around the cabinet, ensuring there is a gap of 50mm around

the sides, 75mm at the rear and 25mm at the top.

LEVELLING THE APPLIANCE

Make sure the cabinet does not ‘rock’ and that it stands level. Do not install

onto carpeted surfaces as this prevents adequate ventilation. This appliance must stand vertically on a
flat, even surface; to level the appliance use the levelling feet by turning them until the appliance is as
level as possible.

DO NOT

expose the appliance to damp conditions, open air or rain.

DO NOT

lift the appliance by the pipes or the door when moving.

LET THE COOLANT SETTLE

Prior to switching on, leave your appliance to stand for 2-3 hours to allow the

coolant fluid time to settle.

BEFORE YOU PLUG IN AND SWITCH ON

check that the voltage of the appliance is the same as your

supply, the voltage of the appliance will be found from the data plate situated inside the cabinet.

DOOR OPENING

In order to maintain the correct temperatures inside your appliance keep door opening

to a minimum and do not leave the door standing open.

Should the appliance become damaged, please contact Lec Medical customer care and do not use the

appliance until you are instructed to do so by a service engineer.

Summary of Contents for ISU111

Page 1: ...1 USER GUIDE LR111 444441207 ISU111 444441208...

Page 2: ...ndeavoured to answer as many questions as possible and provide you with as much support as we can If however you should find something missing or not covered please contact the Lec Medical Customer Ca...

Page 3: ...nstallation start up 4 Using your appliance 5 Defrosting 6 Cleaning your appliance 7 Reversing the door 8 Safety and servicing 9 11 Troubleshooting and Hints 12 13 After sales 14 Disposal 14 About you...

Page 4: ...around the sides 75mm at the rear and 25mm at the top LEVELLING THE APPLIANCE Make sure the cabinet does not rock and that it stands level Do not install onto carpeted surfaces as this prevents adequa...

Page 5: ...allow a sufficient temperature to be reached N B Regular turning off may shorten the life of the appliance USING YOUR APPLIANCE The thermostat is located at the rear of the appliance To reduce the te...

Page 6: ...such as a pipe cleaner or straw FREEZER ISU111 ONLY Your freezer should be defrosted when there is a frost build up of 5mm A thick layer of frost on the inside of your appliance will make it less effi...

Page 7: ...lly the interior of your appliance should be cleaned Remove all drugs vaccines samples etc from the cabinet and store them in a controlled temperature environment Remove all the shelves baskets drawer...

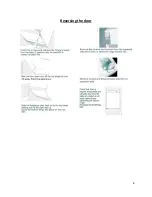
Page 8: ...8 Reversing the door...

Page 9: ...e dangerous ELECTRIC PLUG WIRING UK ONLY The wires in the mains lead are coloured in accordance with the following code GREEN AND YELLOW EARTH BLUE NEUTRAL BROWN LIVE Connect BLUE to NEUTRAL N Connect...

Page 10: ...appliance complies with current British and European Standards and CE Directives SAFETY NOTES Always read these instructions fully before using the appliance for the first time and install this applia...

Page 11: ...m straight away Make sure that the plug is in an accessible place when installation is complete and remove all packaging This appliance is not intended for use by persons including children with reduc...

Page 12: ...and Gurgling noises caused by the refrigeration system are perfectly normal and cannot be avoided The appliance is not meeting the correct temperature Check that the door is shutting and sealing corre...

Page 13: ...appliance are wet Caused by condensation dry the outer of the appliance carefully The inner surfaces of the appliance are wet The door is opened frequently or kept open too long Caused by condensatio...

Page 14: ...ulating gases and refrigerant which will require specialist disposal Most components can be recycled Always contact your local council or authority for information regarding the correct disposal remov...

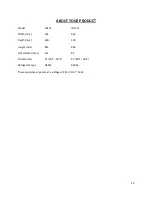
Page 15: ...Model LR111 ISU111 Width mm 545 545 Depth mm 600 590 Height mm 845 845 Net volume litres 112 82 Climate class ST 18 C 38 C ST 18 C 38 C Refrigerant type R600a R600a These appliances operate at a volt...

Page 16: ...en Dimplex Professional Appliances A Division of Glen Dimplex Home Appliances Stoney Lane Prescot Merseyside L35 2XW Tel 44 0 844 815 3755 Fax 44 0 844 815 3748 Email info gdpa co uk www lec medical c...

Reviews: