background image

EN - 9 -

BEFORE CALLING YOUR AFTER SALES SERVICE

If your refrigerator is not working properly,it may be a minor problem, therefore check the
following, before calling an electrician to save time and money.

What to do if your refrigerator does not operate ;

Check that ;

• There is no power,

• The general switch in your home is not disconnected ,

• The thermostat setting is on « 0 » position,

• The socket is not sufficient. To check this, plug in another appliance that you know

which  is working into  the same socket.

What to do if your refrigerator performs poorly ;

Check that ;

• You have not overloaded the appliance ,

• The doors are closed perfectly ,

• There is no dust on the condenser ,

• There is enough place at the rear and side walls.

If there is noise ;

The cooling gas which circulates in the refrigerator circuit may make a slight noise(bubbling
sound)  even  when  the  compressor  is  not  running.  Do  not  worry  this  is  quite  normal.  If
these sounds are different check that ;

• The appliance is well leveled ,

• Nothing is touching the rear ,

• The stuffs on the appliance are vibrating.

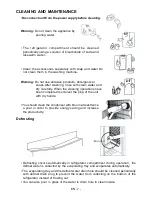
If there is water in the lower part of the refrigerator ;

Check that ;

The drain hole for defrost water is not clogged(Use defrost drain plug to clean the drain
hole)

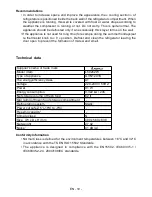
If your fridge is not cooling enough;

Your  fridge  is  designed  to  operate  in  the  ambient  temperature  intervals  stated  in  the
standards,  according  to  the  climate  class  stated  in  the  information  label.  We  do  not
recommend  operating  your  fridge  out  of  stated  temperatures  value  limits  in  terms  of
cooling  effectiveness.

Climate Class

Ambient Temperature (°C)

T

Between 16 and 43  (°C)

ST

Between 16 and 38  (°C)

N

Between 16 and 32  (°C)

SN

Between 10 and 32  (°C)

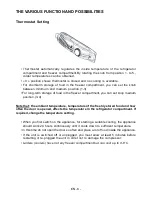
Summary of Contents for L50262W

Page 1: ...USER GUIDE L50262W...

Page 2: ...o answer as many questions as possible and provide you with as much support as possible If however you find something missing or not covered please contact our Customer Care Centre using the number at...

Page 3: ...Installation and Switching On The Appliance 5 Before Switching On 5 THE VARIOUS FUNCTION AND POSSIBILITIES 6 Thermostat Setting 6 CLEANING AND MAINTENANCE 7 Defrosting 7 Replacing The Light Bulb 8 TR...

Page 4: ...k as a safety measure before storing it to protect children while playing might lock themselves inside Old refrigerators and freezers contain insulation gases and refrigerant which must be disposed of...

Page 5: ...les or tin containers of liquids into the freezer especially gassy liquids as they could cause the container to burst during freezing Warning Bottles that contain a high percentage of alcohol must be...

Page 6: ...far from electrical stoves Keep the top free for at least 15 cm Do not place heavy and lots of things on the appliance If the appliance is installed next to another refrigerator or freezer observe a...

Page 7: ...nop medium position 3 4 Note that the ambiant temperature temperature of the freshly stored food and how often the door is opened affects the temperature in the refrigerator compartment If required ch...

Page 8: ...en the cleaning operations have been completed reconnect the plug of the unit with dry hands You should clean the condenser with broom at least twice a year in order to provide energy saving and incre...

Page 9: ...es plug the unit TRANSPORTATION AND CHANGING OF INSTALLATION POSITION Transportation and Changing of Installation Position The original packages and foamed polystyrene PS can be concealed if required...

Page 10: ...e The cooling gas which circulates in the refrigerator circuit may make a slight noise bubbling sound even when the compressor is not running Do not worry this is quite normal If these sounds are diff...

Page 11: ...the refrigerator leaving the door open to prevent the formation of midew and smell Technical data Supplier s name or trade mark Model Item L50262W Type of appliance GT N1201K The energy efficiency cla...

Page 12: ...y for information about the parts of the appliance Parts may vary according to the appliance model 1 2 3 4 5 6 7 8 9 1 TOP TABLE 2 REFRIGERATOR SHELF 3 CRISPER COVER 4 CRISPER 5 LEVELING FEET 6 DOOR S...

Page 13: ...nder neath the appliance i e card towel etc Step 2 Dismantle both levelling feet Step 3 Unscrew the two screws which are fixing the bottom hinge Step 4 Dismantle the bottom hinge Step 5 After removing...

Page 14: ...ushing caps on the door as shown Step 8 Unscrew the pin of the bottom hinge and screw it on the other hole Step 9 Assemble the door and the bottom hinge with two screw on the left side Step 10 Assembl...

Page 15: ...ar a recorded message and be given a number of options This indicates that your call has been accepted and is being held in a queue Calls are answered in strict rotation as our Customer Care Represent...

Page 16: ...52074052...

Reviews: