background image

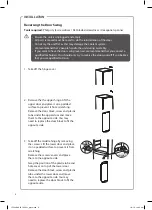
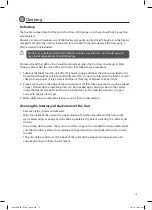
5.  Reverse the middle hinge. Screw the 

middle hinge onto the opposite side of 

the unit.

6.  Carefully set the upper door back into 

place, inserting in onto the middle hinge.

7.  Insert the upper hinge and screw it 

tightly to the top of the unit.

Middle hinge

Ensure the lower door is aligned 

horizontally and vertically, so that 

the seals are closed on all sides 

before finally tightening the hinge.

Ensure the upper door is aligned 

horizontally and vertically, so that 

the seals are closed on all sides 

before finally tightening the hinge.

4.  Remove the lower screws and lower 

hinge from the unit bottom. Reverse the 

lower hinge, move and secure it with 

the lower screws to the opposite side of 

the unit bottom. Carefully set the lower 

door back into place, inserting it onto the 

lower hinge.

8.  Put the hinge cover back.

9

INSTALLATION

LFC60W16_IB_160201_grace.indd   9

1/2/16   10:43 am

Summary of Contents for TNF60186W

Page 1: ...CD308WE ST DESIGN CO BY PART NO STANDARD PART NAME MATERIAL seller REL REV NO g scale AUTHORIZ E 0 1 1 MIDEA REFRIGERATION DIVISION TOTAL SHEETS NO OF SHEETS 145 210mm MARKER 80g 1 2 3 4 2017 03 28 1...

Page 2: ...TNF60186W...

Page 3: ......

Page 4: ...peration 12 Switching On Your Unit 12 Adjusting the Temperature 12 Noises Inside the Unit 13 Tips for Keeping Food in the Unit 13 Preparations for Freezing 14 Defrosting Frozen Food 14 Cleaning 15 Def...

Page 5: ...to avoid a hazard Choose a location for your unit away from heat sources such as radiators or fires as refrigerant and vesicant are burnable The unit must be manoeuvred by a minimum of 2 persons This...

Page 6: ...ents of the unit unless they are of the type recommended by the manufacturer Do not damage the refrigerant circuit The refrigerant is a very environmental friendly gas but is also combustible Take car...

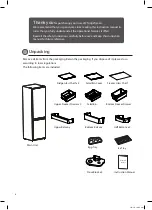
Page 7: ...r x 2 Egg Tray Ice Tray Instruction Manual Upper Balcony Bottom Balcony Thank you for purchasing your new LEC fridge freezer We recommend that you spend some time reading this instruction manual in or...

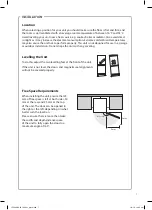
Page 8: ...on Do not drape the unit with any covering Levelling the Unit To do this adjust the two levelling feet at the front of the unit If the unit is not level the doors and magnetic seal alignments will not...

Page 9: ...ge cover 2 Remove the the upper hinge Lift the upper door and place it on a padded surface to prevent it from scratching Remove the door block screw and plastic tube under the upper door and move them...

Page 10: ...closed on all sides before finally tightening the hinge Ensure the upper door is aligned horizontally and vertically so that the seals are closed on all sides before finally tightening the hinge 4 Rem...

Page 11: ...wait for 24 hours to make sure it is working properly and to allow it time to fall to the correct temperature Your unit should not be overfilled Cleaning Before Use Wipe the inside of the unit with a...

Page 12: ...nal Light Bottom Balcony Half Balcony Salad Bin Freezer Control located behind Salad Bin Cover Levelling Feet Freezer Drawer Fridge Glass Shelf Egg Tray Ice Tray Upper Balcony Freezer Glass Shelf 11 L...

Page 13: ...re for the fridge compartment should be an average of 5 C The correct temperature for the freezer compartment should be 18 C or lower Adjusting The Temperature Adjusting the temperature in the fridge...

Page 14: ...to avoid bacterial transfer Keep raw meats fishes in a container which is large enough to collect juices and cover it properly Place the container on the lowest shelf Leave space around your food to...

Page 15: ...ial freezer tapes labels and pens with different colours This allows you to easily organise and to effectively use the freezer Write the contents and date otherwise the frozen food might exceed the st...

Page 16: ...and then a thick rug or blanket to keep it cool 2 Place a dry towel on the edge of the compartment shelf Scrape away the frost using a plastic scraper Defrosting the remaining frost can be speeded up...

Page 17: ...ajar to prevent unpleasant smells Condensation Condensation may appear on the outside of the unit This may be due to a change in room temperature Wipe off any moisture residue If the problem continue...

Page 18: ...n standard test results for 24 hours Actual energy consumption will depend on how the appliance is used and where it is located Storage volume cooling compartment l 219 Storage volume freezing compart...

Page 19: ......

Page 20: ......

Page 21: ...0344 815 3737 16131000A 23743...

Reviews: