background image

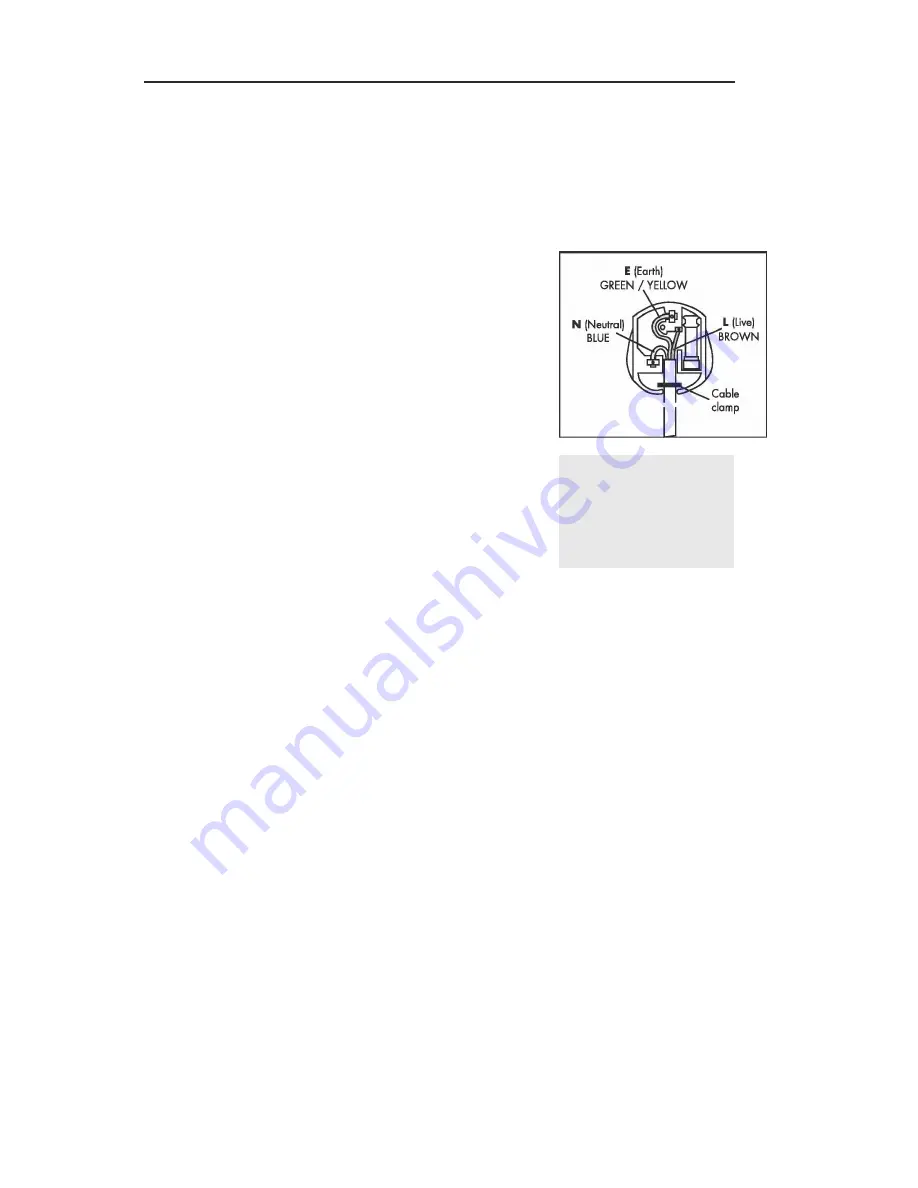
The wires in the mains lead 
are coloured in accordance 
with the following code: 
Green and Yellow = Earth 
Blue = Neutral 
Brown = Live 

Changing the Plug 

11 

Any electrical work required to install this appliance should be 
carried out by a qualified electrician or competent person. 
This appliance must be earthed. The manufacturer declines 
any liability should these safety measures not be observed. 

Electrical Requirements 

Before switching on, make sure the electricity supply 
voltage is the same as that indicated on the appliance 
rating plate. The appliance is supplied with a 13 amp plug fit-
ted. In the event of having to change the fuse in the plug 
supplied, a 13 amp ASTA approved (BS 1362) fuse must be 
used. Should the plug need to be replaced for any reason. The 
wires in the mains lead are coloured in accordance with the 

following code: 

Green and Yellow: Earth 
Blue: Neutral 

Brown: Live 
The wire coloured green and yellow must be connected to the 
terminal marked with the letter "E" or by the earth symbol * 
or coloured green and yellow. The wire coloured blue must be 
connected to the terminal "N". The wire coloured brown must 
be connected to the terminal marked "L". 

Upon completion there must be no cut, or stray strands of wire 
present and the cord clamp must be secure over the outer 
sheath. 

Important! 

The plug must still be accessible after the appliance has been 
installed. The appliance should not be connected to the 
electrical supply by means of an extension cable. In case that 
the electrical cable has to be replaced, please contact the 
Customer Care Centre and arrange a service engineers visit. 

Warning! 
A cut off plug inserted into a 13 amp socket is a serious safety 
(shock) hazard. Ensure that it is disposed of safely. 

This appliance complies with the following E.E.C. Directives: 
73/23 EEC of 19.02.73 (Low Voltage Directive) and subsequent 
modifications, 89/336 EEC of 03.05.89 (Electromagnetic 

Compatibility Directive) and subsequent modifications. 

Summary of Contents for U5010W

Page 1: ...U5010W...

Page 2: ...endeavoured to answer as many questions as possible and provide you with as much support as we can If however you should find something missing or not covered please contact the Lec Customer Care tea...

Page 3: ...For your safety 1 About your product 3 Installing your appliance 4 Using your appliance 5 Care cleanin 8 Troubleshooting 9 Reversing the door 10 Changing the plug 11 Service record and Customer Care B...

Page 4: ...Packaging All of the packaging supplied with your appliance can be recycled or disposed of without any harm to the environment Cardboard may be crushed or cut into smaller pieces if required for recyc...

Page 5: ...ore alcohol in a freezer When defrosting the appliance never use sharp or pointed metal implements Always usea plastic scraper see Defrosting for moreinformation Always keep any ventilation openings c...

Page 6: ...ODEL ST 40dBA R600a 33g A 501 540 845 4kg 24hrs Width mm Height mm Energy Rating Freezing capacity Climate Class Noise dB A re1pw U5010W Technical Data Refrigerant type U5010W Net volume litres 0L 70L...

Page 7: ...25mm 25mm...

Page 8: ...R too warm Door opened often large amount of food added or room temperature very warm Adjust TEMPERATURE Control one setting higher FREEZER too cold Not set correctly for your conditions Adjust TEMOER...

Page 9: ...to drip onto other foods Food which is to be frozen should not be in direct contact with already frozen food You may hear gurgling noises or a humming sound while the appliance is in use and this is...

Page 10: ...the temperature inside If the power cut is longer than 3 hours remove all food wrap well and store in a cool dry place Important Be aware that the storage life of the food will have been reduced Use...

Page 11: ...c components of the appliance i e the thermostat or spilling water on the fridge When cleaning the door seals use only warm soapy water Please use a mild soap and avoid damaging the door seal as this...

Page 12: ...pressor to run for some time Check that the thermostat is set to a suitable temperature Check that the appliance is not in direct sunlight or near a heating source Check that the ventilation grille ha...

Page 13: ...e top hinge pin shaft sheath and block piece on the oppolsite side a Move the top hinge to opposite side b Move the shaft sheath and block piece to opposite side also 4 Unscrew the three scews on the...

Page 14: ...rown Live The wire coloured green and yellow must be connected to the terminal marked with the letter E or by the earth symbol or coloured green and yellow The wire coloured blue must be connected to...

Page 15: ...e Part s replaced Engineers Stamp Printed Name Date Service Record 12 Please record your model number and serial number in the space below Having these numbers to hand will help us to help you quickly...

Page 16: ...Refrigeration Stoney Lane Prescot Merseyside L35 2XW Customer Care Centre 0844 815 3737 www lec co uk Lec Refrigeration a division of Glen Dimplex Home Appliances 08 26362 00 05 2006 4577672200 07 06...

Reviews: