background image

EN - 5 -

Installation  and  Switching  On  The  Appliance

• This appliance is connecting to 220-240V and 50 Hz.

• You can offer help from the service to install and switching on the appliance.

•  Before  making  the  connection  to  the  power  supply,ensure  that  the  voltage  on  the

name plate corresponds to the voltage of electrical system in your home.

• Insert the plug into a socket with an efficient ground connection. If the socket has no

ground  contact  or  the  plug  does  not  match,  we  suggest  you  to  call  an  authorised
electrician  for  assistance.

• The plug should be accessible after the appliance is positioned.

•  Manufacturer  is  not  responsible  for  failure  to  complete  the

ground  connection  as  described  in  this  booklet.

• Do not place the appliance in direct sunlight.

• Do not use in open air and shall not be exposed to the rain.

• Place the appliance far from heat sources and in a well-ventilated

position.  The freezer  should  be  at  least  50  cm  from  radiators,
gas or coal stoves and 5 cm far from electrical stoves.

• Keep the top free for at least 15 cm.

• Do not place heavy and lots of things on the appliance.

•  If  the  appliance  is  installed next  to  another  freezer,  observe  a

minimum  distance of  2 cm  to  prevent  condensation.

• Fit the plastic wall spacers to the condenser at the back of the

refrigerator  in  order  to  prevent  leaning  to  the  wall  for  good
performance.

• The  appliance must  be stand  firmly and level on  the floor  Use

the two front levelling-feet to compensate for an even floor.

• The outside of the appliance and the accessories inside should

be cleaned with a solution of water and liquid soap; the inside
of the appliance with sodium bicarbonate dissolved in lukewarm
water. After drying replace all the accessories.

Before  Switching  On

• Wait 3 hours before plugging the appliance in to the main power

to  ensure  proper  performance.

• There can be an odour when you first switch on the appliance.

It will disappear after the appliance starts to cool.

Summary of Contents for U50262W

Page 1: ...USER GUIDE U50262W...

Page 2: ......

Page 3: ...o answer as many questions as possible and provide you with as much support as possible If however you find something missing or not covered please contact our Customer Care Centre using the number at...

Page 4: ...OUS FUNCTION AND POSSIBILITIES 6 Thermostat Setting 6 ARRANGING FOOD IN THE APPLIANCE 7 CLEANING AND MAINTENANCE 8 Defrosting the Freezer compartment 9 TRANSPORTATION AND CHANGING OF INSTALLATION POSI...

Page 5: ...of the appliance If this appliance is to replace an old refrigerator with a lock break or remove the lock as a safety measure before storing it to protect children while playing might lock themselves...

Page 6: ...nrepairable damage to the unit Use the plastic scraper provided Do not plug the power supply with wet hands Do not place containers glass bottles or tin containers of liquids into the freezer especial...

Page 7: ...ventilated position The freezer should be at least 50 cm from radiators gas or coal stoves and 5 cm far from electrical stoves Keep the top free for at least 15 cm Do not place heavy and lots of thing...

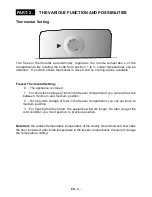
Page 8: ...is closed 1 For short term storage of food in the freezer compartment you can set the knob between minimum and medium position 2 For long term storage of food in the freezer compartment you can set k...

Page 9: ...e contents have deteriorated The storage life of frozen food depends on the room temperature thermostat setting how often the door is opened the type of food and the length of time required to transpo...

Page 10: ...u should clean the condenser back of the appliance with broom once a year in order to provide energy saving and increase the productivity THE POWER SUPPLY MUST BE DISCONNECTED While freezing food Maxi...

Page 11: ...cold Defrosting will be most effective if carried out when the freezer is nearly empty and it should be carried out as quickly as possible to prevent undue increase in temperature of the contents Do...

Page 12: ...k this plug in another appliance that you know which is working into the same socket PART 5 TRANSPORTATION AND CHANGING OF INSTALLATION POSITION Transportation and Changing of Installation Position Th...

Page 13: ...the cooling circuit may make a slight noise bubbling sound even when the compressor is not running Do not worry this is quite normal If these sounds are different check that The appliance is well leve...

Page 14: ...Voltage 220 240V 50HZ Power 91 2 W Energy consumption 0 483 kw 24h Net storage volume of frozen food 62 lt Star rating of frozen food storage compartment Refrigeration system Static Power cut safe Z h...

Page 15: ...ENT 1 THERMOSTAT DIAL 2 FREEZER ROOM COVER 3 FAST FREEZER COMP DRAWER 4 FREEZER COMP BOTTOM DRAWER 5 LEVELING FOOT This presentation is only for information about the parts of the appliance Parts may...

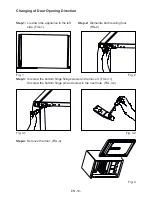
Page 16: ...iance to the left side FIG 1 Step 2 Dismantle both leveling foot FIG 2 Step 3 Unscrew the bottom hinge fixing screws and remove it FIG 3 1 Unscrew the bottom hinge pin and screw in the next hole FIG 3...

Page 17: ...crew the pin on the left hole of the top hinge FIG 5 2 Fig 5 1 Fig 5 2 Step 6 Replace the top bushing and top bushing cap FIG 6 You can use the bushing cap that is put in the user manuel bag Remove th...

Page 18: ...ar a recorded message and be given a number of options This indicates that your call has been accepted and is being held in a queue Calls are answered in strict rotation as our Customer Care Represent...

Page 19: ...the instructions below on how to wire a 13 amp 3 pin plug How to wire a 13 amp plug Important The wires in the mains lead on this appliance are coloured in accordance with the following code Green and...

Page 20: ...52073561...

Reviews: