Installation
Electrical connection
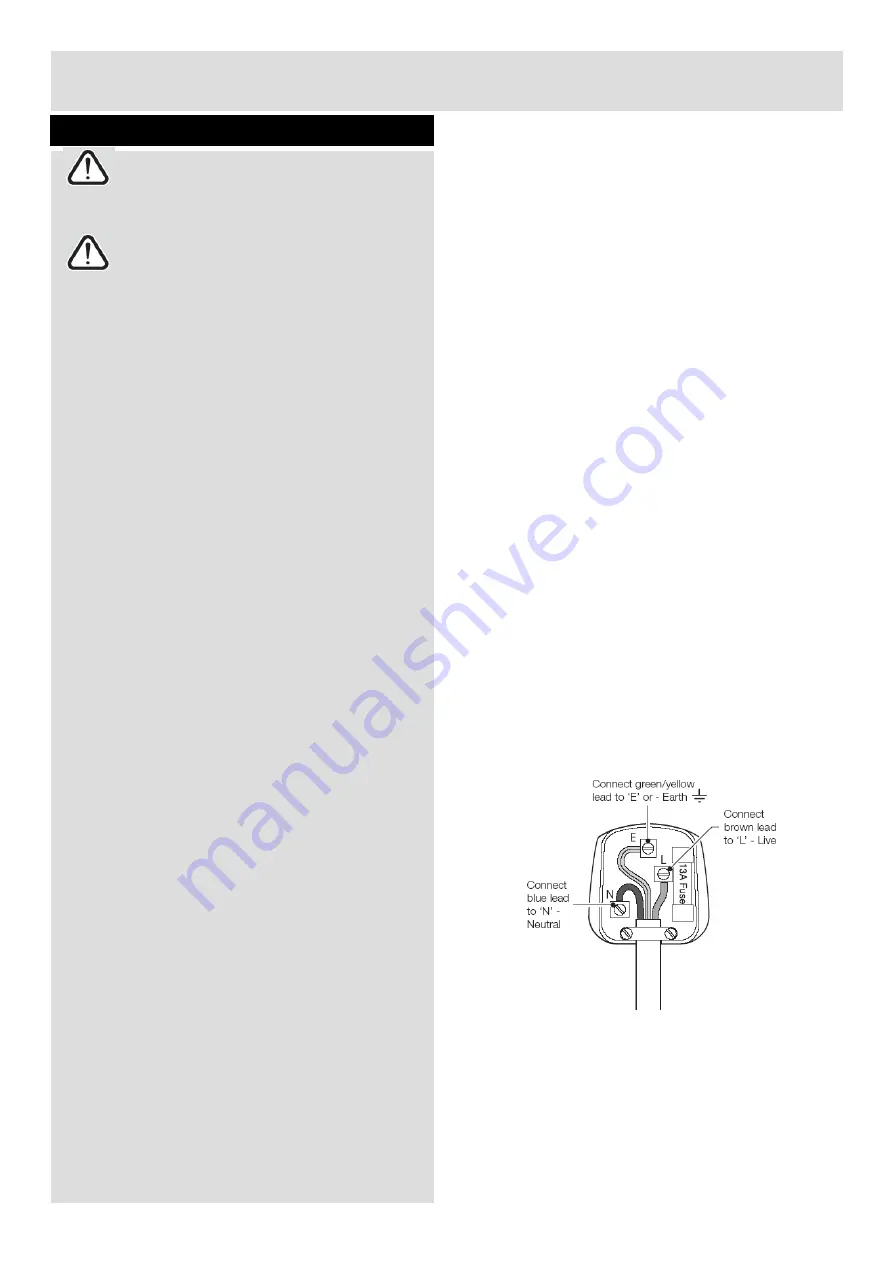
Plug replacement (UK & Ireland only)
Any electrical work that is required to
install this appliance MUST be carried out by
a qualified electrician.
Should you need to replace the plug; the wires in
the power cable are coloured in the following
way:
Warning: THIS APPLIANCE MUST BE
EARTHED
Blue – Neutral ‘N’
Brown – Live ‘L’
Before making any electrical connections,
ensure that:
Green & Yellow – Earth ‘E’
Electrical safety is only guaranteed when the
earth system of your house is in accordance
with the related local regulations.
As the colours of the wires in the power cable
may not correspond with the coloured markings
identifying the terminals in your plug, and
proceed as follows:
Do not damage the refrigerant circuit.
Do not bend, stretch or pull the supply cable to
avoid electric shock.
The green & yellow wire must be connected to
the terminal in the plug that is marked with the
letter E or by the earth symbol.
Do not use electrical appliances inside the
food storage compartments of the appliance,
unless they are of the type recommended by
the manufacturer.
The blue wire must be connected to the terminal
that is marked with the letter N.
Ensure the power socket is suitable for the
maximum power of the machine (fuses in the
power circuit must be 13 amp).
The brown wire must be connected to the
terminal that is marked with the letter L.
The supply voltage should be the same as that
indicated in the technical specifications and
the appliance rating plate.
If power supply cord is damaged, it must
replaced by the manufacturer or its service
agent or a similar qualified person in order to
avoid a hazard.
The appliance should be earthed and in
compliance with the applicable law.
When installed, the power socket must be
within easy reach.
If the socket outlets in your home are not
suitable for the plug supplied with this unit
check with a qualified electrician for
replacement.
The use of adapters, multiple connectors or
extension cables are not recommended.
The appliance must be connected to a 220-
240 volt 50Hz AC supply by means of a three
pin socket, suitably earthed and protected by a
13 amp fuse.
Should the fuse need to be replaced, a 13
amp fuse approved to BS136
2
/A must be used.
The plug contains a removable fuse cover that
must be refitted when the fuse is replaced. If
the fuse cover is lost or damaged, the plug
must not be used until a replacement cover
has been fitted or the plug is replaced.
A damaged plug should be cut off as close to
the plug body as possible, the fuse should be
removed and the plug disposed of safely.
6
Summary of Contents for U6014S
Page 1: ...LEC U6014W S User Manual...
Page 4: ...1 2 3 4...

