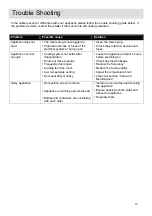
background image


Trouble Shooting 

In the unlikely event of difficulties with your appliance please follow the trouble shooting guide below.  If 

the problem persists, contact the retailer if the machine is still under guarantee.  


Problem 

Possible cause 

Solution 

Appliance does not 

start 

 The mains plug is not plugged in. 

 Protection devices or fuses of the 

electrical system at home open 

 Insert the mains plug. 

 Check the protection devices and 

fuses. 

Appliance not cool 

enough 

 Cooling system not settle after 

transportation 

 Doors not close properly 

 Frequently doors open 

 Loading food too much 

 Low temperature setting 

 Door seal dirty or sticky 

 Leave the appliance at least 4 hours 

before switching on 

 Check any food blockage 

 Reduce the frequency 

 Reduce the food quantity 

 Adjust the temperature knob 

 Clean per section “Care and 

Maintenance” 

Noisy appliance 

 Not position on even surface 


 Appliance is touching objects around 


 Bottles and containers are contacting 

with each other 

 Install on even surface and leveling 

the appliance 

 Ensure spacing at both sides and 

above the appliance 

 Separate them 


10 

Summary of Contents for U6014W/S

Page 1: ...LEC U6014W S User Manual ...

Page 2: ...Safety Information 2 Parts 3 Installation 4 6 User Instructions 7 8 Care and Maintenance 9 Trouble Shooting 10 Technical Specifications 11 Product codes LEC U6014W S ...

Page 3: ... result in injury or damage to the appliance Do not allow children to play with the appliance to avoid the risk of entrapment and suffocation Keep ventilation opening in the appliance enclosure or in the built in structure clear of obstruction This appliance is not intended for use by persons including children with reduced physical sensory or mental capabilities or lack of experience and knowledg...

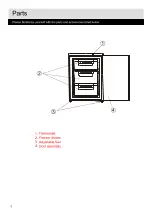
Page 4: ...1 2 3 4 ...

Page 5: ...of correctly Make sure that sufficient room is provided around the appliance to ensure free air circulation Do not place the appliance near a heat source or in direct sunlight Do not put any heavy objects on top of the appliance It will damage the appliance Do not install the appliance in moist and wet place Adjust the feet at front to level the appliance It should be installed on a smooth surface...

Page 6: ... hinge 2 Remove the bottom hinge 2 5 Remove the left front feet 4 and transfer it to the right side 6 Before replacing the bottom hinge 2 remove the hinge pin 9 and reverse the direction of the hinge 2 Reassemble the bottom hinge 2 on the left hand side using the two screws 8 7 Refit the hinge pin 9 into the bottom hinge 2 8 Lower the door onto the bottom hinge pin 9 9 While holding the door in th...

Page 7: ...socket is suitable for the maximum power of the machine fuses in the power circuit must be 13 amp The brown wire must be connected to the terminal that is marked with the letter L The supply voltage should be the same as that indicated in the technical specifications and the appliance rating plate If power supply cord is damaged it must replaced by the manufacturer or its service agent or a simila...

Page 8: ...ature adjustment The compartment temperature can be set by the temperature knob between Min and Max coldest setting We recommend setting the temperature knob midway first To ensure the compartment is maintained at the desired temperature it is advised to monitor the temperature periodically by a thermometer and adjust the temperature knob accordingly Load the appliance after switch on for a while ...

Page 9: ...rrange it so that cold air can circulate freely Higher cold setting will use more energy Do not set to maximum cold if it is not necessary Cool the hot warm food to room temperature before put them into your fridge Frequently open and close door would cause internal temperature rise and it will consume more energy Close the door s properly and make sure the seals and hinges are airtight Check the ...

Page 10: ...pany and take the following actions If it is last within 24 hours keep the doors closed This will allow the stored food to stay cold as long as possible If it is last more than 24 hours it is advised to empty the freezer compartment and temporarily store the food in a portable freezer or using artificial ice packs Try to use up the food which is more easily perishable Remarks Full appliance will s...

Page 11: ...e not cool enough Cooling system not settle after transportation Doors not close properly Frequently doors open Loading food too much Low temperature setting Door seal dirty or sticky Leave the appliance at least 4 hours before switching on Check any food blockage Reduce the frequency Reduce the food quantity Adjust the temperature knob Clean per section Care and Maintenance Noisy appliance Not po...

Page 12: ... food compartment rating 4 Star Climate class ST Operating noise level dB A 41 We apologise for any inconvenience caused by any minorinconsistencies in these instructions w hich may occur as a result of product improvements and development This appliance complies with the following EEC directives 2006 95 EEC Low voltage directive 2004 108 EEC EMC directive Disposal information 11 Minimum Operation...

Page 13: ... message and be given a number of options This indicates that your call has been accepted and is being held in a queue Calls are answered in strict rotation as our Customer Care Representatives become available Enter appliance numbers here for future reference These numbers can be found on your appliances Outside the UK and Northern Ireland refer to your local supplier Stoney Lane Prescot Merseysi...

Reviews: