background image

Pronestander User Manual  

p9

Contraindications 

• 


Children experiencing pain or 

discomfort that cannot be resolved by 

adjustment of support/positioning

•  Children with hip/ knee flexion 

contracture beyond the limits of the 

stander 

All precautions and contraindications 

are taken at the discretion of the 

prescribing clinician or parent. 

Leckey recommends a trained and 

experienced clinician to be present 

during all initial assessment, set 

ups, configurations, and reissues to 

minimise risk. 

SECTION 08:  

PRECAUTIONS AND 

CONTRAINDICATIONS

Precautions

•   Fixed spinal deformities such as 

scoliosis or kyphosis

•  Severe muscle contractures

•  Severe muscular or skeletal 

asymmetry including hip dislocation

•  Progressive and muscle wasting 

conditions

•  High risk or recent history of bone 

fractures

•  High risk of pressure related injury or 

open sores

•  Strong, uncontrolled movement 

patterns

•  Poorly controlled seizure activity

•  Children dependent on the use 

of percutaneous endoscopic 

gastrostomy

•  Medical instability including 

compromised respiratory or 

cardiovascular function

•  Dependant on 3rd party life-

sustaining apparatus such as oxygen 

tanks

•  Significant learning disabilities and/or 

behavioural issues

Summary of Contents for LPS/1

Page 1: ...Pronestander User Manual Supporting Children English...

Page 2: ...ed to promote weight bearing and mid line symmetry This manual shows you how you can quickly and easily make use of all the functions The instructions on the safety and maintenance of the product will...

Page 3: ...uct training record 07 Safety Information 08 Precautions and Contraindication 09 How to unpack and assemble 10 Clinical setup for postural management 11 Frequent adjustments for daily use 12 Cleaning...

Page 4: ...ental delay who are currently non ambulating Children where early intervention is indicated SECTION 02 CERTIFICATION The Pronestander is classified as a Class I Medical Device under EU and UK regulati...

Page 5: ...pplied If the user exhibits any form of distress remove from the product as quickly as is safely possible 4 CAUTION FINGER PINCH HAZARD While the user is in the product the carer should strive to keep...

Page 6: ...fabric components and encourage corrosion on the stander Only use non abrasive household cleaners and moist cloths do not use running water on the upholstery whilst it is still attached to the seat S...

Page 7: ...that users should not be left unattended at any time whilst using Lecky equipment 3 Only use Leckey approved components with your product Never modify the product in any way Failure to follow instruct...

Page 8: ...stationary ensure all castors are locked and facing away from the base as this will improve product stability 9 Never adjust either the angle of the Prostander or overall height of the chestplate whi...

Page 9: ...08 PRECAUTIONS AND CONTRAINDICATIONS Precautions Fixed spinal deformities such as scoliosis or kyphosis Severe muscle contractures Severe muscular or skeletal asymmetry including hip dislocation Prog...

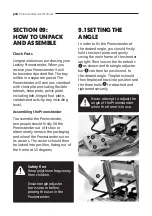
Page 10: ...Assembling the Pronestander To assemble the Pronestander two people should firstly lift the Pronestander out of its box or alternatively remove the packaging and wheel the Pronestander out on its cast...

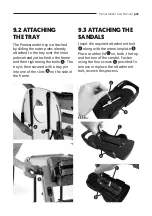
Page 11: ...htening the bolts The tray is then secured with a tray pin into one of the slots on the side of the frame 9 2 ATTACHING THE TRAY 9 3 ATTACHING THE SANDALS Insert the required attachment bolt along wit...

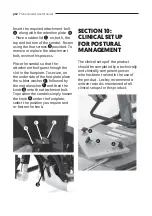
Page 12: ...the underside of the footplate place the rubber washer E followed by the metal washer F and then the knob G onto the attachment bolt To position the sandals simply loosen the knob G under the footplat...

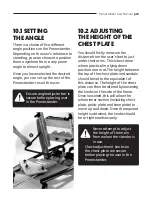
Page 13: ...distance from the user s feet to just under their arms This is best done where practical in a lying down position on a mat The height between the top of the chest plate and sandals should be set to th...

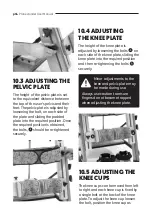
Page 14: ...y 10 5 ADJUSTING THE KNEE CUPS 10 4 ADJUSTING THE KNEE PLATE The height of the knee plate is adjusted by loosening the bolts on each side of the knee plate sliding the knee plate into the required pos...

Page 15: ...the user s pelvis and the longer straps are slipped through the D Rings on the pelvic plate and secured firmly behind the user with Velcro on the belt To ensure that you can easily identify the strap...

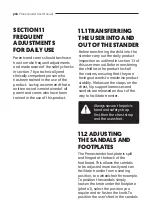
Page 16: ...oduct lock all the castors ensuring that they are facing outwards to maximise product stability Make sure the straps on the chest hip support harnesses and sandals are released and out of the way to f...

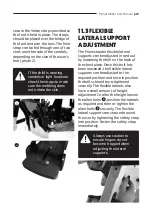
Page 17: ...ut by loosening the bolt on the back of the chest plate Once this bolt has been loosened the flexible lateral supports can be adjusted to the required position and once in position the bolts should be...

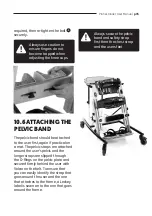
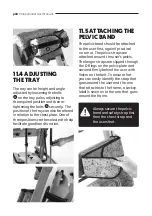
Page 18: ...1 5 ATTACHING THE PELVIC BAND The pelvic band should be attached to the user first again if practical on a mat The pelvic straps are attached around the user s pelvis The longer straps are slipped thr...

Page 19: ...will cause the staining to spread 3 Antiseptic cleaning agents can be used on more stubborn stains These may require a safe solvent such as Isopropyl Alcohol or Mineral Spirit A half cup of household...

Page 20: ...an Leckey Product Specialist Dealer Leckey recommend that each product should be subject to a detailed inspection at least once a year and every time the product is reissued for use This inspection sh...

Page 21: ...ins no modifications or special attachments A detailed technical inspection should be carried on the product prior to re issuing This should be carried out by a technically competent person who has be...

Page 22: ...uid disinfectant on a soft cloth Suitable products are 70 IPA 70 Alcohol or diluted bleach The manufacturer s instructions for the chosen product should be followed Product upholstery and fabrics shou...

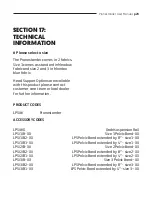
Page 23: ...ECHNICAL INFORMATION PRODUCT CODES LPS Pronestander ACCESSORY CODES LPS G Grab suspension Rail LPS 1 B XX Size 1 Pelvic Band XX LPS 1 B2 XX LPS Pelvic Band extended by 8 size 1 XX LPS 1 B1 XX LPS Pelv...

Page 24: ...mm inches mm inches mm inches Chest Plate Height min 470 18 5 680 27 975 38 max 680 27 975 38 1350 53 Base length 820 32 1070 42 1270 50 width 600 24 650 26 700 28 Activity Tray depth 400 16 450 18 5...

Page 25: ...Manual p25 TABLE OF SYMBOLS Symbol Meaning Medical Device Read the Instructions for Use CE mark Warning Manufacturer Serial number Product code Max occupancy weight Date of Manufacture For indoor use...

Page 26: ...p26 Pronestander User Manual Symbol Meaning Unique Device Identification Machine wash water temperature 50 C Tumble dry low heat Cool iron Do not dry clean...

Page 27: ...Pronestander User Manual p27 NOTES...

Page 28: ...LS164 08...

Reviews: