


Mygo Seat - Size 3 Stander User Manual
p3
CONTENTS
01
Intended use
p.4
02
Certification
p.4
03
Warnings and Cautions
p.5
04
Terms of warranty
p.6
05
Product history record
p.6
06
Product training record
p.7
07
Safety information
p.7
08
Precautions and Contraindications
p.9
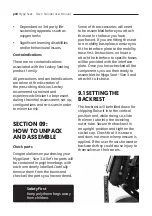
09
How to unpack and assemble the seat
p.10
10
Fitting the cushions
p.21
11
Clinical setup for postural management
p.26
12
Frequent adjustments for daily use
p.38
13
Cleaning & care information
p.48
14
Daily product inspection
p.49
15
Annual product inspection
p.49
16
Reissuing Leckey products
p.51
17
Product servicing
p.52
18
Technical information
p.53
19
Table of Symbols
p.56


