background image

 Spectra Par 7T3   

                                                                                                      Safety

IMPORTANT:


The manufacturer will not accept liability for any resulting damages caused 

by the non-observance of this manual or any unauthorised modification to the

equipment.


• Never let the power-cable come into contact with other cables. Handle the power-cable 


  and all mains voltage connections with particular caution!


• Never remove warning or informative labels from the equipment.


• Do not open the equipment and do not modify the equipment.


• Do not connect this equipment to a dimmer-pack.


• Do not switch the equipment on and off in short intervals, as this will reduce the 


  system’s life.


• Do not expose to flammable sources or gases.


• Always disconnect the power from the mains when equipment is not in use or before 


  cleaning! Only handle the power-cable by the plug. Never pull out the plug by pulling the 


  power-cable.


• Make sure that the available voltage is between 100V-240V.


• Make sure that the power-cable is never crimped or damaged. Check the equipment and 


  the power-cable periodically.


• Avoid direct eye exposure to the light source while the product is on.


• If the equipment is dropped or damaged, disconnect the mains power supply immediately. 


  Have a qualified engineer inspect the equipment before operating again.


• If your product fails to function correctly, discontinue use immediately. Pack the unit 


  securely (preferably in the original packing material), and return it to your Prolight dealer 


  for service.


• Only use fuses of same type and rating.


• Repairs, servicing and power connection must only be carried out by a qualified 


  technician. THIS UNIT CONTAINS NO USER SERVICEABLE PARTS.


• WARRANTY; One year from date of purchase.

OPERATING DETERMINATIONS

If this equipment is operated in any other way, than those described in this manual,

the product may suffer damage and the warranty becomes void.

Incorrect operation may lead to danger e.g.: short-circuit, burns, electric shocks, 

LED failure etc.

Do not endanger your own safety and the safety of others!

Incorrect installation or use can cause serious damage to people and property.

2.

Summary of Contents for SPECTRA PAR 7T3

Page 1: ...www prolight co uk Order code LEDJ257 USER MANUAL SPECTRA PAR 7T3 IP 66...

Page 2: ...ON TAKE CARE USING THIS EQUIPMENT HIGH VOLTAGE RISK OF ELECTRIC SHOCK Before your initial start up please make sure that there is no damage caused during transportation Should there be any consult you...

Page 3: ...ble is never crimped or damaged Check the equipment and the power cable periodically Avoid direct eye exposure to the light source while the product is on If the equipment is dropped or damaged discon...

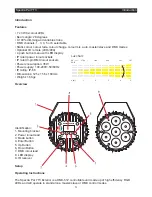
Page 4: ...ckets Power consumption 35W Power supply 100 240V 50 60Hz IP rating IP 66 Dimensions 125 x 156 x 180mm Weight 1 6Kgs Overview Setup Operating Instructions The Spectra Par 7T3 Exterior is a DMX 512 con...

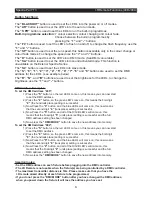
Page 5: ...h value and adjust by using the UP and DOWN buttons Speed values SP00 SP99 00 slow 99 fast Flash values FS00 FS99 00 slow 99 fast In Pr01 you can set a specific static colour When in P 01 Press the E...

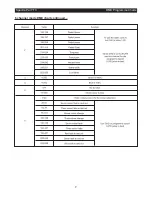
Page 6: ...ngs press the M and E button at the same time 3 channel mode DMX chart 4 channel mode DMX chart 5 Spectra Par 7T3 DMX Programme Charts Channel 1 Channel 1 2 3 Channel 1 2 3 4 Value 0 1 22 23 45 46 68...

Page 7: ...de DMX chart 6 channel mode DMX chart 6 Spectra Par 7T3 DMX Programme Charts Channel 1 2 3 4 5 Value 0 255 0 255 0 255 0 255 0 255 Function Red 0 100 Green 0 100 Blue 0 100 Master dimmer 0 100 Strobe...

Page 8: ...Spectra Par 7T3 DMX Programme Charts 6 channel mode DMX chart continued 7...

Page 9: ...place setting is successful 3 Now Press the 4 button and the blue LED s will come on this now means that the second digit 4 tens place setting is successful 4 Now Press the 5 button and all of the R...

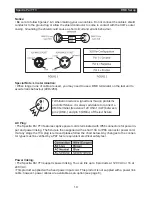
Page 10: ...mple a fixture assigned to a DMX address of 1 may be placed anywhere in a DMX line at the beginning at the end or anywhere in the middle When a fixture is assigned a DMX address of 1 the DMX controlle...

Page 11: ...power in put and power linking The fixture is then supplied with a short 13A to IP66 connector power cord If at any stage the 13A plug is removed please follow the chart below Any changes to the conn...

Page 12: ...ve fixture is disturb ing the link Bad data link connection Inspect the connection and cables Correct the connection Repair or replace the damaged cables Insert a termination plug into the output sock...

Page 13: ...problem persists Fixture is too hot The LEDs are damaged The power supply settings do not match the local AC voltage and frequency Allow the fixture to cool down Make sure that all air vents are not...

Page 14: ...13 Notes Spectra Par 7T3 Notes...

Page 15: ...14 Notes Spectra Par 7T3 Notes...

Page 16: ......

Reviews: