background image


11 

3.6.1 ECO mode setting 

 Enter the setting interface. Press and hold the function setting key

for more than 2 seconds, then come 

to setting interface, the letters “ECO” will flash; 

 Enter the ECO setting interface. Press and hold the function setting key

for more than half a 

second(less than 2 seconds), then come to setting interface of ECO, a

t this time, the letters “ECO” will light 

for a long time. The “ON” (or OFF) will flash. Press and hold the inquiring key (

,

for more than half 

a second (less than 2 seconds) to determine whether the ECO function is used or not. If used, the 

correspondi

ng word is “ON”, if not, the word is “OFF”. It can be determined by yourself. 

 Confirm the ECO selecting interface. After selecting ON or OFF, press and hold the function setting 

key

  for more than half a second (less than 2 seconds). Now, the ECO setting function is completed 

and the “ON” or “OFF” will light without flash. 

 Exit from the setting interface. Press and hold function setting key

for more than 2 seconds, exit from 

the setting interface and return to main interface.   


3.6.2 Bypass mode setting 

 Enter the setting interface. Press and hold the function setting key

for more than 2 seconds, then come 

to setting interface, press and hold the function setting key

for more than half a second(less than 2 

seconds), select the function setting, choose the bypass output interface, at the moment, the letters “BPS” 

will flash.   

 Enter the Bypass output setting interface. Press and hold the function setting key

for more than half a 

second(less than 2 seconds), then come to setting interface of BPS, at this time, the letters “BPS” will light 

for a long time. The “ON” letter will flash. Press and hold the inquiring key (

,

for more than half a 

second (less than 2 seconds) to determine whether the BPS function is used or not. If used, the 

corresponding word is “ON”, if not, the word is “OFF”. It can be determined by yourself. 

 Confirm the Bypass output setting interface. After selecting ON or OFF, press and hold the function setting 

key

  for more than half a second (less than 2 seconds), Now, the BPS setting function is completed 

and the “ON” or “OFF” will light without flash. 

 Press and hold the function setting key

for more than 2 seconds, exit from the setting interface and 

return to main interface.   

 After setting BPS ON, without turning on the UPS whatever mains power being plugged in or not, there is 

bypass output but no backup function. 

Summary of Contents for 1-1 Series

Page 1: ...using our products Please strictly obey all the instructions in this manual and pay attention to all the warning and operation information It is not advisable to install or operate the machine before...

Page 2: ...S if any damage in transport If find damaged or parts missing do not power on please turn to the carrier and dealer To determine whether this UPS is the model you want to buy Check the model name show...

Page 3: ...ry over 8 hours before used Once the AC mains power energizes the UPS it will automatically charge the battery Without prior charging UPS output remains as usual but with shorter back up time than nor...

Page 4: ...E 1 2 5 V A C 3 5 A I N P U T O U T P U T S O C K E T T E L M O D E M F A X O U T I N R S 2 3 2 U S B E P O I N T E L L I G E N T S L O T O U T P U T L N G N D R E S E T R E S E T T O 7 2 V D C 4 0 A...

Page 5: ...10mm2 10KVAH 10mm2 10mm2 10mm2 10mm2 10mm2 Note The cable for 6KVAS 6KVAS should withstand over 40A current It is recommended to use 10AWG or thicker wire for safety and efficiency The cable for 10KV...

Page 6: ...er in OFF position and then install the battery pack Pay highly attention to the rated battery voltage marked on the rear panel if you want to change the numbers of the battery pack please make sure y...

Page 7: ...nnecting N1 L2 it becomes three outputs one high voltage 208v 220v 230v 240V at L1 N2 two low voltage outputs 100v 110v 115v 120V at L1 N1 and L2 N2 However there is a limit for current rating at L1 N...

Page 8: ...ls Correct installation procedure is highly vital or else probable electric shock will arise Users are strictly required to follow the below procedure Connect battery in correct way and make sure the...

Page 9: ...function INQUIRING KEY Non function setting mode Press and hold or for more than half a second less than 2 seconds display the items orderly Press and hold for more than 2 seconds Circularly and order...

Page 10: ...ted B The fan icon is for fan working indication when fan normally runs the icon will display rotation if the fan is not connected or faulty the icon blinks C Press the mute button under the battery m...

Page 11: ...S are working in battery mode 3 4 2 Turn Off operation i Turn off the UPS in line mode Press and hold the OFF key for more than half a second to turn off the UPS and inverter After UPS shutting down L...

Page 12: ...erface Press and hold the function setting key for more than 2 seconds then come to setting interface press and hold the function setting key for more than half a second less than 2 seconds select the...

Page 13: ...is 220V Confirm the output voltage setting interface After selecting numerical value press and hold the function setting for more than half a second less than 2 seconds Now the OPU setting function is...

Page 14: ...ce Press and hold function setting key for more than half a second less than 2 seconds exit from the setting interface and return to main interface 3 7 Parameters inquiring operation Press and hold th...

Page 15: ...pproximately reckoned according to the battery voltage Press and hold the inquiring key for more than 2 seconds LCD begins to display the items circularly and orderly which transfer to another every 2...

Page 16: ...w LED are on When the input mains meets the input range of the ECO mode and the ECO function is on the UPS will works in ECO mode If input AC mains exceed the range of ECO several times within one min...

Page 17: ...le for working status S N Working status LED on Front panel Alarm beep Note Normal Battery Bypass Fault 1 Inverter mode mains power Mains power voltage N Mains power high low voltage protection switch...

Page 18: ...arning for bypass mode overload One beep 2 sec 7 Fans fault fan icon One beep 2 sec 8 Faults mode Long beep LED indicator lights long time LED indicator flicker LED indicator status depends on other c...

Page 19: ...Turn of the UPS and disconnect all the load make sure there no any fault or internal short circuit of the load And then restart the UPS if failure still please contact the supplier Fault LED on audibl...

Page 20: ...ries If you want to replace the battery cable please purchase it from our local service center or distributors to avoid fever and lighter which can cause fire from inadequate power capacity Don t disp...

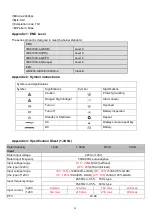
Page 21: ...cancel Turn on Overload Turn off Battery inspection Standby or Shutdown Repeat AC Display screen repeat key DC Battery Appendix 3 Specification Sheet 1 3KVA Rated Capacity 1KVA 1 5KVA 2KVA 3KVA Input...

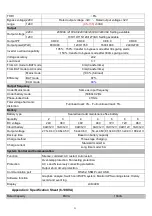
Page 22: ...d rate 1Hz s Total voltage harmonic distortion Full linear load 3 Full nonlinear load 5 Battery Battery type Sealed lead acid maintenance free battery Quantity 2 3 4 4 6 6 8 DC voltage 24V 36V 48V 48V...

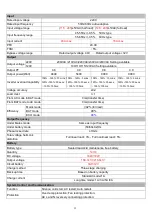
Page 23: ...3 mins 125 150 30 secs 150 100ms Voltage accuracy 0 2 Load crest 3 1 From AC mode to BAT mode 0ms transfer time From BAT mode to AC mode 0ms transfer time Efficiency Mains mode 92 full load BAT mode 9...

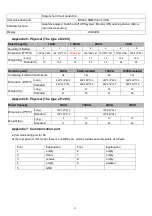
Page 24: ...Isolated 10KVA 10KVA Isolated Containing isolation transformers No Yes No Yes Dimension W D H Long 262 514 455 262 650 735 262 514 455 262 650 735 Standard 262 514 735 262 650 735 262 514 735 262 650...

Page 25: ...ftware and hardware on the network such as running HP open view IBM net view SUN net manager and other operation system UPS is with function login on internet which can supply information of UPS statu...

Reviews: