TIL1X2PT / TIL1X3PT / TIL1X4PT / TILVABPT
Installation Instructions
14
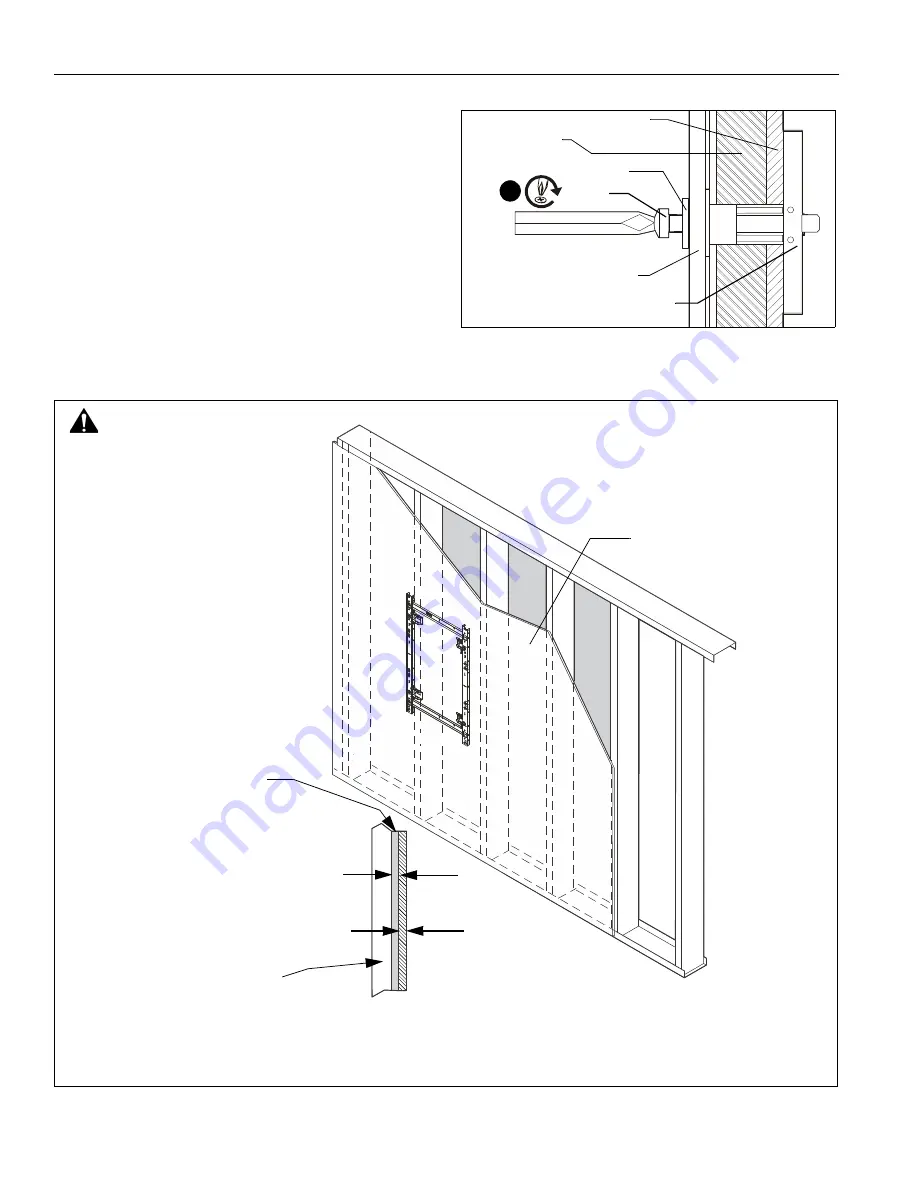
5.
Line up anchor with attachment point.
6.
Insert 1/4-20 x 1-3/4" Phillips pan head screw through 1/4"
washer, corresponding mounting hole in wall bracket and
into anchor, and tighten until flush against wall bracket. DO
NOT over tighten! (See Figure 23)
Figure 23
Drywall
Anchor metal channel
Phillips
6
Steel stud
Washer
(side view)
Wall bracket
(if present)
screw
Site Requirements for Wood or Steel Stud Installation
Figure 24
FRONT
There must be a minimum of
1-7/8" (48mm) clearance
inside wall
16" or 24" (on center) Studs
If back side of wall is unfinished,
to a minimum of one stud left
drywall must be installed
and right of the stud(s) being used
to install the mount. Drywall must be
secured to studs with screws a
maximum of 12" (305mm) apart
down center of stud.
Steel Stud (2 x 4 / 25ga minimum)
Stud type and structural strength must conform to the North American
Specification for the Design of Cold-Formed Steel Structural Members.
(Both Sides of Stud)
[362 S 125 18, C-Shaped, S-Stud Section]
Plywood
3/4" minimum thickness
plywood covered
with drywall having
maximum thickness of 5/8"
5/8" maximum
drywall thickness
Stud
Summary of Contents for CHIEF PT Series
Page 16: ...Installation Instructions TIL1X2PT TIL1X3PT TIL1X4PT TILVABPT 16 ...
Page 25: ...Installation Instructions TIL1X2PT TIL1X3PT TIL1X4PT TILVABPT 25 ...
Page 26: ...TIL1X2PT TIL1X3PT TIL1X4PT TILVABPT Installation Instructions 26 ...
Page 27: ...Installation Instructions TIL1X2PT TIL1X3PT TIL1X4PT TILVABPT 27 ...


