24
4.2
Start-up procedure
4.2.1 Normal mode
1. Ensure that the mains power supply to be used has a suitable voltage/frequency and an up-
stream protection rated at either 10A or 16 A.
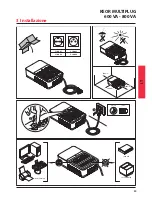
2. Plug the UPS power cord into the mains power supply socket. The blue led blinks for an instant.
3. The UPS recharges its battery each time it is connected to a mains power supply (even if it is
powered down). In this stand-by condition, it is also possible to use the USB charger port. It is
recommended to charge the battery at least 4 hours before connecting the loads.
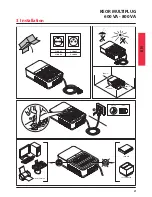
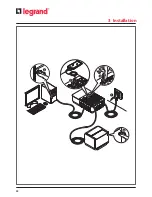
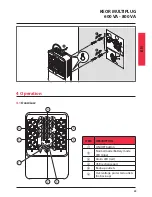
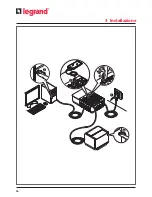
4. Connect the loads to the output sockets. There are two different type of output sockets:
- 4 x back-up sockets: they are powered only when the UPS is on. If the mains power fail, the
back-up sockets are battery powered.
- 2 x overvoltage protected sockets: they are powered also when the UPS is off. These sockets pro-
vide protection only from overvoltages. If the mains power fail, these sockets are not powered.
Ensure that the power of the loads can be managed by the UPS.
5. Press the ON/OFF button to start-up the UPS and power the loads. The blue and red leds are lit
for 3 seconds along with a 3 seconds long acoustic signal.
INDICATION
The UPS has the autorestart function. In case the mains power fail and the UPS reaches the end of
the back-up time, the load is powered automatically when the mains power is back.
4.2.2 Cold start
1. Make sure the internal battery is fully charged.
2. Connect the loads in the back-up sockets.
3. Press the ON/OFF button to start-up the UPS and power the loads. The blue and red leds are lit
for 3 seconds along with a 3 seconds long acoustic signal. After that, the blue led blinks once
and there are two beeps.
INDICATION
The output frequency is set to 50 Hz.
4 Operation
Summary of Contents for KEOR MULTIPLUG 600 VA
Page 8: ...8 3 Installation ...
Page 16: ...16 ...
Page 22: ...22 3 Installation ...
Page 30: ...30 ...
Page 36: ...36 3 Installazione ...
Page 44: ...44 ...
Page 50: ...50 3 Installation ...
Page 58: ...58 ...
Page 64: ...64 3 Instalación ...
Page 72: ...72 ...
Page 78: ...78 3 Монтаж ...
Page 86: ...86 ...
Page 87: ...87 ...

