Page 17
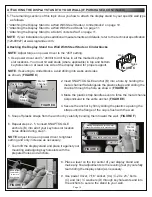
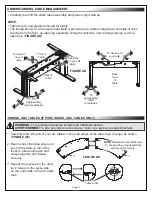
1. With
at least one other person, carefully lift your display slightly
above both top and bottom poles on the mount (I-E)
.
(
FIGURE V
)
2.
Slowly lower the display while ensuring top interface
bracket hooks fully engage onto the top pole of
the mount.
3. Carefully bring the lower side of the display
forward until the lower jaws of the interface brackets
securely latch onto the bottom pole of the mount.
NOTE
: Remove your display by pulling both release cord rings
down while pulling bottom of the display away from the mount, and
then team lift it off the poles.
TIP
: Store release cords behind your display by attaching the magnetic rings to
the metal interface brackets or the mount.
HANGING YOUR DISPLAY ONTO THE MOUNT
WARNING:
This procedure requires at least one additional person.
AVERTISSEMENT:
Cette procédure nécessite au moins une personne supplémentaire.
WARNING:
Do not release your display
until certain the top hook of each interface
bracket is securely seated on the upper
pole of the mount.
AVERTISSEMENT:
Ne relâchez pas votre
écran tant que le crochet supérieur de
chaque support d'interface n'est pas
solidement fixé sur le pôle supérieur du
support.
NOTE
: Tables models include 3 and 5 person angle tables and
a curved table. While the this topic shows views with a 3 peson angle
table model, the steps are generic and apply to all tables unless
otherwise specified.
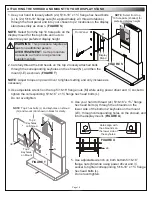
1. Use your hand to gently pull at the opening on the top of the
inside filler panel from the table leg assembly (P, only the one
from the side where you plan to have cables enter/exit your table)
and carefully set it aside for re-installation.
(
FIGURE W
)
ASSEMBLING YOUR TABLE (IF PURCHASED)
FIGURE W
Opening
on Panel
NOTE
: Panel shown
in black for clarity.
Top
Hooks on
Interface
Brackets
Interface
Bracket
Release
Cords
Top
Pole on
Mount
Bottom
Pole on
Mount
N
A
I-E
I-B
FIGURE V
N


