background image

6

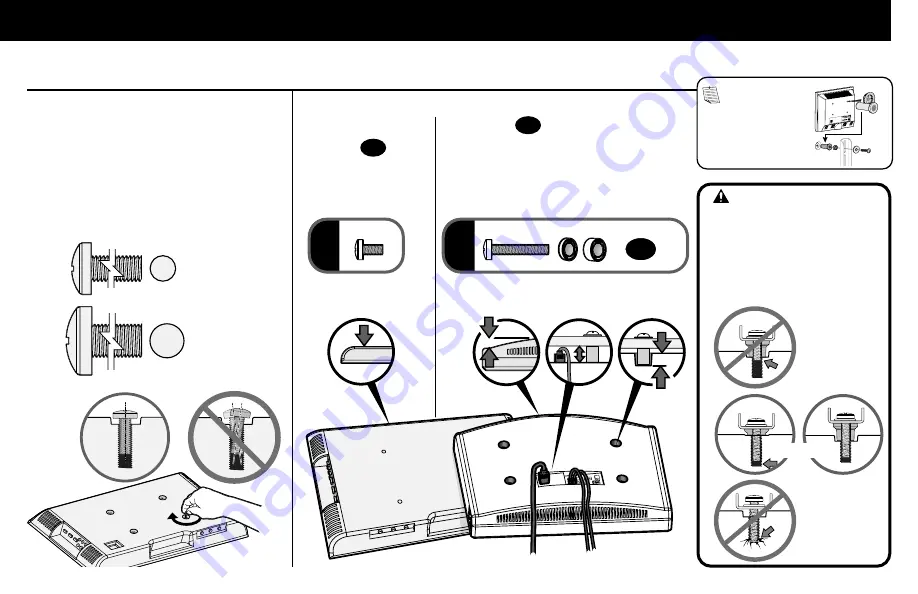
1.1 Select TV Screw Diameter

1.2  Select TV Screw Length

 CAUTION:


Verify adequate thread engagement 

with your screw/washer/spacer 

combination AND TV bracket.

-

 Too short will not hold the TV.

-

 Too long will damage the TV.

M6

M8

a

b

a

:

 For flat-back TVs,  

no spacers 

02


required.

b

:

 Spacers


02

 supplied for:


Round (irregular) back TVs


Extra space needed (for cables or 

inset mounting holes)

FLAT BACK

ROUND BACK

CABLES

INSET HOLES

Test the three TV screw diameters (M6, or M8) 

in the threaded inserts on the back of your TV to 

determine which screw diameter fits your TV. 

Too Short

Too Long

Correct

 NOTE: 

If your 

TV included inset 

spacers or adapters, 

use them UNDER the 

mount hardware.

STEP 1     Attach TV Brackets to TV

02

Summary of Contents for SANUS VSTV2-B2

Page 1: ...EA 31 0 495 580 852 UK 44 0 800 056 2853 Want to watch a video that shows how easy this DIY project will be Watch it now at SANUS com 3093 WE RE HERE TO HELP Texto en español página 16 DeutscherTextSeiten20 Svensktextsida24 中文文字说明请参见第 28 页 Textefrançaispage18 Nederlandsetekstoppagina22 Русский текст стр 30 日本語は 26 ページ ...

Page 2: ...he weight capacity can result in serious personal injury or damage to equipment It is the installer s responsibility to make sure the weight of the display including accessories does not exceed 125 lbs 56 6 kg Use with heavier televisions may result in instability causing tip over resulting in death or serious injury WARNING Use this mounting system only for its intended use as described in these ...

Page 3: ...77in 426mm 22 28in 566mm 4deg UP TILT 25 00in 635 1mm 35 57in 903 5mm 24 80in 630mm 5deg ROLL 8X 0 98in 25mm HEIGHT ADJUST 7 87in 200mm TOTAL HEIGHT ADJUSTMENT 18 44in 468 5mm 35 57in 903 5mm 10 57in 268 5mm 27 70in 703 5mm TV INTERFACE HEIGHT ADJUSTMENT TOP VIEW SWIVEL 3 D SIDE VIEW EXTENDED SIDE VIEW RETRACTED SIDE VIEW TILT FULLY ASSEMBLED MOUNT ...

Page 4: ...at could be a choking hazard if swallowed Before starting assembly verify all parts are included and undamaged If any parts are missing or damaged do not return the damaged item to your dealer contact Customer Service Never use damaged parts Supplied Parts and Hardware STEP1 02 TV Bracket TV Screws M6 M8 Washer Spacers 5 0 mm 2 5 mm x4each qty 4 each 04 01 x2 01 x4 ...

Page 5: ... STEP 1 STEP2 STEPS2and3 5 32 in 10 32 x 1 2 in 1 4 20 x 3 8 in M5 x 6mm 06 x4 05 x1 08 x1 09 x1 11 x1 07 x3 10 x2 Vertical Height Adjustment Bracket Lock Screw Hex Key Post Base Base Screw Bracket Screw ...

Page 6: ...ers 02 required b Spacers 02 supplied for Round irregular back TVs Extra space needed for cables or inset mounting holes FLAT BACK ROUND BACK CABLES INSET HOLES Test the three TV screw diameters M6 or M8 in the threaded inserts on the back of your TV to determine which screw diameter fits your TV Too Short Too Long Correct NOTE If your TV included inset spacers or adapters use them UNDER the mount...

Page 7: ...g your selection for screw washer a Flat Back or screw washer spacer b Round Back Extra Space CAUTION Avoid potential personal injuries and property damage DO NOT use power tools for this step Tighten the screws only enough to secure the TV bracket to the TV DO NOT overtighten the screws IMPORTANT Ensure TV brackets are securely fastened before moving on to the next step 04 02 03 03 04 01 ...

Page 8: ...ertical height adjustment bracket 05 is CENTERED on the TV and secure using interface screwsv IMPORTANT Ensure all brackets are securely fastened before moving on to the next step 1 4 Attach Vertical Bracket 06 01 05 UP ...

Page 9: ...9 STEP 2 Attach Post to Base 1 2 11 07 07 08 09 08 ...

Page 10: ...STEP 3 Attach TV to Post Highest Position Lowest Position 1 Highest TV Position Lowest TV Position Examples Determine the height from the base 08 that you would like your TV to hang 08 08 05 09 05 09 05 08 ...

Page 11: ...11 Hang the TV bracket assembly at your desired height onto the post 08 NOTE Leave enough space under your TV for any accessories that you may want to place on the shelf 2 08 05 ...

Page 12: ...V bracket assembly to post 08 with two lock screws 10 IMPORTANT Keep the base clear while installing TV IMPORTANT Ensure TV bracket assembly is securely fastened to post 08 before moving on to the next step 10 10 3 10 08 ...

Page 13: ...13 Cable Management 08 08 ...

Page 14: ...14 Adjustments 1 2 3 LEVEL TILT IMPORTANT DO NOT force the screw beyond its limit 2X 10 10 05 05 08 ...

Page 15: ...15 10 To Remove Your TV 2X SWIVEL 08 05 1 2 ...

Page 16: ...recto o el uso indebido ADVERTENCIA Si se supera el peso máximo admitido es probable que el usuario sufra lesiones o se dañe el equipo Es responsabilidad del instalador asegurarse de que el peso combinado de la pantalla más cualquier accesorio no supere los 56 6 kg 125 lb Si lo utiliza con televisores que sobrepasen este peso la inestabilidad podría hacer que el televisor vuelque y cause una lesió...

Page 17: ...e cualquier soporte de televisor antes de comenzar Posicione los soportes 01 sobre el patrón de orificios del televisor y verifique que estén centrados sobre el patrón de orificios y nivelados Fije los soportes 01 usando su conjunto de tornillo arandela dorsoplano o una selección de espaciador tornillo arandela dorsoredondeado espacioextra IMPORTANTE Asegúrese de que los soportes del televisor est...

Page 18: ...ponsabilité de l installateur de s assurer que le poids total de l écran et des accessoires ne dépasse pas 56 6 kg 125 lb L utilisation avec des téléviseurs plus lourds pourrait causer une instabilité et un basculement pouvant entraîner des blessures graves ou la mort AVERTISSEMENT N utilisez ce système de montage que pour l usage prévu conformément à ces instructions N utilisez pas d accessoires ...

Page 19: ...niveau et centrés Fixez le support de téléviseur 01 à l aide de votre sélection de vis rondelles téléviseurs à dos plat ou entretoises vis rondelles téléviseur à dos rond nécessitant un espace supplémentaire IMPORTANT Assurez vous que les pattes de fixation pour téléviseur sont correctement fixées avant de passer à l étape suivante 1 4 Fixez les pattes de fixation verticales ÉTAPE 1 Fixez les patt...

Page 20: ...es Bildschirms und des Zubehörs 56 6 kg 125 lbs nicht überschreitet Bei der Montage eines schwereren Fernsehers kann die Vorrichtung instabil werden und vornüberkippen was tödliche oder schwere Verletzungen zur Folge haben kann WARNUNG Verwenden Sie das Halterungssystem nur für den vorgesehenen in der Anleitung beschriebenen Zweck Verwenden Sie keine Zubehörteile die nicht vom Hersteller empfohlen...

Page 21: ... die Anschlussplatten gerade mittig auszurichten Befestigen Sie die Fernseher Anschlussplatten 01 mitder Schraube UnterlegscheibeIhrerWahl flacherRücken oderSchraube Unterlegscheibe Abstandhalter runderRücken extraAbstand WICHTIG Stellen Sie sicher dass die Anschlussplatten des Fernsehers gut gesichert sind bevor Sie mit dem nächsten Schritt fortfahren 1 4 Montieren der vertikalen Anschlussplatten...

Page 22: ... gewicht van het scherm en de accessoires niet hoger is dan 56 6 kg 125 lbs Het gebruik van zwaardere televisietoestellen kan leiden tot instabiliteit waardoor ze kunnen kantelen hetgeen kan leiden tot dodelijk of ernstig letsel WAARSCHUWING Gebruik het bevestigingssysteem alleen zoals beschreven in deze instructies Gebruik geen hulpstukken die niet worden aanbevolen door de fabrikant WAARSCHUWING...

Page 23: ... beugels 01 op het gatenpatroon zorg er daarbij voor dat de beugels gelijkmatig en recht liggen Bevestig de tv beugels 01 met de juiste schroeven ringen vlakke achterkant of schroeven ringen afstandhouders ronde achterkant extra ruimte BELANGRIJK Zorg ervoor dat de tv beugels stevig vastzitten voordat u doorgaat met de volgende stap 1 4 De verticale beugel bevestigen STAP 1 De tv beugels aan de tv...

Page 24: ...era att vikten på bildskärmen och tillbehör inte överskrider 56 6 kg 125 lb Användning med tyngre TV apparater kan leda till instabilitet som orsakar att TV n faller vilket kan leda till dödsfall eller allvarliga personskador VARNING Monteringssystemet ska endast användas enligt dessa anvisningar Använd ingen extrautrustning som inte rekommenderats av tillverkaren VARNING Dödsfall eller allvarliga...

Page 25: ...ästet 01 över TV hålmönstret se till att fästena är centrerade och ligger i våg Sätt fast TV fästena 01 med ditt val av skruv bricka plan baksida eller skruv bricka distansbricka rund baksida extra utrymme VIKTIGT Kontrollera att TV fästena är ordentligt fastsatta innan du går vidare till nästa steg 1 4 Montera vertikalt fäste Medföljande delar och monteringstillbehör sidan 4 STEG 1 Montera TV fäs...

Page 26: ... マーサービスにお問い合わせください 注意 負傷したり壁面を傷付けたりしないように注意してください 注意 メーカーは 不適切な組み立てや使用によって起きた破損または負傷に 対して責任を負いません 警告 耐荷重を超えると 重傷を負ったり 装置を破損する恐れがあります 設置者は ディスプレイとあらゆるアクセサリの総重量が 56 6 kg 125 ポンド を超えないことを確認する責任があります これ以上の重量があるテレビを使用すると 不安定になって倒れ 死亡事故や重傷が発生するおそれ があります 警告 本取扱説明書に記載されている用途以外に マウントシステムを使用しないでください メーカーが奨励していない付属品は使用しな いでください 警告 オーディオやビデオ機器の家具に子供が乗ると 死亡事故や重傷が発生するおそれがあります 家具の上にリモコンや玩具を置くと 子供がそれを取るために家具に乗る場合...

Page 27: ...取り付けられている場合は 手順を開始する前に取り外してください テレビブラケット 01 が中央かつ水平になるように テレビのマウントホールに配置します ネジおよびワッシャー 背面がフラットな 場合 またはネジ スペーサーお よびワッシャー 背面が曲面であるか余分なスペースが必要な場合 で テレビブラケット 01 を取り付けます 重要 次の手順に進む前に テレビブラケットが確実に取り付けられていることを確認します 1 4 垂直ブラケッ トを取り付ける 手順 1 テレビブラケッ トをテレビに取り付ける 6 ページ 日本語 垂直の高さ調節ブラケット 05 がテレビの中央にあることを確認します 垂直の高さ調節ブラケット 05 をインターフェイスネジ 06 で固定します 重要 次の手順に進む前に すべてのブラケットが確実に取り付けられていることを確認します ケーブルの整理 13ページ テレビの調整 ...

Page 28: ...免潜在人身伤害和财产损毁 注意 对因不当安装或不当使用而造成的损失或伤害 制造商不承担任何责任 警告 超过承重范围可能会造成严重的人身伤害或设备损坏 安装人员应负责确保显示器和任何附件的总重量不超过 56 6 kg 125 磅 与超过最大承重的电视机配合使用可能会导致电视机因不稳定而翻倒 进而造成死亡或重伤 警告 只能将此套支架用于这些说明所描述的目标用途 请勿使用非制造商建议的附件 警告 如果儿童攀爬音频和 或视频设备家具 可能会造成死亡或重伤 将遥控器或玩具放在家具上可能会促使儿童攀爬家具 进而导致家具翻倒在儿童身上 警告 如果将音频和 或视频设备重新放置在不是专门设计用来支持音频和 或视频设备的家具上 可能会因家具倒塌或翻倒在儿童身上而导致死亡或重伤 注 适用于 40 86 英寸的电视机 注 这个产品 不含用户可维修零件 尺寸 电视机接口 第 3 页 重要安全说明 使用本产品之前 请...

Page 29: ... 1 3 安装水平托架 重要事项 在开始之前 先移除所有已安装的电视支架 将电视机托架 01 放置在电视机螺孔上方 确保托架居中且水平 选择使用螺钉 垫圈 电视机后部平直 或螺钉 垫圈 隔圈 电视机后部呈圆弧状形状 需要额外空间 固定托架 01 重要事项 在执行下一步之前 请确保电视机托架牢牢紧固 1 4 安装垂直托架 步骤 1 将电视机托架安装到电视机上 第 6 页 中文 确保垂直高度调整托架 05 位于电视机的中心位置 用连接螺钉 06 将垂直高度调整托架 05 固定 重要事项 在执行下一步之前 请确保所有托架已牢牢紧固 线缆管理 第 13 页 电视机调节 第 14 页 拆下电视机 第 15 页 步骤 2 将支柱连接到底座 第 9 页 步骤 3 将电视机连接到支柱上 第 10 页 1 确定垂直高度调整托架的位置 2 确定您希望电视机离底座的具体高度 注意 若需在架板上放置附件 请预留足...

Page 30: ...ожет привести к тяжелым травмам или смерти ПРЕДУПРЕЖДЕНИЕ Используйте данную крепежную систему только по назначению в соответствии с предписаниями данной инструкции Запрещается использовать дополнительные приспособления не рекомендованные производителем ПРЕДУПРЕЖДЕНИЕ Не разрешайте детям залезать на подставку для аудио или видеооборудования это может привести к тяжелым травмам или смерти Размещени...

Page 31: ... схемы монтажных отверстий и убедитесь что кронштейны отцентрированы по вертикали и выровнены Закрепите кронштейны для крепления телевизора 01 с помощью выбранных винтов и шайб плоская задняя стенка или втулок винтов и шайб выпуклая задняя стенка или требуется дополнительное пространство ВАЖНО Передтемкакперейтикследующемушагу убедитесь чтотелевизионныекронштейнынадежнозакреплены 1 4 Прикрепите ве...

Page 32: ...e of this product The information contained in this document is subject to change without notice or obligation of any kind Legrand makes no representation of warranty expressed or implied regarding the information contained herein Legrand assumes no responsibility for accuracy completeness or sufficiency of the information contained in this document Thank you for choosing Sanus Please take a momen...

Reviews: