background image

25  


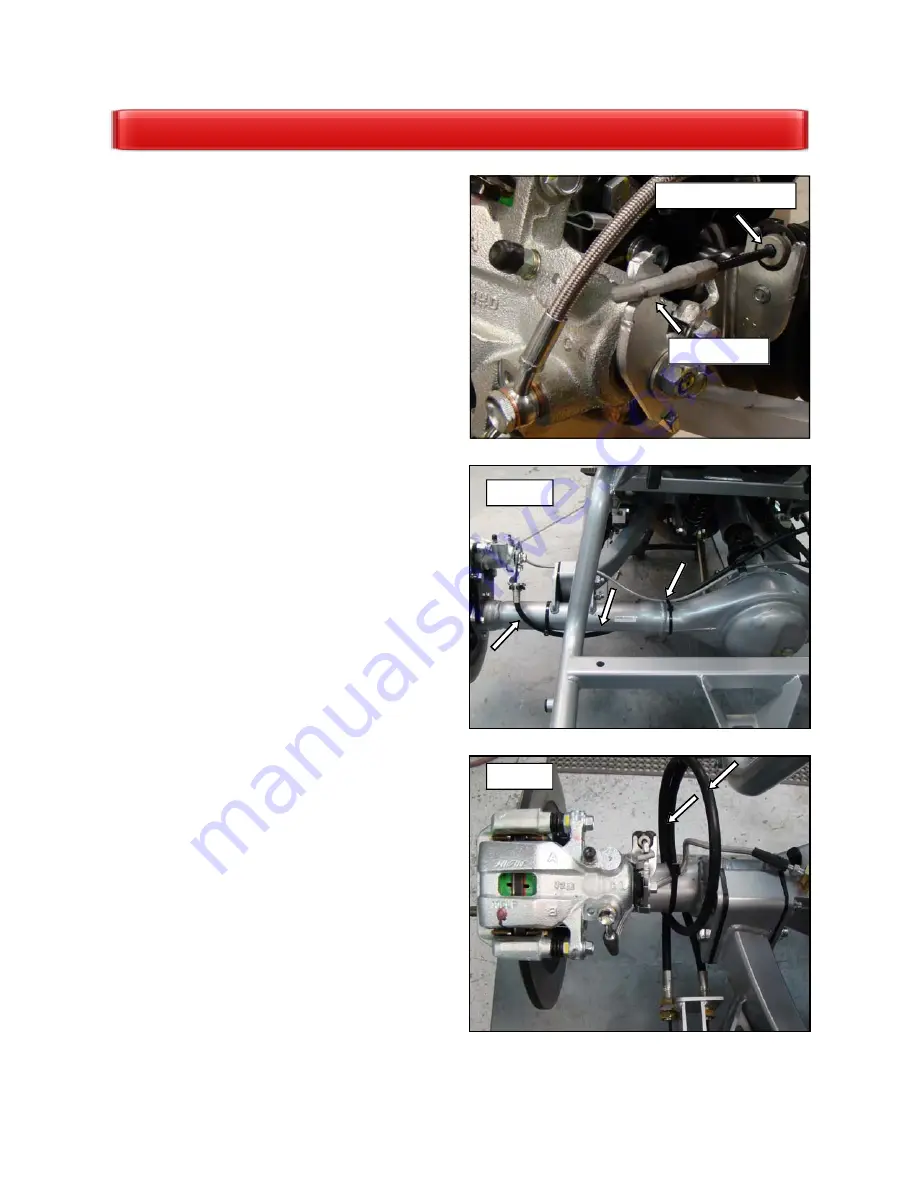
Park Brake Cables 


1. 

See Fig. 1. 

Install park brake cable to caliper 

brackets. Secure cable to bracket with cir-clip 

on cables.  

2. 

See Fig. 2

. Route LH cable around axle tube 

as shown towards RH side of trike. Secure to 

axle tube with cable ties as needed.  

3. 

See Fig. 3

. Route RH cable around axle tube 

as shown. Secure to LH cable with cable ties 

as needed.  


BRAKES 

Fig. 1 

Attach cable 

Secure to bracket 

Fig. 2 

Fig. 3 

LH side 

RH side 

Summary of Contents for Monarch II Honda GL1800

Page 1: ...2001 2010 Honda GL1800 Models Solid Axle Installation Instructions Oct 2014 125 Industrial Drive Spearfish SD 57783 Toll Free 888 3WHEELS w w w l e h m a n t r i k e s c o m ...

Page 2: ...rts and skill set to perform the installation safely and completely 2008 All rights reserved Lehman Trikes provides this publication as is without warranty of any kind either expressed or implied While every precaution has been taken in the preparation of this manual Lehman Trikes assumes no responsibility for errors or omissions Neither is any liability assumed for damages resulting from the use ...

Page 3: ...lved SAFETY ALERT WARNING indicates a potential hazard that may result in severe injury or death to the operator by stander or person s inspecting or servicing the vehicle WARNING Indicates a potential hazard that may result in minor per sonal injury or damage to the vehicle CAUTION CAUTION indicates special precautions that must be taken to avoid vehicle damage or property damage CAUTION NOTE pro...

Page 4: ...ION 21 BRAKE SYSTEM INSTALLATION 23 FRAME INSTALLATION 26 AMPLIFIER INSTALLATION 29 LATCH ASSEMBLY 30 TAILLIGHT MODIFICATION 32 BODY PREPARATION 33 DOOR SWITCH WIRING 34 DOOR INSTALLATION 35 BODY INSTALLATION 37 LICENSE PLATE BRACKET INSTALLATION 39 EXHAUST INSTALLATION 41 FINAL ASSEMBLY 43 TIRE PRESSURE MONITORING SYSTEM TPMS 44 ABS DISABLE 46 HARDWARE BREAKDOWN 47 CONTENTS ...

Page 5: ... hardware as tour box will be reinstalled on trike 8 Disconnect saddle bag latch cables from re lease levers inside tour box 9 Remove lights from tour box with an 8mm socket 10 Remove cable ties holding tour box harness to frame Remove connector holding harness to rear tab on tour box 11 Disconnect all wiring for tour box located under seat Make note of wiring locations as harness will need to be ...

Page 6: ... the following from the LH saddlebag only Latch assembly and mounting screws Door strikers and mounting screws Latch cable 19 Remove and save LH RH passenger foot boards and mounting hardware 20 See Fig 6 Remove and save rear frame covers Save front mounting bolts 2 only 21 See Fig 6 Remove and save swingarm pin covers and hardware 22 Remove and discard rear crash guards and hardware Fig 6 Fig 4 F...

Page 7: ...mplifier from rear fender NOTE Long bolts upper will be reused for brake line clamp installation and side stand switch disabling Short bolts lower will be used for amplifier installation on trike 27 See Fig 9 2006 MODELS Remove and save rear inner plastic fender mounting bolts 28 Remove rear wheel with 19mm socket Dis card wheel nuts 29 Remove battery and battery box to access re verse module Remo...

Page 8: ...dware 1 Original Upper Amp Mounting Bolt 1 Original Upper Saddlebag Washer 1 M6 Flange Lock Nut CN1902 Tour Box Frame Modification ALL MODELS 1 See Fig 1 Mark and cut tour box frame as shown with reciprocating saw or equivalent 2 Remove tour box frame from motorcycle frame And discard mounting hardware Use touchup paint on bottom of tour box frame where cuts were made Fig 10 Remove side stand Fig ...

Page 9: ...der Modification TRIMMING FENDER 2001 05 MODELS CAUTION Do not cut electrical components 1 See Fig 1 Mark and trim fender as shown 2 See Fig 2 Fender should look as shown when completed Fig 2 Fig 1 Cut here Cut here Modified fender ...

Page 10: ... 2 Trim here PREPARING THE MOTORCYCLE Fender Modification TRIMMING FENDER 2006 MODELS CAUTION Do not cut electrical components 3 See Fig 3 Mark and Cut amplifier box 1 in front of rubber cover 4 See Fig 4 Mark and cut front half of fender 5 1 2 from rear ...

Page 11: ...See Fig 1 Remove rear caliper mounting bolts with 14mm socket Free brake lines from final drive assembly clips 2 See Fig 2 Remove front and rear brackets holding brake lines to swingarm Save front mounting bracket 3 See Fig 3 Remove final drive assembly from swingarm using 17mm wrench 4 Remove driveshaft from swingarm tunnel Re move and discard rubber driveshaft boot PREPARING THE MOTORCYCLE Fig 3...

Page 12: ...et and 6 extension 7 See Fig 6 Remove rear linkage bolt with 17mm and 19mm sockets Remove front link age bolt from motorcycle frame using 19mm socket and 10mm Allen socket 8 See Fig 6 Remove lower shock bolt with 14mm and 17mm sockets 9 See Fig 6 Raise swingarm and remove swin garm linkage bolt with 19mm socket and 10mm Allen socket 10 Remove and save LH swingarm pin lock nut Remove LH and RH swin...

Page 13: ...spring 3 See Fig 2 Compress spring and remove re taining ring 4 Remove old spring and install new heavy duty spring 1 Heavy Duty Spring LS0625 5 Compress new spring with compression tool 6 Align orientation marks while compressing 7 Re install retaining ring and slide ring into groove 8 Tighten set screw Fig 1 Loosen set screw Orientation marks Fig 2 Retaining ring PREPARING THE MOTORCYCLE ...

Page 14: ...on the brake system will be modified Once modification is complete the rear brake pedal will maintain front and rear linked braking The front brake lever will operate the front brakes only The anti dive valve feature is maintained on both front and rear braking The diagrams below outline the difference between the original Honda GL1800 brake system and the modified Trikes brake system Fig 1 Fig 2 ...

Page 15: ...le ties secure discon nected brake line to top of crossbar on frame 5 Disconnect lower brake line from caliper 6 See Fig 3 Route brake line above plastic panel on RH side below shock compressor location 7 Drill 1 4 hole in plastic and mount brake line using the following hardware that was saved from disassembly 1 Original Front Brake Line Clamp 1 Original Upper Amplifier Mounting Bolt 1 Original S...

Page 16: ... line from block Remove block from frame and remove entire line from motorcycle 3 See Fig 3 Install new brake line between anti dive valve and master cylinder using OEM banjo bolts and the following hardware Torque banjo bolts to 18 ft lbs 1 Front brake line S002066 4 Copper Banjo Washers GC6002 PREPARING THE MOTORCYCLE Fig 1 Fig 2 Fig 3 Anti dive valve Master cylinder New line installed Remove lo...

Page 17: ...LP6000 1 PIN SWINGARM RH 3 LP6001 1 PIN SWINGARM LH SWINGARM INSTALLATION Swingarm Installation 1 See Fig 1 Place Lehman swingarm into motorcycle frame Make sure factory Honda shock is through center of swingarm during installation Shock will be mounted into place later ...

Page 18: ...ite 242 Torque pivot nut to 80 ft lbs using Honda pivot lock nut wrench 07ZMA MCA100 As torque on this wrench is multiplied set wrench to 72 ft lbs 7 Remove RH front chrome cover and attach rubber boot to transmission housing Reinstall swingarm pn covers with original hardware 8 See Fig 3 Install left and right swingarm stop blocks to motorcycle frame Apply Loctite 262 to left and right bump stop ...

Page 19: ... original hardware and torque lower shock bolt to 31 ft lbs and linkage bolts to 47 ft lbs 12 Reinstall shock compressor to original location on frame 13 Install urethane and steel bushings to ends of swingarm 4 Urethane Bushing LB6301 4 Steel Bushing LB6303 Fig 5 Fig 6 USE STOCK FASTENERS TO ATTACH SHOCK LINKAGE SPACER CW2150 PLACE WASHER UNDER NUT USE OEM FASTENERS TO ATTACH SHOCK SWINGARM INSTA...

Page 20: ...INSTALLATION Auxiliary Shock 1 See Fig s 7 8 Install lower end of auxiliary shock with shim and flange bushing as shown Apply a small amount of lube to bushing 1 5 8 Shim CS4030 1 Flanged Bushing LB6314 Bushing Flange on RH side ...

Page 21: ... Shaft LS6305 1 Set Screw CS3978 4 See Fig 3 Install collar and spring to OEM driveshaft as shown 1 Driveshaft Collar S002091 1 Driveshaft Spring S002201 5 Grease all internal splines on Honda motorcy cle yoke NOTE Ensure that centers of universal joints are aligned in phase as closely as possible centers may not line up exactly 6 See Fig 4 Assemble drive shaft as shown 7 Install drive shaft throu...

Page 22: ...n NOTE Do not torque differential mounting hardware until stabilizer and driveshaft have been properly adjusted 4 M12 x 100 Bolts CB1612 4 7 16 Flat Washers CW2022 4 M12 Lock Nuts CN1916 9 See Fig 6 Attach driveshaft to differential yoke using the following hardware Use Blue Loctite and Torque nuts to 18 ft lbs 1 U Bolt kit S002202 DIFFERENTIAL INSTALLATION Fig 5 Mount differential Fig 6 ...

Page 23: ... shock mount using the following hardware Install with head of bolt against rod end Use flat washer on nut side only Torque to 78 ft lbs 1 1 2 x 3 Bolt CB1425 1 1 2 Flat Washers CW2025 1 1 2 Lock Nut CN3060 13 See Fig 5 Center driveshaft in swingarm tunnel by rotating stabilizer bar left or right as needed Tighten front and rear jam nuts once driveshaft is centered 14 Tighten differential mounting...

Page 24: ...th rear pedal in the following order Refer to Honda service manual for further information Fig 2 LH front upper bleeder Fig 3 RH front lower bleeder Fig 4 LH front anti dive valve 6 Repeat bleeding on front and rear until all air is eliminated from brake system Verify rear brake pedal and front brake lever are firm and do not bottom out 7 Fill fluid reservoir and install cap NOTE New brake pads an...

Page 25: ...r clip on cables 2 See Fig 2 Route LH cable around axle tube as shown towards RH side of trike Secure to axle tube with cable ties as needed 3 See Fig 3 Route RH cable around axle tube as shown Secure to LH cable with cable ties as needed BRAKES Fig 1 Attach cable Secure to bracket Fig 2 Fig 3 LH side RH side ...

Page 26: ... Pin CC4017 6 See Fig 2 Attach park brake bracket LB6322 to swingarm using the following hardware Torque bolts to 36 ft lbs 2 M10 x 25 Flange Bolts CB1928 2 M10 Flange Nuts CN1910 7 See Fig 2 Route cables through holes in park brake bracket Secure to bracket with nuts and washers supplied with cables 8 See Fig 2 Install cables through cable pulling bracket with jam nut on each side of bracket 4 5 ...

Page 27: ...1920 3 See Fig 3 Install aux shock into upper shock mount While aligning holes insert upper aux shock bushing into shock mount and aux shock 1 Upper Shock Bushing LB6313 4 Apply red Loctite 262 to upper shock bolt with flange nut Torque bolt to 36 ft lbs 1 M10 x 1 5 x 45 Flange Bolt CB1935 1 M10 Flange Nut CN1910 Fig 1 Fig 2 Fig 3 Upper mounting bolts Upper shock bushing Lehman frame FRAME INSTALL...

Page 28: ...k M8 x 40 bolts Torque bolts to 18 ft lbs 2 M8 x 50 Flange Bolt CB1923 2 M8 Flange Nuts OEM 2 M8 x 40 Flange Bolts OEM 8 See Fig 4 Torque front frame mounting hard ware to 22 ft lbs Once front trike frame hard ware is secure remove upper tour pack frame hardware and remove tour pack frame from trike until after the body is installed 9 See Fig 6 Attach reverse resistor to frame on left side side us...

Page 29: ...ication before reinstalling 12 See Fig 8 Trim rear cover as needed for proper clearance around trike frame Reinstall frame covers with original hardware in front and cable tie in rear FRAME INSTALLATION Before Modification After Modification Fig 7 Fig 8 ...

Page 30: ...inside of frame tab RH bracket is mounted on outside of frame tab 3 See Fig 1 Mount amplifier box using the fol lowing hardware 2 Bolts From OEM Rear Fender Cover 2 5 16 Flat Washers CW2010 2 Nuts From OEM Heat Shield 4 See Fig 2 Drill 1 4 holes where plastic fender and amplifier box overlap Install with the fol lowing hardware 2 Bolts From OEM Amplifier Box Mount ing 2 Nuts From OEM Heat Shield 5...

Page 31: ... the following hardware 1 Latch Mount Bracket LB6302 1 Cable Bracket LB6320 4 OEM Phillips Screws From Saddle bag 6 See Fig 2 Install cable clip and cable to new extension 7 Test latches to verify they release at the same time Adjust rod length as needed Door may not release properly if latches do not release together 8 See Fig 2 Install cable clamp to safety re lease cable Loop cable through smal...

Page 32: ...6 Button Head Bolts CB1904 4 M6 Fender Washers CW2107 2 See Fig 2 Route latch cable through large hole in front trunk wall Secure grommet in hole 3 See Fig 2 Route safety release cable through small hole in front trunk wall 4 Apply silicone around safety release cable from inside trunk LATCH INSTALLATION Fig 1 Fig 2 Safety cable Latch cable ...

Page 33: ...w to retain metal adapter 4 See Fig 2 Insert short side of taillight adapter to each light using the following hardware 2 Taillight Adapter LP6301 2 1 4 SS Flat Washers CW2006 2 10 24 x 1 2 Phillips Screws CB1009 Rear Harness Modification 5 See Fig 3 Remove rubber grommet from center of LH RH saddle bag wiring harness NOTE Do not remove rear grommet from taillight pocket wiring 6 Remove excess ele...

Page 34: ... Seal CW2505 5 Install modified wiring harnesses to body Use harness with main red connectors on LH side and blue connectors on RH side NOTE Turn signal connectors are different be tween 2001 06 and 2007 10 models 6 See Fig 2 Install harness grommets through taillight pockets on each side 7 See Fig 3 Connect taillights to harness and carefully install into body using the following hardware 6 1 4 S...

Page 35: ...met GG0011 11 Install trunk switch harness through grommet Apply silicone around harness from inside trunk 1 Latch Wiring Harness GH0026 12 Install plastic connector onto terminals inside trunk 13 Plug harness into latch assembly 14 Apply silicone around harness and grommet from inside trunk BODY Fig 4 Grommet Door latch wiring ...

Page 36: ...iginal strikers and hard ware from LH saddlebag to top of trunk door 3 Verify hinges are in the middle of adjustment slots in trunk 4 See Fig 3 Before installing door check spac ing of door hinges for consistency from side to side If hinges are not equal loosen hardware on crossbar between hinges Twist bar until hinges are equal and tighten hardware DOOR INSTALLATION Fig 1 Fig 2 Fig 3 Consistent s...

Page 37: ...g 5 Lower door and check for consis tent spacing between door and body 8 Pull latch assembly towards rear of body and tighten hardware Align strikers from side to side to match opening on each latch 9 Latch door Verify that both side latch when closed Adjust latch assembly in or out as needed 10 See Fig 6 Door adjustment is made using the following Moving hinges upward in trunk results in the top ...

Page 38: ...on front and rear mounting holes 4 See Fig 1 Install side covers and adjust body to achieve a consistent 1 8 gap between the front of body and side cover 5 See Fig s 2 3 Align body to trike Center body by checking side to side wheel opening and front to back front of fender measure ments 6 Determine body height by measuring from in ner fender down to center of axle 7 Ensure gaps at side covers are...

Page 39: ...body using the following hardware Apply Loctite 242 and tighten hardware 1 LH Fender Brace LB6323 1 RH Fender Brace LB6324 2 M8 x 20 Flange Bolt CB1919 2 M8 Flange Nut CN1905 11 See Fig 5 Clamp other end of brace to Leh man frame and drill second mount hole in trike frame using an 11 32 drill bit Attach to trike frame using the following hardware Use 1 M8 x 1 25 x 20mm flange bolt and 1 M8x1 25 fl...

Page 40: ...ill 1 7 16 hole for license light wires centered between license plate bracket bolts and 3 from bottom of trunk opening Drill hole so it is toward top of bracket so it is un seen when plate is on Install grommet in body 1 Rubber Grommet GG0011 5 Attach license plate bracket to body using the following hardware 2 M6 x 25 Button Head Bolts CB1911 2 1 4 Flat Washers CW2006 2 M6 Flange Lock Nuts CN190...

Page 41: ...add 34 of wire Cover with heat shrink NOTE Connect license plate wiring as follows Black wire on light to green on harness Red wire on light to brown wire on harness 10 Run wire through body grommet from back side and install 2 male terminal pins and 1 female connector 11 See Fig 4 Connect wiring and install light as sembly to bracket using the following hard ware 2 M6 x 16 Button Head Bolts CB190...

Page 42: ...42 Fig 1 Honda Parts Fig 2 Exhaust Installation 1 See Fig s 1 2 Assemble exhaust components as shown EXHAUST CN1902 ...

Page 43: ...Adjust fit relative to body side to side About 1 of muffler should extend past rear of body 4 See Fig 4 Center exhaust tips in body cut outs Adjust to equal height 5 Tighten exhaust clamps and all mounting hard ware Fig 3 Fig 4 Exhaust tips centered in cut outs Attach Muffler EXHAUST ...

Page 44: ...ke har ness to motorcycle harness 8 Connect battery and check lights for proper operation 9 Tighten all tour box mounting hardware 10 See Fig 2 Route safety cable to front of tour box Install cable clamp and make small loop Crimp cable clamp and secure to front of tour box 1 Cable Clamp CC1900 11 Install seat and grab handles using original hardware 12 Install passenger footboards using original h...

Page 45: ...e tailed information 1 See Fig 1 Carefully remove RH trim 2 See Fig 2 Remove the RH fairing storage compartment 3 See Fig 3 Disconnect wire harness 4 Remove mounting bolts and remove module from bike TPMS DISABLE Fig 1 Remove screws Remove clips Remove faring trim Fig 2 Disconnect harness from control module Fig 3 ...

Page 46: ...low stripe and black wire with white stripe to solid green wire NOTE Splice wiring from connector side 6 Cover all exposed wires with heat shrink 7 Reconnect module Turn on ignition and verify TPMS light is not illuminated 8 Reinstall module storage compartment and fairing trim 9 Place TPMS disabled sticker inside tour box lid ...

Page 47: ...on black 5 pin connector so the unplugged end is facing you with 3 pin slots on the bottom 3 See Fig 1 Remove a small amount of plastic between bottom center and bottom right pin slots Remove only enough material to install a mini fuse 4 Install 5 amp mini fuse from fuse panel into bottom center and bottom right slots Verify that fuse connects yellow blue wire ABS light to larger green wire ground...

Page 48: ...ear tire pressure 26 psi 7 Front tire pressure 36 psi 8 Trunk latch on right handle of tour pack 9 Trunk clean and dry 10 Trunk door seals and operates smoothly 11 Honda shock set 13 12 Auxiliary shock set mid setting 13 Heat shields Side covers 14 Monarch II Lehman badge installed 15 Accessories if applicable 16 No paint defects 17 Warranty Owners manual with trike FINAL INSPECTION ...

Page 49: ...R 3 32 X 1 2 4 CN1902 NUT NL FG M6 1 ZN 3 CN1910 NUT FG M10 1 5 CL 8 8 ZN 4 CN1916 NUT NL M12 1 75 CL 10 9 ZN 4 CN3009 NUT 31 24 GR 8 ZN 1 CN3040 NUT NL 25 20 ZN 2 CN3060 NUT NL 50 13 ZN 1 CS4030 SPACER MACH BUSHING 5 8 X 1 1 8 4 CW2025 WSH FL 50 GR 8 4 CW2022 WSH FL 44 GR 8 ZN 5 CB1920 SCR FH M8 1 25 X 25 CL 8 8 ZN 2 CB6001 BANJO BOLT M10 X 1 1 CW2150 WSH FL M12 X 24 2 5 MM 2 CW2160 WSH FL 6 4 X ...

Page 50: ... 8 ZN 1 CN1908 NUT NL M8 1 25 CL 8 8 ZN 1 CN3068 NUT NL 10 32 2 CS4023 1 SCR PN PH 10 24 X 1 00 1 CS4066 SCR RD PH 10 32 X 0 50 2 CT1020 CABLE TIE 11 1 8 CW2006 WSH FL 25 SS 2 CW2010 WSH FL 31 X 1 50 X 25 RUBBER 8 CW2097 WSH 31 X 1 50 X 25 RB 18 CW2107 WSH FENDER 6 4MM X 24MM PLATED 4 CW2108 WSH 28 X 1 25 X 06 2 CW2154 WSH FL 6 4 X 18 X 1 8 ZN 2 CW2167 WSH FL M8 ZN 2 CW2505 SEAL 3 8 X 7 32 2 GG001...

Reviews: