background image

The Leica Academy

Not only do we provide top performing products of high quality from observa-
tion to playback. For many years we have been providing practical seminars and 
training courses at the Leica Academy as a special service. Here, a knowledge of 
the world of photography, projection and enlargement is brought home to both 

CFHJOOFSTBOEBEWBODFEQIPUPHSBQIZFOUIVTJBTUT$PVSTFDPOUFOUoEFMJWFSFE

by a trained team of experts in modern equipped classrooms located in the 

(FSNBOUPXOPG4PMNTBTXFMMBTUIF"MUFOCFSHFTUBUFOFBSCZoWBSJFTGSPN

general photography to interesting special fields, offering a wealth of suggestions, 
information and advice for practice. For more information and the current seminar 
programme, including photography trips, please contact:

Leica Camera AG 

Tel.: +49 (0) 6442-208-421

Leica Akademie 

Fax: +49 (0) 6442-208-425

Oskar-Barnack Str. 11 

la@leica-camera.com

D-35606 Solms, Germany

Leica on the Internet

For current information on products, innovation, events and the Leica corpora-
tion, log on to our homepage at: 

http://www.leica-camera.us
http://www.leica-camera.co.uk

Leica Information Service

The Leica Information Service will answer questions relating to use of the  
Leica range post, telephone or e-mail:

Leica Camera AG 

Tel.: +49 (0) 6442-208-111

Informations-Service 

Fax: +49 (0) 6442-208-339

Postfach 1180 

info@leica-camera.com

D-35599 Solms, Germany

Leica Customer Service

Leica Camera AG Customer service for servicing your Leica equipment as well as 
damage repair is at your disposal (see warranty card for address list).

Leica Camera AG 

Tel.: +49 (0) 6442-208-189

Customer Service 

Fax: +49 (0) 6442-208-339

Solmser Gewerbepark 8 

customer.service@leica-camera.com

D-35606 Solms, Germany

Leica service addresses

74

Summary of Contents for C-LUX 3

Page 1: ...LEICA C LUX 3 Instructions ...

Page 2: ...ying back pictures and motion pictures 44 Deleting files 45 Connecting to a computer 54 Connecting to a TV 56 Connecting to a printer 58 Message displays 60 Correcting faults Troubleshooting 61 Index 65 Functions that cannot be combined 66 Technical specifications 71 Leica service addresses 74 Dear Customer May we take the opportunity of thanking you for having purchased this LEICA C LUX 3 Please re...
Page 3: ...PS BO FYQFSJFODFE SBEJP 57 UFDIOJDJBO GPS IFMQ FCC Caution To assure continued compliance follow the attached installation instructions and use only shielded interface cables with ferrite core when connect ing to computer or peripheral devices Any changes or modifications not expressly approved by the party responsible for compliance could void the user s authority to operate this equipment THE FOL...

Page 4: ... CUT OFF PLUG IS IN SERTED INTO ANY 13 AMPERE SOCKET If a new plug is to be fitted please observe the wiring code as stated below If in any doubt please consult a qualified electrician IMPORTANT The wires in this mains lead are coloured in accordance with the following code Blue Neutral Brown Live As these colours may not correspond with the coloured markings identifying the terminals in your plug p...

Page 5: ...evice Camera t PVS 69 IBT B WBMVBCMF IJHI HMPTT MBDRVFS mOJTI O PSEFS UP QSF serve this immaculate surface permanently you should make sure the camera does not come in contact with any hard abrasive objects whatsoever t BOEMF UIF DBNFSB XJUI DBSF t P OPU TIBLF PS LOPDL UIF DBNFSB BT UIF MFOT PS UIF NPOJUPS NBZ CF damaged t P OPU UPVDI UIF MFOT PS TPDLFUT XJUI EJSUZ IBOET t 1SPUFDU UIF DBNFSB GSPN ...

Page 6: ...Z BOE NFNPSZ DBSE GSPN DBNFSB t P OPU TUPSF CBUUFSZ JO DBNFSB XIJMF GVMMZ DIBSHFE BT JU XJMM EFDIBSHF BOE loose its capacity t IBSHF JU BU MFBTU PODF B ZFBS t 4UPSF DBNFSB XJUI B ESZJOH BHFOU EFIVNJEJGZJOH BHFOU TJMJDB HFM PCUBJOBCMF from specialist retailers Memory cards t P OPU FYQPTF DBSET UP IJHI UFNQFSBUVSFT EJSFDU TVOMJHIU FMFDUSPNBHOFUJD radiation or place where static electricity is genera...

Page 7: ...lways remove battery from device before cleaning or disconnect the the power plug from the outlet Fault and interfer ence prevention t FFQ UIF DBNFSB BT GBS BXBZ BT QPTTJCMF GSPN FMFDUSP magnetic equipment such as Televisions Microwave ovens Video games Radio transmitters High voltage lines etc These components may disrupt and or negatively affect the camera s pictures and sound Data loss damaged ...

Page 8: ...TDPOOFDU NBJOT DBCMF GSPN NBJOT UP TUPQ power consumption completely t FFQ UIF DPOUBDUT PG UIF DIBSHFS VOJU BOE CBUUFSZ DMFBO Rechargeable lithium ion battery Power generation is based on the chemical reaction in the interior of the cell This reaction is affected by ambient tem perature and humidity Too high or too low a tempera ture will shorten service life of the battery Battery Charger unit Qu...

Page 9: ... Strap eyelet AV out USB DC in Self timer indicator Cursor up exposure compensation Bracketing button Cursor right Flash setting button Cursor down Macro mode MENU SET button Release lever Display button Cursor left Self timer button Mode switch Still picture recording Motion picture mode for movie recording Record mode Playback mode Comp out Names of the components 10 ...

Page 10: ...l date 17 Power LCD mode 4 Colour mode 11 Elapsed rec time 18 Intelligent exposure 5 Picutre mode 12 Age Location 19 Continuous mode 6 Available rec time 13 Min shutter speed 20 Quick AF 7 Spot AF area 14 Self timer mode 21 Travel day 1 Playback mode 8 Folder File number 15 Rec date time dest 2 Protected picture 9 Pic No Total pictures 16 Aperture shutter speed 3 Favorites 10 Motion pic rec time 1...

Page 11: ... TRAVEL DATE and or AGE is set the number of days passed since the travel date birthday During slide shows In recording mode In playback mode The histogram displays the brightness The guide lines help to align the subject Normal brightness The monitor becomes easier to see brighter e g for outdoors Automatic brightness Press Q MENU About the LCD monitor 12 ...

Page 12: ... A histogram is a graph that displays brightness along the horizontal axis black to white and the number of pixels at each brightness level on the vertical axis It allows you to easily check a picture s exposure Examples of histogram Dark mid tone and bright areas are bal anced out evenly mak ing it suitable to take a picture Properly Exposed The picture will become overexposed with more bright ar...

Page 13: ...VJMU JO NFNPSZ XIFO you are not using a card t 4 FNPSZ BSE 4 FNPSZ BSE BOE VMUJ FEJB BSE BSF JOEJDBUFE BT card in the manual 1 2 3 One item only depending on the specified country Using for the first time Article Type Art No AC Adaptor USA ACA DC4 US 18 641 UK HK 6 18 643 AUS ACA DC4 AUS 18 649 Mains Lead UK HK UK 423 068 801 020 US US 423 068 801 021 AUS AUS 423 068 801 023 Component Cable CV1 18 6...

Page 14: ...f the optional AC adaptor is at tached t 5IF HSFFO JOEJDBUPS nBTIFT when the battery tempera ture is too high longer charging time Charge until green indicator turns off after about 120 min Detach the battery Detach the battery Charging the battery Connect adapter if outside USA Battery life according to CIPA standard 280 Recordable pictures Insert the battery Ensure battery is insert ed correctly...

Page 15: ... CF SFDPSEFE PO UIF DBSE BOE played back t When using the built in memory access indication t 8IFO VTJOH UIF DBSE access indication t BSE JT PQUJPOBM t FWFS UPVDI UIF DPOOFD tion terminals of the card To remove the card press until it clicks Pull the card out upright t 5IF EBUB PO UIF CVJMU JO memory or the card may be damaged or lost due to electromagnetic radiation static electricity or failure ...

Page 16: ...d then press MENU SET 04 Press to select DESTINATION and then press MENU SET to set 05 Press to select the destination area and then press MENU SET to set 06 Press MENU SET to close the menu If daylight saving time is used press The time advances by one hour Press again to return to the original time The travel destination icon appears when playing back pictures taken at the travel destination Set...

Page 17: ...a subject please see page 30 Press for to set the Select a mode Set the flash to match the situation Set flash or proceed with step 5 For more information on the flash please see page 32 2 4 Snapshot mode Select mode Aim the AF area at your main subject Switch camera ON set mode Select mode The status indicator lights up for about 1 sec Set ON OFF switch to ON mode switch to and mode dial to PME UIF ...

Page 18: ...d settings t G POF PG UIF QPSUSBJU TDFOFT JT EFUFDUFE UIF DBNFSB XJMM BVUPNBUJDBMMZ EFUFDU UIF QFSTPOT GBDF BOE XJMM BEKVTU UIF GPDVT BOE FYQPTVSF 6OEFS CBDLMJHIU DPOEJUJPOT UIF FYQPTVSF JT BVUPNBUJDBMMZ DPSSFDUFE TP UIBU UIF CSJHIUOFTT PG the faces will be optimal t 5P UBLF QJDUVSFT PG BO PUIFS TQFDJmD UZQF PG TDFOF JU JT SFDPNNFOEFE UP UBLF pictures in the appropriate scene mode See mode on page...

Page 19: ... the shutter button is pressed For more information on camera shake please see page 42 Select mode The status indicator lights up for about 1 sec Set ON OFF switch to ON mode switch to and mode dial to 1 Switch camera ON set mode Press for to set the Select a mode Set the flash to match the situation Set flash or proceed with step 4 3 For more information on the flash please see page 32 Select mode P...

Page 20: ...U TFUUJOHT QBHF BOE PO UIF 2 6 QBHF Focus on subject press shutter button halfway Depending on the setting pictures taken vertically are shown rotated Use a tripod if the shake alert appears When pressing the shutter but ton the monitor may become bright or dark Take the picture 6 Press shutter button fully The picture is shown for a short time View picture 21 ...

Page 21: ... focus a subject please see page 30 For more information on the different AF settings please see page 39 Focus on subject press shutter button halfway Select mode The status indicator lights up for about 1 sec 1 Switch camera ON set mode Select desired scene PME UIF DBNFSB mSNMZ with both hands Press MENU SET and select a scene in menu aim the camera at your subject 2 Aim the AF area at your main ...

Page 22: ...feet PV DBO UBLF B QJDUVSF PG ZPVSTFMG XJUI BVEJP G ZPV EP UIJT UIF TFMG UJNFS indicator will light up while recording the audio 5IF PPN NBHOJmDBUJPO JT BVUPNBUJDBMMZ NPWFE UP 8JEF W The self timer can only be set to off or 2 seconds If it is set to 2 seconds this setting will remain until the camera is turned off the scene mode is changed PS 3 NPEF PS 1 NPEF JT TFMFDUFE 5IF TUBCJMJ FS GVODUJPO NP...

Page 23: ...PS UBLJOH QJDUVSFT FYQSFTTJOH UIF BUNPTQIFSF PG UIF DBO dle lit subject Be sure to use a tripod and self timer CANDLE LIGHT This is more effective when taking pictures without using the flash 5IF GPDVT SBOHF CFDPNFT UIF TBNF BT NBDSP NPEF BDSP 5 cm 0 17 feet Wide W 50 cm 1 64 feet Tele T to 5IF JOJUJBM TFUUJOH GPS 0 JT 1PSUSBJU XJUI OJHIU TDFOFSZ PME UIF DBNFSB mSNMZ BOE UIF subject should keep sti...

Page 24: ... or name will not be displayed G UIF DBNFSB JT UVSOFE PO XJUI TFU UIF BHF BOE OBNF BSF displayed at the lower left of the screen for about 5 seconds along with the current date and time If the age is not properly displayed check the clock and birthday settings The birthday setting and name setting can be reset with RESET 5IF GPDVT SBOHF CFDPNFT UIF TBNF BT NBDSP NPEF BDSP 5 cm 0 17 feet Wide W 50 ...

Page 25: ...to 5IF GPDVT PPN FYQPTVSF TIVUUFS TQFFE 40 TFOTJUJWJUZ BOE nBTI MFWFM BSF mYFE UP UIF TFUUJOHT GPS UIF mSTU QJDUVSF The ISO sensitivity automatically switches between ISO 100 and ISO 3200 The continuous mode shooting allows you to capture a crucial moment by shooting pictures continuously HI SPEED BURST 1 Press to select aspect ratio and resolution and then press MENU SET 2 Take pictures Pictures ...

Page 26: ...the terminals Problems caused by sand or seawater are not covered by the product war ranty For taking pictures through an aeroplane window Please turn off the camera when taking off or landing AERIAL PHOTO We recommend using this technique if it is difficult to focus when taking pic tures of clouds etc Aim the camera at something with high contrast press the TIVUUFS CVUUPO IBMGXBZ UP mY UIF GPDVT B...

Page 27: ...JPO 1 3 PME UIF DBNFSB mSNMZ with both hands Select mode Select mode and aim the camera at your subject Aim the AF area at your main subject Select aspect ratio and quality or pro ceed with step 4 2 1 Press MENU SET to open the menu 2 Press to choose ASPECT RATIO 3 Press and choose or by pressing 4 Confirm by pressing MENU SET 5 Press to choose PICTURE MODE 6 Press and choose Quality by pressing 7 ...

Page 28: ... work frame by frame if movie is paused The volume level can be lowered 5 or increased 6 VTJOH UIF PPN MFWFS Movie control Volume control 1 Switch ON Set mode The status indicator lights up for about 1 sec Watch recorded movie Set mode and switch camera ON Press to select movie Press for play back 2VJDL5JNF JT BWBJMBCMF BU www apple com quicktime download Select movie 2 The available recording tim...

Page 29: ...amera shake occurs Photographing a subject outside the auto focus area Retry the actions in step 1 until you are satisfied with the result before pressing the shutter button fully Press to select macro mode Take pictures of subjects as close as 5 cm Makro mode BDSP NPEF DBO POMZ CF set in and mode manually Use a tripod and the self timer in macro mode Focus priority is to sub jects near the camera ...

Page 30: ... in the REC menu to adjust white balance manually White balance Select WB ADJUST Adjust white balance Press repeatedly Press repeatedly PV DBO DIPPTF UIF GPMMPXJOH white balance settings Automatic adjustment Outdoors clear sky Outdoors cloudy sky Outdoors in the shade Incandescent light Value set using Set manually 1 Select and then press MENU SET 2 Aim the camera at a sheet of white paper The fra...

Page 31: ...2 5m 1m 3 6m Tele T Flash is fired automatically when the re cording conditions make it necessary AUTO 1 30 to 1 2000 Use this when you take pictures of people in low light conditions AUTO Red eye reduction 1 30 to 1 2000 Permanently on Use this when your sub ject is back lit or under fluorescent light Forced ON 1 30 to 1 2000 Red eye reduction only in mode 1 35 5 Forced ON Red eye reduction 1 30 to...

Page 32: ...con blinks red and you cannot take a picture When AUTO LCD OFF is set the LCD monitor turns off and the status indicator lights The white balance may not be properly adjusted if the flash level is insufficient for the subject When the shutter speed is fast the flash effect may not be sufficient It may take time to charge the flash if you repeat taking a picture Take a picture after the access indicatio...

Page 33: ...SHUTTER TONE Choose desired shutter tone BEEP OFF MONITOR Adjust the brightness of the LCD display in 7 steps WORLD TIME Destination Home Set the time in your home area and travel destination CLOCK SET Changing the date and time TRAVEL SETUP Set the departure and return date of your travel LOCATION EE MPDBUJPO JOGPSNBUJPO CZ FOUFSJOH UFYU TRAVEL DATE TRAVEL SETUP LOCATION OFF SET OFF SET The SETUP...

Page 34: ...he recorded picture is shown until any button is pressed ZOOM 5IF QJDUVSF JT EJTQMBZFE GPS TFDPOE BOE UIFO FOMBSHFE Y and displayed for 1 more second NO RESET Reset the file and or folder number to 0001 A number between 100 and 999 can be assigned When the folder number reaches 999 the number cannot be reset We recommend formatting the card after saving the data on a PC or elsewhere To reset the fo...

Page 35: ...n the camera off during formatting If a card has been inserted only the card is formatted To format the built in memory remove the card If the card has been formatted on a PC or other equipment format it on the camera again It may take longer to format the built in memory than the card If the built in memory or the card cannot be formatted consult your nearest Service Centre USB MODE Set how to tr...

Page 36: ... FYUFOEFE PQUJDBM PPN EPFT OPU XPSL JO 53 4 03 4 4 41 6345 4 6345 1 0 PS GRAIN in mode so the resolution for is not displayed JT BO BCCSFWJBUJPO PG A YUFOEFE PQUJDBM PPN Pictures may appear mosaic depending on the subject and the recording conditions PICTURE MODE 4FU UIF OVNCFS PG QJYFMT 5IF IJHIFS UIF OVNCFST UIF mOFS UIF EFUBJM of the movie will appear when they are played back Accessible in mot...

Page 37: ...O QSFTT 6 SET 2 Aim the camera at a sheet of white paper The frame in the centre must be filled with white paper and press 6 4 5 3 Select and press the shutter CVUUPO UP FYJU NFOV Switch off in the REC menu to adjust white balance manually Select WB ADJUST Adjust white balance Press repeatedly Press repeatedly ASPECT RATIO This allows you to select the aspect ratio of the pictures to suit printing ...

Page 38: ...is at an angle 8IFO UIF GBDF JT FYUSFNFMZ CSJHIU PS EBSL When there is little contrast on the faces When the facial features are hidden behind sunglasses etc When the face appears small on the screen When there is rapid movement When the subject is other than a human being When the camera is shaking 8IFO EJHJUBM PPN JT VTFE 2 PV DBO GPDVT PO UIF TVCKFDU NPSF RVJDLMZ UIBO JO PUIFS NPEFT 2 The pictu...

Page 39: ...FUXFFO UIF MJHIU BOE TIBEF JU NBZ UBLF UJNF VOUJM UIF FYQPTVSF JT TUBCMF G DPOUJOVPVT JT VTFE BU UIJT UJNF UIF FYQPTVSF NBZ OPU become optimal The frequency pic sec may become slower depending on the recording environment such as in dark places if the ISO sensitivity is high etc Continuous mode is not cancelled when the camera is switched off If you take pictures in continuous mode with the built ...

Page 40: ...EFE PQUJDBM PPN Extended optical zoom mechanism 5P VTF UIF FYUFOEFE PQUJDBM PPN NFDIBOJTN GPS FYBNQMF TFU UIF resolution to NJMMJPO QJYFMT 5IF NJMMJPO QJYFM BSFB JT DSPQQFE UP UIF DFOUSF NJMMJPO QJYFM BSFB BMMPXJOH B QJDUVSF XJUI B IJHIFS PPN FGGFDU XJUIPVU MPTT PG RVBMJUZ JHJUBM PPN DBOOPU CF TFU JO mode 5IF PO TDSFFO PPN JOEJDBUJPO NBZ NPNFOUBSJMZ TUPQ PV DBO FOUFS UIF EJHJUBM PPN SBOHF CZ DPOUJ...

Page 41: ...4 1 2 1 PV DBO UBLF B CSJHIU QJDUVSF JO EBSL QMBDFT CZ TFUUJOH 4 53 SPEED slower Also you can set it faster to reduce the blur Min shutter speed setting 1 250 1 Brightness Darker Brighter Camera shake Less PSF This should usually be set to 1 8 to take pictures When you select a different minimum shutter speed appears on the screen 4FUUJOH 4 53 41 UP GBTUFS TQFFE NJHIU NBLF UIF QJDUVSF EBSLFS G DPS...

Page 42: ... the current recording mode Select setting Confirm For further information on any of these settings please see the corresponding JUFN JO FJUIFS UIF 4 561 PS 3 FOV Snapshot mode 53 0 BURST PICTURE SIZE Program mode 45 3 0 BURST 0 8 5 4 4 5 7 5 I EXPOSURE PICTURE SIZE Scene mode 45 3 0 BURST 0 8 5 PICTURE SIZE Motion picture mode 45 3 0 0 8 5 1 563 0 REC MENU SETUP MENU The QUICK menu 43 ...

Page 43: ...ssible enlarging factors Y Y Y Y Y Press to move the position For different playback modes please see PLAYBACK MODE on page 52 Playing back motion pictures 2VJDL5JNF JT BWBJMBCMF BU www apple com quicktime download Press to select motion picture Press for playback While playing back movies you can Play Pause 1 Stop 2 Fast Rewind 3 Fast Forward 4 them by pressing the respective button 3 4 work fram...

Page 44: ... picture from 2 Select frame by frame by pressing or press MENU SET to view the 9 frames playback screen Press to advance 3 frames Press to advance 1 frames 5VSO UIF PPN MFWFS UPXBSET XJEF W to change the fps setting 5P FOE GSBNFT QMBZCBDL TDSFFO QSFTT 6 4 5 3 Press the shutter button 4 Press and confirm saving with MENU SET 30 15 10 5 fps 10 5 fps Do not turn the camera off while deleting while is...

Page 45: ...he same recording date the first picture recorded on that day is displayed G ZPV UBLF QJDUVSFT BGUFS TFUUJOH UIF USBWFM EFTUJOBUJPO JO 803 5 the pictures are displayed by the dates at the travel destination 1 Enter TITLE EDIT by pressing 2 Select SINGLE or MULTI by pressing and press MENU SET 3 In SINGLE mode select picture by press ing and confirm with MENU SET In MULTI mode select pictures by pres...

Page 46: ...nd day are stamped WITHTIME Year month day and time are stamped AGE If set the age is stamped TRAVEL DATE If set the travel date is stamped TITLE Stamps text from BABY1 2 PET or TITLE EDIT RESIZE SINGLE MULTI Reduce the resolution of a picture The final resolution depends on the aspect ratio setting Not for movies protected pictures 1 Enter RESIZE by pressing 2 Select SINGLE or MULTI by pressing an...

Page 47: ...y pressing 2 Select or aspect ratio by pressing 3 Select a picture by pressing and confirm with MENU SET 4 Press to select the horizontal position and press MENU SET to confirm conversion 5 Press and confirm saving with MENU SET 6 Press to return to the PLAYBACK menu After converting the aspect ratio the resolution may become larger Converting pictures recorded with other equipment might be impossibl...

Page 48: ...elect ON by pressing and press MENU SET 3 Press MENU SET again to exit the PLAYBACK menu 4 Select a picture by pressing and mark it favourite by pressing To unmark it press again 5 Continue editing from step 4 How to cancel all your FAVORITE settings 1 Enter FAVORITE by pressing 2 Select CANCEL by pressing and press MENU SET 3 Press and confirm canceling with MENU SET 4 Press MENU SET again to exit...

Page 49: ...r press to return to the PLAY BACK menu How to cancel all your PROTECT settings 1 Enter PROTECT by pressing 2 Select CANCEL by pressing and press MENU SET 3 Press and confirm canceling with MENU SET 4 Press MENU SET again to exit the PLAYBACK menu Even if you protect pictures in the built in memory or a card they will be deleted if the built in memory or the card is formatted WFO JG ZPV EP OPU QSPU...

Page 50: ...r file number as the picture to be copied in the copy destination a new folder is created and the picture is copied When JT TFMFDUFE BOE B QJDUVSF FYJTUT XJUI UIF TBNF OBNF GPMEFS number file number as the picture to be copied in the copy destination that picture is not copied It may take time to copy the picture data 0OMZ QJDUVSFT SFDPSEFE XJUI B FJDB EJHJUBM DBNFSB XJMM CF DPQJFE PV may not be abl...

Page 51: ...pictures 1 Enter SLIDE SHOW by pressing MENU SET 2 Select a playback method by pressing ALL Plays all the recorded pictures 5 03 4 5 0 1MBZT QJDUVSFT recorded in a special category Categories you have pictures in are displayed darker After a while the number of pictures in the selected category is displayed besides COUNT FAVORITE Plays all the recorded pictures marked as favourite 3 Press MENU SET...

Page 52: ... built in memory If you press while searching the searching will be cancelled Pictures are sorted into the categories shown below 10353 5 40 5 4 53 4 03 4 10353 5 5 10353 5 4 3 46 4 5 3 1 050 5 10353 5 5 4 3 45 33 4 410354 1 35 5 3 803 4 4 08 3 1 050 PET FOOD TRAVEL DATE 05 0 1 563 4UJMM QJDUVSFT BSF OPU EJTQMBZFE 1 Select picture by pressing Playback motion pictures or audio if available by press...

Page 53: ...OZ PUIFS 64 DPOOFDUJPO DBCMF FYDFQU UIF POF TVQQMJFE t FGPSF JOTFSUJOH PS SFNPWJOH B DBSE UVSO UIF DBNFSB PGG BOE EJTDPOOFDU the USB connection cable Otherwise data may be destroyed PV DBO VTF UIF QQMF A2VJDL5JNF TPGU ware which can be downloaded for free http www apple com quicktime download This software is installed as standard on BO QQMF BDJOUPTI DPNQVUFS Working with data on the Computer 2 Mo...

Page 54: ...onnected Do not rotate the mode dial while the camera is connected Pictures edited or rotated with a compu ter may be displayed in black in certain playback modes Read the instructions of your computer If the remaining battery power becomes low while the camera and the computer are communicating the status indica tor blinks and the alarm beeps Stop the communication at once on the computer Otherwi...

Page 55: ...ing instructions for the TV When you play back a picture vertically it may be blurry Even if you set VIDEO OUT to PAL the output signal will still be NTSC in the recording mode Disconnect camera from the TV 3 Switch off camera and TV and disconnect cables Insert the AV plugs straight in or straight out to avoid damaging the terminals Remove the card if you want to playback from the built in memory...

Page 56: ...output is set to PAL system Set the required video output settings in the SETUP menu Connect AV cable to the AV OUT DIGITAL socket on the camera Switch ON Choose desired playback method See page 52 Follow the on screen information Switch ON select external input Connect compo nent cable to the COMPONENT OUT socket on the camera Switch ON Switch ON select external input Follow the on screen informa...

Page 57: ...DBSE UVSO UIF DBNFSB PGG BOE EJTDPOOFDU the USB connection cable Otherwise data may be destroyed PV DBOOPU TXJUDI CFUXFFO UIF CVJMU JO NFNPSZ BOE UIF DBSE XIJMF UIF DBNFSB is connected to the printer Disconnect the USB connection cable insert or re move the card and then connect the USB connection cable to the printer again Do not rotate the mode dial while the camera is connected Read the instruc...

Page 58: ...t USB cable to the camera If you have not set PictBridge connec tion by default in the SETUP USB 0 NFOV QSFTT to select 1JDU SJEHF BOE QSFTT 6 4 5 Switch ON and connect USB cable to the printer Follow the on screen information Printer settings priorized 1 picture per page no frame 1 picture per page with frame 2 pictures per page 4 pictures per page Printer settings priorized L 3 5 x 5 89 x 127 mm...

Page 59: ...n be copied to the card until the card is full SOME PICTURES CANNOT BE COPIED COPY COULD NOT BE COMPLETED mMF GSPN UIF DBSE JT DPQJFE UP UIF CVJMU JO NFNPSZ XJUI B OBNF BMSFBEZ FYJTU ing The file s is not based on the DCF standard PSFPWFS QJDUVSFT SFDPSEFE PS FEJUFE CZ PUIFS FRVJQNFOU NBZ OPU CF DPQJFE BUILT IN MEMORY ERROR FORMAT BUILT IN MEMORY If you have formatted the built in memory on a compu...

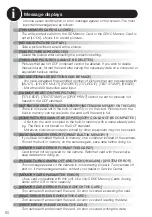
Page 60: ...DBSE PS CVJMU JO NFNPSZ Recording MOTION RECORDING WAS CANCELLED DUE TO THE LIMITATION OF 8IFO ZPV TFU QJDUVSF RVBMJUZ UP QGT 7 QGT PS QGT 87 XF SF DPNNFOE VTJOH B A T 4 FNPSZ BSE PS IJHIFS FQFOEJOH PO UIF UZQF PG UIF 4 FNPSZ BSE UIF SFDPSEJOH QSPDFTT DPVME PUIFSXJTF CF JOUFSSVQUFE A FOLDER CANNOT BE CREATED A folder cannot be created as no more memory numbers are available Format UIF DBNFSB BGUFS...

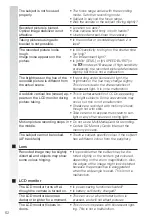
Page 61: ... different from the actual scene t G SFDPSEJOH VOEFS nVPSFTDFOU MJHIU UIF brightness or the hue may change slightly This occurs due to the characteristics of fluorescent light It is not a malfunction A reddish vertical line smear ap pears on the LCD monitor during picture taking t 5IJT JT B DIBSBDUFSJTUJD PG T BQQFBSJOH on bright subjects Some unevenness may occur but this is not a malfunction t 4U...

Page 62: ...t played back t BT 5 03 1 PS 703 5 1 CFFO TFU GPS QMBZCBDL IBOHF UP 03 1 The picture being played back is rotated and displayed in an unexpected direction t 305 5 41 JT TFU UP 0 t PV DBO SPUBUF QJDUVSFT XJUI UIF 305 5 function In calendar view pictures are displayed with a different date as they have been taken t T DBNFSB DMPDL TFU QSPQFSMZ t 8BT QJDUVSF FEJUFE PO B DPNQVUFS t T QJDUVSF GSPN BOPUI...

Page 63: ... BODFM UIF QSJOUFS T CPSEFSMFTT QSJOU PS trimming functions File numbers are recorded in ascending order t 4BWFE GPMEFS OVNCFST BSF MPTU JG UIF CBUUFSZ JT removed inserted whilst camera is switched on AGE is not displayed correctly t IFDL UIF DMPDL BOE CJSUIEBZ TFUUJOHT The picture is not displayed fully on the TV t IFDL UIF 57 41 5 TFUUJOH The card built in memory is not recognized by the compute...

Page 64: ...guage 36 64 Leveling 48 LCD Mode 12 34 LCD Monitor 6 8 11 12 M Macro Mode 30 Minimum Shutter Speed 42 Monitor 34 Motion Picture Mode 28 Motion Picture Playback 29 44 N No Reset 35 Normal Play 44 52 Number of Recordable Pictures 68 O Optical Image Stabilizer 42 Optical Zoom 41 P PC 54 PictBridge 36 58 Picture Mode 37 Picture Size 37 Playing Back Motion Pictures 29 44 Playing Back Pictures 44 Printi...

Page 65: ... t mode Extended Optical Zoom t and in mode t mode DIGITAL ZOOM t and in mode t 8IFO OUFMMJHFOU 40 JT TFU HISTOGRAM t mode t VSJOH NVMUJ QMBZCBDL t VSJOH QMBZCBDL PPN t 3 FLASH t 8IFO BVUP CSBDLFU IBT CFFO TFU t 8IFO UIF CVSTU NPEF JT TFU t and in mode t mode SELFTIMER t in mode t mode EXPOSURE t in mode AUTO BRACKET t and in mode t mode PICTURE SIZE t and in mode t mode QUALITY t and in mode t mo...

Page 66: ... 4UJMM QJDUVSFT XJUI BVEJP t 1JDUVSFT TUBNQFE XJUI 5 95 45 1 RESIZE TRIMMING LEVELING t PUJPO QJDUVSFT t 4UJMM QJDUVSFT XJUI BVEJP t 1JDUVSFT TUBNQFE XJUI 5 95 45 1 ASPECT CONV t 1JDUVSFT UBLFO XJUI or t PUJPO QJDUVSFT t 4UJMM QJDUVSFT XJUI BVEJP t 1JDUVSFT TUBNQFE XJUI 5 95 45 1 ROTATE t PUJPO QJDUVSFT t 1SPUFDUFE QJDUVSFT ROTATE DISP t VMUJ QMBZCBDL t 3 PRINT WITH DATE t 1JDUVSFT TUBNQFE XJUI 5 ...

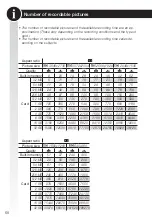
Page 67: ...010 17700 12870 24780 19820 38120 Aspect ratio Picture size Y Y Quality Built in memory 51 97 240 400 Card 29 56 145 230 61 115 290 480 125 230 600 970 240 460 1170 1900 480 910 2320 3770 1 GB 970 1830 4640 7550 2 GB 1920 3610 8780 12290 4 GB 3770 7090 17240 24130 8 GB 7670 14440 35080 49120 16 GB 15440 29070 70590 98840 32 GB 30970 58310 141620 198270 t 5IF OVNCFS PG SFDPSEBCMF QJDUVSFT BOE UIF B...

Page 68: ...3580 7050 5040 9880 7160 13720 10980 20590 32 GB 7180 14160 10110 19820 14360 27530 22020 41300 Aspect ratio Picture size Y Y Y Y Quality Built in memory 13 26 18 37 27 53 47 92 Card 7 15 10 21 15 30 27 53 15 32 22 45 32 63 57 105 33 65 46 92 66 125 115 220 65 125 91 180 130 250 220 430 125 250 180 350 250 500 450 860 1 GB 250 510 360 710 520 1000 900 1720 2 GB 520 1020 730 1420 1040 1980 1800 341...

Page 69: ...n 40 sec 2 h 5 min 5 h 36 min 8 GB 33 min 40 sec 1 h 16 min 1 h 28 min 4 h 15 min 11 h 23 min 16 GB 1 h 8 min 2 h 33 min 2 h 59 min 8 h 35 min 22 h 55 min 32 GB 2 h 16 min 5 h 8 min 5 h 59 min 17 h 13 min 46 h t PUJPO QJDUVSFT DBO CF SFDPSEFE DPOUJOVPVTMZ VQ UP 5IF NBYJNVN BWBJM able recording time for up to 2 GB only is displayed on the screen t 5IF OVNCFS PG SFDPSEBCMF QJDUVSFT BOE UIF BWBJMBCMF...

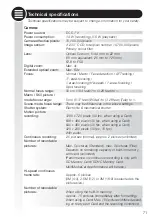
Page 70: ...in the above settings Shutter system Electronic mechanical shutter Motion picture recording Y QJYFMT GQT XIFO VTJOH B BSE Y QJYFMT GQT XIFO VTJOH B BSE Y QJYFMT GQT XIFO VTJOH B BSE Y QJYFMT GQT GQT With audio Continuous recording QJD TFD OPSNBM BQQSPY QJD TFD VOMJNJUFE Number of recordable pictures BY QJDUVSFT 4UBOEBSE NBY QJDUVSFT JOF Depends on remaining capacity of built in memory with card un...

Page 71: ...is Y QJYFMT Y QJYFMT Y QJYFMT Y QJYFMT Y QJYFMT Y QJYFMT When the aspect ratio setting is Y QJYFMT Y QJYFMT Y QJYFMT Y QJYFMT When the aspect ratio setting is Y QJYFMT Y QJYFMT Y QJYFMT Y QJYFMT Motion pictures Y QJYFMT 8IFO VTJOH B BSE Y QJYFMT 8IFO VTJOH B BSE Y QJYFMT 8IFO VTJOH B BSE Y QJYFMT Quality Fine Standard File format for photos Still picture 1 CBTFE PO A FTJHO SVMF GPS BNFSB JMF TZTUF...

Page 72: ...DMVEJOH DBSE BOE CBUUFSZ QQSPY H P XJUI DBSE BOE CBUUFSZ Operating temperature 0 C to 40 C 32 F to 104 F Operating humidity UP Battery charger Information for your safety Input 7 UP 7 _ Output 3 065165 7 0 8A Equipment mobility PWBCMF Battery Pack Information for your safety Voltage 3 6V 73 ...

Page 73: ...ontact Leica Camera AG Tel 49 0 6442 208 421 Leica Akademie Fax 49 0 6442 208 425 Oskar Barnack Str 11 la leica camera com D 35606 Solms Germany Leica on the Internet For current information on products innovation events and the Leica corpora tion log on to our homepage at http www leica camera us http www leica camera co uk Leica Information Service The Leica Information Service will answer quest...

Page 74: ...my point of view Leica Camera AG Oskar Barnack Str 11 D 35606 Solms www leica cameras com info leica camera com Telefon 49 0 64 42 208 0 Telefax 49 0 64 42 208 333 93 237 VIII 08 XX P ...

Reviews: