background image

107

Replacing the mains fuse on the power unit*


n. b.:

Remember to disconnect from the mains!

Switch off the microscope and the power unit.

Disconnect the appliance cable of the micro-
scope and the power unit.

Remove the defect fuse from the fuse holder.
Replacement fuses of IEC 127-2 standard
and/or UL 198 G and/or company type:

Part no.:

846-205.000-00

Name:

T 4 A
Wickmann 19 195/
Schutter FST

2

3

4

1

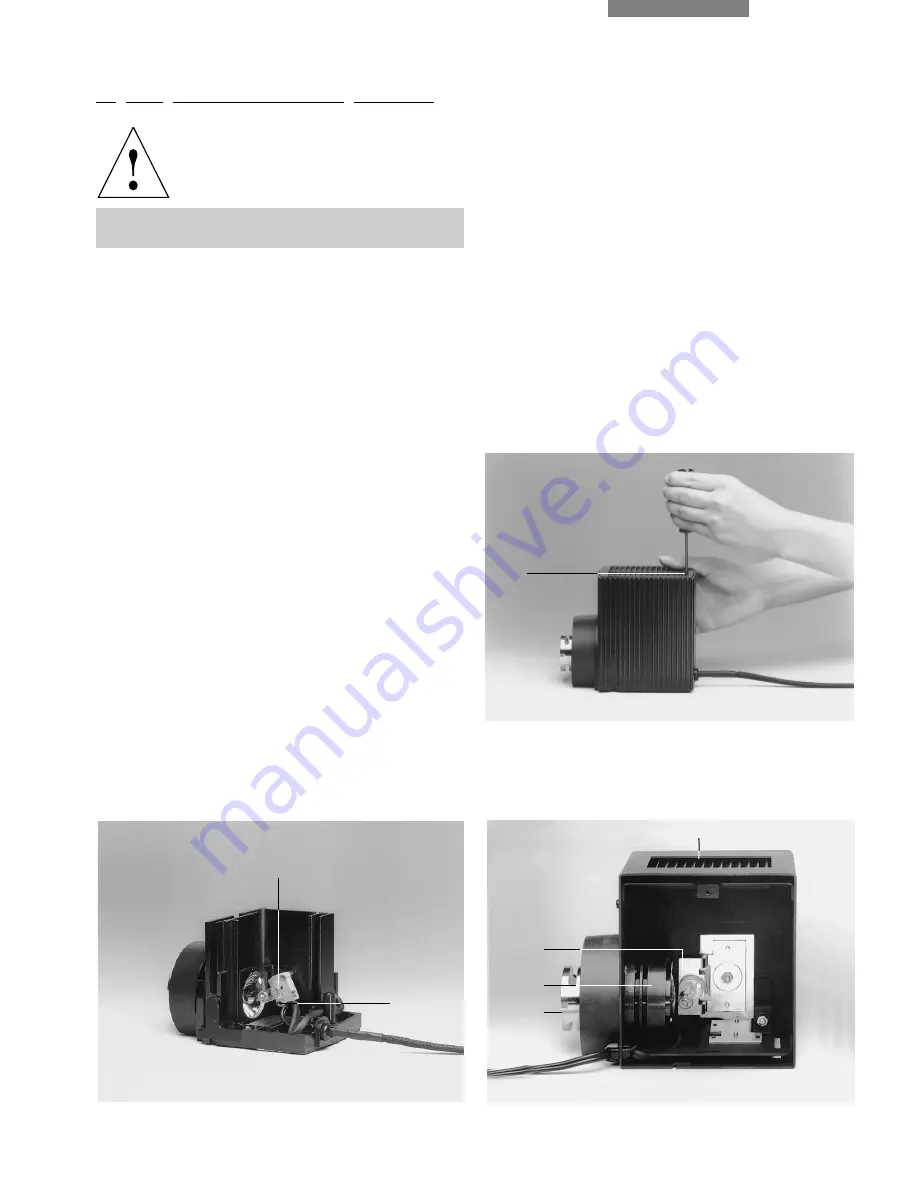
Fig. 85  

Lamphousing 107/2

1

 Screw for opening the lamphousing

Fig. 86 

 Lamphousing 107/2, opened

1

 Collector, 

2

 Holder with 12 V 100 W halogen lamp

Fig. 87 

Lamphousing 106, opened

1

 Screw for opening the lamphousing, 

2

 Holder with 12 V

100 W halogen lamp, 

3

 Collector, 

4

 Diffusing disc

2

1

1

Summary of Contents for DM IRB

Page 1: ...Leica DM IRB Instructions...

Page 2: ...Issued in 1998 by Leica Microsystems Wetzlar GmbH Ernst Leitz Strasse D 35578 Wetzlar Germany Responsible for contents Marketing MQM product management Tel 49 0 64 41 29 25 19 Fax 49 0 64 41 29 22 55...

Page 3: ...3 Leica DMIRB Instructions...

Page 4: ...nsent of Leica Microsystems Wetzlar GmbH The information contained in the following documentation represents the latest stage of technology and knowledge We have composed the texts and illustrations w...

Page 5: ...f condensers 18 Assembly of IC condenser prisms 21 Condenser top 22 Condenser 0 30 S70 22 Condenser 0 53 S23 and 0 90 S1 23 Assembly of field diaphragm 24 Assembly of filters and filter holder 24 Asse...

Page 6: ...asic setting for transmitted light 64 Operation of objectives 70 Operation of transmitted light 71 Operation of phase contrast 74 Operation of transmitted light darkfield 76 Operation of transmitted l...

Page 7: ...g p 20 refer to a particular page in this manual Special safety information is indicated by the triangular symbol on the left and is given a grey background Caution Operation errors can damage the mi...

Page 8: ...ted according to EN 61 010 1 IEC 1010 1 VDE 0411 1 safety standards for electrical measurement control and laboratory equip ment n b To keep the microscope in this safe condition it is essential to no...

Page 9: ...y or anywhere else where water may get inside them n b Before changing fuses or lamps always turn the mains switch off and disconnect the mains cable n b Protect the microscope from major tem perature...

Page 10: ...ocal microscopy The DM IRB has universal application potential incorporating all the contrasting techniques of brightfield darkfield phase contrast DIC fluorescence and Hoffmann modulation contrast wh...

Page 11: ...ers 17 Aperture diaphragm adjustment 18 Lamphousing mount or mirrorhousing for two lamphousings 19 Lamphousing 20 Stage plate 21 Analyser 22 Tube lens module Bertrand lens and magnification changer 23...

Page 12: ...either an SLR camera or a TV camera with c mount connection The stand with bottom port cannot be equipped with an SLR front port This variant is only produced at a customer s specific request The elec...

Page 13: ...takes 4 filter cubes This module is also available as a motorised va riant under the name RF4 mot module see Technical Description Aperture diaphragm The aperture diaphragm determines the resolution...

Page 14: ...e lists available from your Leica agency IR R tube adapter The tube adapter is used to adapt tubes from the DM R range Eyepieces A magnified virtual image of the actual intermediate image produced by...

Page 15: ...and extreme humidity Also the workplace should not be exposed to major temperature fluctuations direct sunlight or vibrations These may impair measurements or photographs of the microscope image Ambi...

Page 16: ...ry later when ordering more equipment or when the microscope is serviced Make sure that no small parts are left in the packing material Some of our packing material has symbols indicating environment...

Page 17: ...interface surface 4 4 Erect the TL illumination column and secure with the 4 screws When screwing on the TL illumination column do not hold onto it so that optimal alignment to the optical axis is gua...

Page 18: ...ve of support surface 5 Drill holes for fixing screws Fig 5 Transmitted light illumination column back view 1 Knurled screw for clamping the transmitted light illumi nation column Assembly of condense...

Page 19: ...DF diaphragm can only be inserted in a large hole Using the centring keys screw the centring screws back in until they no longer protrude over the outer edge of the disc Fit IC condenser prisms if app...

Page 20: ...40 OIL S1 4 Spacer ring for assembling 9 2 and 9 3 Fig 10 6 position condenser disc empty 1 Condenser disc with slots for light rings and IC condenser prisms 2 Guide groove for IC condenser prisms 2nd...

Page 21: ...crews back in until they no longer protrude over the outer edge of the disc The prism is adjusted with the left centring screw only see operation of ICT The right centring screw must never restrict th...

Page 22: ...30 S70 1 Transmitted light illumination column tilted 2 Dovetail guide 3 Condenser height markings S1 S23 and S70 4 Condenser 0 30 S70 5 Condenser clamp screw 6 Field diaphragm clamp screw 7 Transmitt...

Page 23: ...3 and 0 90 S1 With the illumination column tilted to the back insert the condenser holder 15 4 into the dovetail guide of the illumination column from below 15 2 The condenser height adjustment should...

Page 24: ...ers with 40 mm diameter The filters are already fitted into the holder at the factory If you are retrofitting filters yourself assemble as follows Slacken the clamp screws Fig 19 1 and remove the filt...

Page 25: ...the stop pin 21 4 and only screw down lightly to avoid strain Insert the prisms so that the code letter e g A points upwards and is readable Label the position of the prism on the front of the ICR pri...

Page 26: ...ng the analyser Remove the blind slide and insert the analyser 24 2 from the left as far as the 1st clickstop Inserting the polariser The polariser is inserted into the filter holder of the condenser...

Page 27: ...for the electronic version Assembly of the lamp mount mirror housing lamphousing illumination telescope 1 Insert the lamp mount or mirror housing in the back panel and screw down with Allen screws En...

Page 28: ...p plug to the connecting socket in the stand 28 3 5 Insert light filters 50 mm into the 2 spaces in the lamphousing mounts 29 4 n b Connect the appliance cable to the mains socket on the microscope st...

Page 29: ...a new lamp into the base without tilting as far as it will go n b Leave the protective cover on the lamp until it is in position Avoid making finger marks or wipe off immediately Close the lamphousing...

Page 30: ...ve the collector to the front and lift the defect lamp out of the base 33 1 33 2 33 3 For convenience the lamp holder can be removed from the lamphousing as well To do this slacken the fixing screws o...

Page 31: ...ferent lamp holders Fig 35 and power units Type Average life span Hg ultra high pressure lamp 150 W A C 100 h Xe high pressure lamp 175 W D C stabilised 400 h Hg ultra high pressure lamp 100 W D C sta...

Page 32: ...rten its life n b It is extremely important to heed the follow ing advice Always disconnect the power unit from the mains before assembling the lamphousing 106 z Wait for the lamphousing to cool down...

Page 33: ...crew 37 1 38 1 39 1 on the side of the tube change mount on the stand mount the tube or tube adapter IR R clamp screw points to the right and align with edges parallel to the microscope the Siedentopf...

Page 34: ...ar tube with 15 50 viewing angle field of view index up to 22 eyepiece diameter 30 mm for HC PLAN 10x 20 or 22 eyepieces interpupillary distance setting 55 75 mm 1 Clamp screw 2 Eyepiece port 3 Sieden...

Page 35: ...Leica DM R HC tubes 1 HC BSA 25 2 HC FSA 25 P PR 3 Beamsplitter switch rod 4 Mount for photo adapter tube 5 Clamp for photo adapter tube 6 Clickstop position for Pol eyepieces 7 Socket for control ca...

Page 36: ...coupling ring 44 2 ensuring that the guide pin engages in the groove and screw down In the same way screw the slide overlay device with coupling ring to the reflection optics again watching the posit...

Page 37: ...pieces in the above list Graticules can only be inserted in eyepieces with an adjustable eyelens M type The sec ond eyepiece should be an M type as well Important Be very careful to keep the optical s...

Page 38: ...in the eyepiece so that the magnification can be changed in steps e g in the order 4 10 20 40 If any positions remain unoccupied close them with a screw cover to prevent dust penetrating the microsco...

Page 39: ...tage with Allen screws To assemble the square insert plate 1 Insert the corner of the insert plate that is marked red 50 5 at an angle from above into the corner of the stage that is also marked red a...

Page 40: ...centration aid To secure specimen slides in the frame inserts 52 1 press on the middle of the leaf spring 52 2 and slide in the coverslip in the direction of the arrow Clamp the frame insert in the ob...

Page 41: ...iations will therefore naturally occur for previous or subsequent versions The EPROM version number is displayed by simultaneously pressing the LEARN and CHANGE keys Fig 53b and by pressing the CHANGE...

Page 42: ...free to choose the order in which the separate steps of the learn mode are carried out However for the first installation we recommend you keep to the following order Check that the focus threshold a...

Page 43: ...g changed Besides this you automatically switch back to the normal operation mode Installing the objective prisms If your system is not equipped for interference contrast skip this section and the nex...

Page 44: ...by turning the handwheel Do this for all four positions Empty positions should be coded Installing the objectives Select the Objectives option in the Learn mode OBJ by pressing the CHANGE key the OBJ...

Page 45: ...jective prism Learn mode Objective data IC coding code letter By turning the focus handwheel select the display that corresponds to the top line of engraving on the objective A B C D E F The symbol H...

Page 46: ...tive nosepiece key Screw the objective with the next highest magnification into the nosepiece opening which is now furthest to the right By turning the handwheel select the magnifi cation display that...

Page 47: ...ct EXIT and confirm with LEARN Parfocality Select the Parfocality option PARF in the Learn mode by pressing the CHANGE key the PARF option now flashes Confirm your choice with the LEARN key Learn mode...

Page 48: ...ted clockwise the objective nosepiece is moved upwards i e the objec tive moves towards the sample Conclude the Learn mode for user adjustment by pressing the CHANGE key EXIT flashes in the display co...

Page 49: ...lation Installation is now complete You are back in the normal operation mode Before you start work you should set the focus threshold with one of your specimen slides with the key Fig 53b Installing...

Page 50: ...ification down to survey magnification for example is to sustain the lower objective key for approx 3 sec The selected objective is turned into the light path in the direction that involves the shorte...

Page 51: ...ion objectives or objectives of the Combined category are travelled to I now appears in the LC display at the bottom right DRY and IMMERSION The Leica DM IRB microscope is equipped with a switch funct...

Page 52: ...only dry objectives or objectives of the Combined category are travelled to D now appears in the LC display at the bottom right To learn objective categories see Installing the objectives p 44 Automat...

Page 53: ...l panel The lamp voltage is displayed in volt from 2 5 12 V If you press the CHANGE key again you return to the display of the Z position The lamp intensity is adjusted by rotating an adjustment wheel...

Page 54: ...EP S0 0 05 m S1 0 1 m S2 0 7 m S3 1 5 m on the front of the microscope The micrometer values always indicate the smallest stepwidth that can be carried out The electronic focus offers the user the fol...

Page 55: ...se note that when you replace the front fixing screw if the stage plate it must not be screwed in fully If it is screwed in too far it will block the focus motor The message BLK then appears in the LC...

Page 56: ...ch one of these keys twice you switch by two filter cube po sitions The SHUTTER CLOSED key is used for opening and closing the electric shutter The LED indicates whether the shutter is closed or not L...

Page 57: ...L interface on the micro scope is active from Eprom version number 2 4 upwards Optionally a dual footswitch order no 505 096 can be connected to the FOOTSWITCH socket Control unit An electronic contro...

Page 58: ...reparation Lamp LAMP Condenser COND Field diaphragm FIELD Aperture diaphragm AP Objective change MAG Incident light fluroescence axis FLUOR Z drive FOCUS x y stage X Y Footswitch FOOT Several keys are...

Page 59: ...mode IMM DRY when the upwards arrow key is pressed once Similarly the next lower magnification is switched to when the downwards arrow is pressed If the same key is pressed more than once in quick suc...

Page 60: ...ys are pressed simultaneously again or a specific focus speed is selected with the STEP key The AF key is not assigned yet X Y The arrow keys define the direction in which the stage is to move Two dif...

Page 61: ...d then the LAST key at MAG Now switch between the two magnifications with the left footswitch Example 2 Switching between two fluorescence filters with a footswitch Set a filter cube with the arrow ke...

Page 62: ...automatic functions take effect Person sensor option The dark flap can be opened automatically via a sensor when you look through the microscope and closed again when you look away This is achieved b...

Page 63: ...e fast focusing is controlled with the two keys on the right side of the microscope indicated by the symbol on the right in the upper line of the display Similarly if this symbol appears on the left s...

Page 64: ...witch rod for lateral TV port 24 Transmitted light illumination column 25 Condenser 26 Transmitted light lamphousing 27 Transmitted light field diaphragm 28 SLR port 29 Second lamphousing Operation n...

Page 65: ...eight remains un changed The total vertical travel of the nosepiece is 7 mm In air the focusing range extends from 2 mm below the stage surface to 5 mm above it One drum interval of the fine focusing...

Page 66: ...nd eyepieces Eyeglass wearers must remove for 10x 25 or push back for 10x 20 and 10x 22 the anti glare protection of the eyepieces but it should always be left on for viewers not wearing eyeglasses Se...

Page 67: ...HCI BV22 For eyepieces with inserted graticule only Greatly defocus the specimen or remove from the light path Exactly focus the graticule by adjusting the eyelens with a relaxed eye the eye relaxes...

Page 68: ...ht Look through the right hand eyepiece tube with your right eye and sharply focus the specimen with the fine drive Then look at the same area of the specimen with your left eye and rotate the left ey...

Page 69: ...the beam split version no 2 is active If the switch rod is pushed in beam split no 1 applies Operation of the front photo TV port Stands either with or without SLR front port can be supplied The beam...

Page 70: ...ss up the front part by about 2 mm Lock the objective in this position by rotating slightly Operation of objectives n b When using the immersion objective again remember to release the lock as otherwi...

Page 71: ...tain the desired image contrast Brightfield illumination with condensers 0 53 S23 and 0 90 S1 Brightfield illumination is possible with condens er 0 53 S23 with objective magnifications from 5x to 100...

Page 72: ...ield diaphragm protects the specimen against unnecessary heat and keeps all light not required for imaging away from the specimen thereby enhancing contrast Therefore it is only opened wide enough to...

Page 73: ...r at wrong height Light ring switched in by mistake Dirty optics Visual comparison of the objective and con denser apertures is done as follows remove an eyepiece from the eyepiece tube or engage the...

Page 74: ...entration for phase contrast viewing with a Bertrand lens a Condenser in brightfield position H b Condenser in PH position light ring LR not centred c Light ring and phase ring centred Fig 64 Centrati...

Page 75: ...the centration process itself correct Koehler illumination must be set Possible errors Specimen too thick too thin staining too intense refractive index of mounting medium and specimen identical so th...

Page 76: ...y the fact that the maximum and minimum apertures are given in the objective engraving and in our lists e g 1 30 0 60 Rotate the condenser disc to the H position brightfield Focus the specimen 5x 10x...

Page 77: ...cube if necessary turn the condenser disc and turret for objective side IC prisms to pos H Insert the polariser into the filter holder with the engraving facing upwards Turn the filter holder to the...

Page 78: ...turn the condenser disc and turret for objective side IC prisms to pos H Focus the specimen 20x objective Set Koehler illumination exactly not needed for condenser 0 30 S70 Remove the specimen from t...

Page 79: ...ircle of the objective Fig 65 If not proceed as follows Put one of the supplied centring keys in the disc opening on the left of the label plate for the IC prism e g 64 2 Fig 65 and turn it to centre...

Page 80: ...side prism turret to the left and right Fig 67 Also adjust the contrast with the aperture diaphragm Optimum contrast for specimens with parallel structures can be obtained by rotating the specimen Co...

Page 81: ...xis Fluorescence observation Focus the specimen in transmitted light first if possible perhaps Phaco or ICT Select a filter cube to suit the excitation and emission spectrum of the specimen and move i...

Page 82: ...eflector focus on a strongly reflecting specimen e g surface mirror with the coarse and fine drive Open the field and aperture diaphragm 72 1 72 3 2 Remove the eyepiece from the right or left tube and...

Page 83: ...Hg lamps switch gas discharge lamps on and off at sepa rate power units For lamphousing 106 z the direct lamp image and the reflection of the reflector are focused separately and aligned to each other...

Page 84: ...g Xe lamps Hg lamps will reach their full intensity only after a few minutes they do not ignite when hot n b Never look straight into the light path Remember the risk of glare when switching to the BF...

Page 85: ...tion in lamphousing 106 z in reality the lamp images are not as sharp a direct lamp image focused but decentred b direct lamp image in correct position c indirect and direct lamp image in correct posi...

Page 86: ...ting the image intensity Centring the field diaphragm Turn a low to medium objective magnification 10x 20x into the light path and focus a specimen with the coarse and fine drive Open the field diaphr...

Page 87: ...ation Numerical aperture of the objective too low Eyepiece magnification too high Spent lamp Room too bright Trinocular tube wrong beamsplitter setting Stray light due to reflections at the condenser...

Page 88: ...cing the colour temperature The engraved value e g N16 indicates the attentuation value So N16 means reduction to 1 16 6 3 transmission Green filter panchromatic for general enhancement of contrast in...

Page 89: ...bit of getting used to The white line pattern can be given a coloured background by inserting 32 mm colour filters in the filter slot 74 7 Slide overlay device The slide overlay device is used for ref...

Page 90: ...chment is varied Like the slide overlay device the macro overlay Fig 73 only works in the 50 50 beamsplitter position switch rod in middle position of the FSA 25 PE tube The microscope illumination is...

Page 91: ...e overlay device 5 Knurled focusing ring 6 5 x 5 cm slide holder 7 Filter slot 8 Illumina tion adapter of lamphousing Fig 75 Transformer 1 3 8 2 4 6 7 5 The total magnification in the microscope the r...

Page 92: ...oscope has the advantage over photomicrography that significant details can be highlighted and that structures can be depicted in three dimensions This is not possible with photomicrography Apart from...

Page 93: ...le If 1 220 mm of the stage micrometer corre sponds to 100 divisions of the measurement scale the micrometer value is 1 220 100 0 0122 mm 12 2 m For extremely low objective magnifications it may be th...

Page 94: ...s screw connection c mount adapter 1x 16 12 5 541 706 B mount adapter 1x 16 12 5 541 702 B mount adapter 1 25x 17 5 5 541 539 F mount adapter 1x 16 12 5 541 540 F mount adapter 1 25x 17 5 5 541 541 re...

Page 95: ...pulled out 80 light to the side port and 20 light to the tube 82 2 DM IRB with side photo port and front port DM IRB SLR and correspondingly two beam splitter switch rods 81 1 and 81 2 Image recording...

Page 96: ...orehand Fig 80 Leica DM IRB equipped with three TV cameras Fig 81 Switch rods for beamsplitting 1 Upper beamsplitter switch rod SIDE 2 Lower beamsplitter switch rod FRONT Fig 82 Beamsplitting 1 100 li...

Page 97: ...the aid of a modu lator This gives a three dimensional impression simi lar to an interference contrast image Unlike interference contrast however the specimen can be observed through birefringent plas...

Page 98: ...a grey zone and a light zone Principle of LMC The light coming from the light slit diaphragm is diffracted at the object into different directions depending on the object s refractive index gradient s...

Page 99: ...itions In the front focal plane of the condenser a light slit diaphragm has already been assembled in each of the LMC positions corresponding to the supplied objectives LMC objectives The following ob...

Page 100: ...aphragms are supplied separately they must be inserted in the positions in the condenser disc to match the objectives used Adjustment Open the aperture diaphragm on the condenser fully Switch on the l...

Page 101: ...e of the modulator and the light slit are virtually the same size Adjust the light slit diaphragm until the bright slit lies near the dark edge Repeat this process for each objective Always make sure...

Page 102: ...ndenser offers plenty of space for manipulation tools The 3D image impression makes it easier to find suitable injection points Optical sectioning LMC produces a large flat observation area This makes...

Page 103: ...Dust and loose particles of dirt can be removed with a soft brush or lint free cotton cloth Obstinate dirt can be removed with any ordinary hydrous solution benzine or alcohol Use a linen or leather...

Page 104: ...glass surfaces can be carefully removed with a clean cloth moistened with distilled water If the dirt can still not be removed pure alcohol chloroform or benzine can be used instead of distilled wate...

Page 105: ...ts are manufactured and tested with extreme care If you do have cause for complaint however please do not try to repair the instruments and their accessories yourself Contact your national agency or o...

Page 106: ...lamp holder Mount the lamphousing and screw down with a 3 mm Allen key Reconnect the transmitted light illumination column to the power supply on the back of the stand Connect the microscope and if u...

Page 107: ...e holder Replacement fuses of IEC 127 2 standard and or UL 198 G and or company type Part no 846 205 000 00 Name T 4 A Wickmann 19 195 Schutter FST 2 3 4 1 Fig 85 Lamphousing 107 2 1 Screw for opening...

Page 108: ...07 2 n b Never use fuses with a different rating from the ones specified Connect the microscope and the power unit to the mains Replacing the 12 V 100 W halogen lamp in lamphousing 106 107 107 2 Ask a...

Page 109: ...e it with the screws 88 10 Push the cut out plug into the socket 88 11 Close the lid and tighten the screws 88 4 and 88 9 on the lid Align the lamphousing against the microscope and secure with the cl...

Page 110: ...cannot accept any liability for damage resulting from lamp explosions Disconnect the power unit and the micro scope from the mains The LH 106 z L is opened by undoing the fixing screws 88 4 pulling th...

Page 111: ...tab Put the lamp holder with burner inserted into the lamphousing and secure with the screws 90 10 Close the lid of the lamphousing When closing the lamphousing make sure that the pins of the cut out...

Page 112: ...board must have ven tilation holes which are plugged with cotton wool for example to keep dust out If this type of storage is not possible the microscope is kept in a closed container with drying agen...

Page 113: ...updated Please ask your Leica agency for a copy of the Objective data sheets Objective lettering Examples and explanation of symbols Objective for tube length infinity The objective can be used with...

Page 114: ...of vessel base P POL Strain free objective for quantitative polarisa tion microscopy U V I With special achromatic correction i e parfocal from the ultraviolet through the visual to the near infrared...

Page 115: ...our of the objective engraving indicates the use of the objective Black or Brightfield objectives dark blue low strain Green Phase contrast objectives low strain Locking of objectives The front part o...

Page 116: ...es the image and that lies inside the eyepiece This fov is specified on the eyepiece after the magnification e g 10x 20 For the Leica DM IRB microscope we recom mend fov 22 The maximum eyepiece field...

Page 117: ...es Graticules for length measurements and grain and particle measurements Our product range comprises the following graticules Graticule 10 mm 100 divisions Order no 506 950 Graticule 10 mm 100 divisi...

Page 118: ...t film integrated in filter magazine BG38 blue filter Suppresses red for fluorescence integrated in fluorescence illuminator ALF Artificial light filter for enhancement of colour contrast in colour ph...

Page 119: ...94 HCI B22 Binocular tube with 45 viewing angle field of view index up to 22 eyepiece diameter 30 mm for HC PLAN 10x 20 or 22 eyepieces interpupillary distance setting 55 75 mm 1 Clamp screw 2 Tube po...

Page 120: ...e tube lens has the factor 1x The Siedentopf binocular part allows adjustment of the interpupillary distance from 55 mm to 75 mm The viewing an gle is 45 The tube has adjustable eyepiece tubes for mec...

Page 121: ...e 10x 100x J device Pol contrast 2 5x 40x Pol device 5x 100x Pol device 10x 100x Pol device Darkfield 5x n a 0 40 3 S23 10x n a 0 75 D S1 J 100 x for maximum resolution also possible with condenser to...

Page 122: ...DF or IC prisms for transmitted light interference con trast ICT Performance data of stages and mountable object guides Plane stage With hole for insert rings of 20 mm diameter or 40 mm diameter Hole...

Page 123: ...also be used Stages Plane stage and mountable object guide The plane stage is secured to the microscope with 3 screws The object guide can be mounted to either the right or the left of the plane stag...

Page 124: ...0 W 2 m 504 071 12 V 100 W 2 9 m 504 065 Hg 100 W with ZG 504 068 504 062 Hg 100 W with ZG 3 m 504 069 504 063 Hg 100 W without ZG 504 083 504 090 Hg 50 W 504 066 Xe 75 W 504 061 504 089 Type Average...

Page 125: ...l technical data For indoor use only Mains voltage 90 250 V Frequency 50 60 Hz Power consumption DM IRB max 160 W Fuses T 4 A Ambient temperature 10 36 C Relative humidity 0 80 up to 30 C Overvoltage...

Page 126: ...able from 2 5 V 5 to 12 V 5 8 5 A Voltage setting Potentiometer 5 KOhm Rotated clockwise for maximum intensity Maximum lamp voltage 12 0 V in the range 90 V to 250 V Soft start Rise time up to maximum...

Page 127: ...tment 020 434 045 2 5 mm Allen key Assembly of heating stage and angled short illumination mirror Screw cover for unoccupied nosepiece positions 020 422 570 000 Screw cover M25 Objective nosepiece Spa...

Page 128: ...uropean Union This declaration will cease to be valid if the instrument is modified without our consent Product name DM IRB Instrument type Light microscope Instrument no 020 525 701 to 020 525 780 EU...

Page 129: ...3...

Page 130: ...1 29 25 99 www leica com Leica Microsystems Wetzlar GmbH z Ernst Leitz Stra e z 35578 Wetzlar z Tel 0 64 41 29 0 z Fax 0 64 41 29 25 99 Printed on chlorine free bleached paper Order nos of the edition...

Reviews: