background image

EN

101

Cont
ent

Aperture Priority ........................................................................136

Shutter Speed Priority ................................................................136

Manual Settings .........................................................................137

Metering Memory Lock ..............................................................137

Exposure Compensation ............................................................138

Automatic Bracketing ................................................................139

Flash Photography

Using the Built-in Flash Unit ..........................................................140

Flash Modes .................................................................................141

Flash Range..................................................................................142

Synchronization Point ...................................................................143

Flash Exposure Compensation ......................................................143


Additional Functions

Video Recording ...........................................................................144

Sound Recording ..........................................................................145

Self-timer .....................................................................................146

Formatting the Memory Card ........................................................147

Selecting the Working Color Space ...............................................148

Creating new Folder Numbers .......................................................148

User Profiles .................................................................................149

Image Stabilization .......................................................................149 

Playback Mode

Playback Modes ...........................................................................150

Standard Playback ........................................................................150

Video Playback .............................................................................151

Image Selection ............................................................................152

Enlarging Images/Simultaneous Playback of 16 Images ................152

Detail Selection ............................................................................153

Deleting Images/Recordings ........................................................154

Image Protection/Clearing Delete Protection ................................155

Viewing Pictures in Portrait Format ...............................................156

Miscellaneous

Data Transfer to a PC ....................................................................157

Wireless Data Transfer ..................................................................157

Working with Raw Data (DNG).......................................................158

Installing Firmware Updates ..........................................................158

Accessories ..................................................................................159

Replacements ..............................................................................159

Safety and Care Instructions .........................................................160

Index .................................................................................................166

Appendix

Displays ..........................................................................................168

Menu Options .................................................................................176

Technical Data ...................................................................................178

Leica Service Addresses ....................................................................180

X-U_EN.indd   101

20.10.2015   09:28:58

Summary of Contents for LEICA X-U 113

Page 1: ...LEICA X U Anleitung Instructions ...

Page 2: ...PLAY DELETE FOCUS WB ISO MENU SET PLAY DELETE FOCUS WB ISO MENU SET INFO LEICA CAMERA WETZLAR GERMANY EV UW 21 23 20 18 17 16 15 14 19 6 7 8 5 5a 1 1 2 4 3 9 10 11 12 13 22 Umschlag_X U_DE EN indd 2 ...

Page 3: ...25 24a 24 24b 28 26 27 21 10 2015 11 01 23 ...

Page 4: ......

Page 5: ...Leica X U Anleitung X U_DE indd 1 20 10 2015 09 26 17 ...

Page 6: ...lten Sie bitte zunächst diese Anleitung lesen LIEFERUMFANG Bevor Sie Ihre Leica X U in Betrieb nehmen überprüfen Sie bitte das mitgelieferte Zubehör auf Vollständigkeit a Akku Leica BP DC8 b Akku Schutzhülle c Akku Ladegerät BC DC8 mit austauschbaren Steckern d Tragriemen e Objektivdeckel mit Sicherungsbändchen f Zubehörschuh Abdeckung Dieses Produkt ist Gegenstand der AVC Patent Portfolio Lizenz ...

Page 7: ...DE 3 X U_DE indd 3 20 10 2015 09 26 18 ...

Page 8: ...k auf die Kamera trifft z B beim ins Wasser Springen mit der Kamera in Wasserfällen bei Wasserstrahlen aus Schläuchen Hochdruck Spritzpistolen etc Die Kamera behält ihre Wasser und Staubdichtigkeit nur innerhalb eines Temperaturbereichs von 0 C bis 40 C Sorgen Sie dafür dass sie nur in den entsprechenden Bedingungen eingesetzt wird und auch entsprechend aufbewahrt wird z B nicht in direktem Sonnen...

Page 9: ...a hineinläuft bzw Schmutzpartikel nicht hineinfallen Öffnen Sie die Akkufach Speicherkartenschacht Klappe erst wenn alle Fremdstoffe entfernt sind und die Kamera getrocknet wurde Nach dem Öffnen der Klappe Überprüfen Sie die Klappe die Dichtung am Klappenrand Akkuschacht und Speicherkartenfach sorgfältig Noch verbliebenes Wasser bzw trotz aller Vorsicht eingedrungene Feuchtigkeit Wassertropfen sofo...

Page 10: ...gig sind d h nicht z B durch Ablagerun gen oder Partikel schwergängig oder gar blockiert sind Vereinzelt aus dem Kameragehäuse austretende Luftbläschen sind normal und keine Störung Wischen Sie die Kamera nach der Reinigung trocken und lassen Sie sie an einem gut gelüfteten und schattigen Platz trocknen Legen Sie sie dazu vorzugsweise auf ein trockenes Tuch Dadurch kann das noch in den verschieden...

Page 11: ...n Untere Kreuztaste drücken Bei eingeschalteter Unter Wasser Betriebsart erscheint links in der Kopfzeile dafür erlischt die Anzeige für den eingestellten Weißabgleich Alle anderen Funktionen der Kamera stehen auch beim Fotografieren und Videoaufnahmen unter Wasser unverändert zur Verfügung Zu bedenken ist weiterhin dass mit zunehmender Tiefe Entfernung die Helligkeit schnell abnimmt und dass Schw...

Page 12: ...e ausschließlich empfohlenes Zubehör um Störun gen Kurzschlüsse oder elektrische Schläge zu vermeiden Versuchen Sie nicht Gehäuseteile Abdeckungen zu entfernen fachgerechte Reparaturen können nur in autorisierten Servicestel len durchgeführt werden RECHTLICHE HINWEISE Beachten Sie bitte sorgfältig die Urhebergesetze Die Aufnahme und Veröffentlichung von selbst bereits aufgenommenen Medien wie Bänd...

Page 13: ...echtliche Hinweise Kamera Produktionsdatum Das Produktionsdatum Ihrer Kamera finden Sie auf den Aufklebern in der Garantiekarte bzw auf der Verpackung Die Schreibweise ist Jahr Monat Tag X U_DE indd 9 20 10 2015 09 26 18 ...

Page 14: ...bild Aufnahmefrequenz 24 Auslöser 25 Menüsteuerung 26 Kamera Grundeinstellungen Menüsprache 30 Datum Uhrzeit 30 Automatische Abschaltung der Kamera 30 Tastentöne und Verschlussgeräusche 30 Monitoreinstellungen 31 Aufnahme Grundeinstellungen Dateiformat Kompressionsrate 32 JPEG Auflösung 32 Weißabgleich 33 ISO Empfindlichkeit 35 Bildeigenschaften 36 Aufnahme Betrieb Entfernungseinstellung 38 Automa...

Page 15: ...8 Benutzerprofile 59 Bildstabilisierung 59 Wiedergabebetrieb Wiedergabe Betriebsarten 60 Normale Wiedergabe 60 Video Wiedergabe 61 Aufnahmen wählen 62 Aufnahmen vergrößern gleichzeitige Wiedergabe von 16 Aufnahmen 62 Ausschnitt wählen 63 Aufnahmen löschen 64 Aufnahmen schützen Löschschutz aufheben 65 Aufnahmen im Hochformat wiedergeben 66 Verschiedenes Datenübertragung auf einen Rechner 67 Drahtlo...

Page 16: ...Messmethode zum Aktivieren des AF Messbereich Rahmens 18 PLAY Taste zum Aktivieren des dauerhaften Wiedergabebetriebs zum Zurückkehren zur vollen 1 1 Wiedergabe der Aufnahme 19 Einstellwippe zur manuellen Entfernungseinstellung zum Blättern in Menü und Untermenüpunkt Listen zum Einstellen eines Wertes für Belichtungskorrektur Belichtungsreihen Blitz Belichtungsreihen zum Vergrößern Verkleinern der...

Page 17: ...enus 22 Status LED a Blinkend Entfernungseinstellung nicht möglich Bilddaten werden geschrieben gelesen b Dauerhaft leuchtend Entfernungs und Belichtungseinstellung erfolgt und gespeichert 23 Monitor Ansicht von unten 24 Abdeckklappe für Akkufach Speicherkarten Schacht mit a Ver Entriegelungshebel b Ver Entriegelungsschieber 25 Stativgewinde A DIN 4503 26 Speicherkarten Schacht 27 Akkufach 28 Akku...

Page 18: ...tten auf den angegebenen Seiten Beachten Sie insbesondere die Hinweise zur Nutzung im unter Wasser auf Seite 4 Vorbereitungen 1 Geeigneten Netzstecker am Ladegerät befestigen s S 19 2 Akku zum Laden in das Ladegerät einsetzen s S 19 3 Ladegerät an eine Steckdose anschließen 4 Hauptschalter der Kamera auf OFF stellen s S 24 5 Aufgeladenen Akku in die Kamera einsetzen s S 20 6 Speicherkarte einsetze...

Page 19: ... zum ersten Druckpunkt drücken um Entfernungsein stellung und Belichtungsmessung zu aktivieren und zu speichern s S 25 7 Auslöser für die Aufnahme ganz durchdrücken Aufnahmen betrachten PLAY Taste drücken Um andere Aufnahmen zu betrachten rechte linke Seite der Kreuztasten drücken Aufnahmen vergrößern Einstellwippe nach rechts drücken s S 62 Aufnahmen löschen DELETE FOCUS Taste drücken und in dem ...

Page 20: ...n unter Umständen zu einer Explosion führen Die Akkus dürfen nicht über längere Zeit Sonnenlicht Wärme Luft oder Kondensfeuchtigkeit ausgesetzt werden Zur Vermeidung von Brand oder Explosionsgefahr dürfen Akkus auch nicht in einen Mikrowellenherd oder in einen Hochdruckbehälter gelegt werden Werfen Sie Akkus keinesfalls in ein Feuer da sie sonst explodieren können Feuchte oder nasse Akkus dürfen k...

Page 21: ...d in Extremfällen ernste oder lebensbedrohliche Verletzungen verursachen Das mitgelieferte Ladegerät darf ausschließlich zum Laden dieses Akkutyps verwendet werden Versuchen Sie nicht es für andere Zwecke einzusetzen Sorgen Sie dafür dass die verwendete Netzsteckdose frei zugänglich ist Beim Ladevorgang wird Wärme erzeugt Das Aufladen darf daher nicht in kleinen verschlossenen d h unbelüfteten Beh...

Page 22: ...maximale Lebensdauer des Akkus zu erreichen sollte er nicht längere Zeit extremen hohen oder niedrigen Temperaturen z B in einem geparkten Auto im Sommer oder Winter ausgesetzt werden Die Lebensdauer jedes Akkus ist selbst bei optimalen Einsatzbe dingungen begrenzt Nach mehreren hundert Ladezyklen ist dies an deutlich kürzer werdenden Betriebszeiten zu erkennen Geben Sie schadhafte Akkus gemäß den...

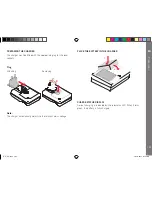
Page 23: ... Stecker Anbringen Entfernen 1 2 Hinweis Das Ladegerät stellt sich automatisch auf die jeweilige Netzspannung ein AKKU IN DAS LADEGERÄT EINSETZEN 1 2 LADESTATUS ANZEIGE Der korrekte Ladevorgang wird durch die rot leuchtende Status LED angezeigt Wenn sie grün wird ist der Akku vollständig aufgeladen X U_DE indd 19 20 10 2015 09 26 24 ...

Page 24: ...ausschalten d h Hauptschalter auf OFF stellen Abdeckklappe des Akkuschachts Speicherkarten Fachs öffnen Wichtig Öffnen oder schließen Sie die Akkuschacht Speicherkartenfach Klappe nicht unter Wasser 2 1 Akku einsetzen Klick X U_DE indd 20 20 10 2015 09 26 28 ...

Page 25: ...u Schäden an der Speicherkarte führen Ladezustands Anzeige Der Ladezustand des Akkus wird im Monitor angezeigt s S 78 Hinweise Nehmen Sie den Akku heraus wenn Sie die Kamera für längere Zeit nicht benutzen Spätestens zwei Tage nachdem die Kapazität eines in der Kamera verbliebenen Akkus erschöpft ist müssen Datum und Uhrzeit neu eingestellt werden X U_DE indd 21 20 10 2015 09 26 30 ...

Page 26: ...DE 22 Vorbereitungen Speicherkarte einsetzen In die Leica X U können SD SDHC oder SDXC Speicherkarten eingesetzt werden click Speicherkarte herausnehmen 1 2 click X U_DE indd 22 20 10 2015 09 26 33 ...

Page 27: ...dere Videoaufnahmen erfordern eine hohe Schreib Ge schwindigkeit Öffnen Sie das Fach nicht und entnehmen Sie weder Speicherkarte noch Akku solange die Status LED als Hinweis auf den Speicherzu griff der Kamera leuchtet Sonst können die Daten auf der Karte zerstört werden und bei der Kamera können Fehlfunktionen auftreten Da elektromagnetische Felder elektrostatische Aufladung sowie Defekte an Kame...

Page 28: ...viert wird nur eine Aufnahme erstellt Wenn der Hauptschalter auf C steht und gleichzeitig der Selbstaus löser eingesetzt wird erfolgt nur eine einzige Aufnahme Die maximale Bildfrequenz von 5 B s wird nur mit Verschlusszeiten von 1 60s und kürzer erreicht 1 4s bei 3 B s Nach einer Serie von maximal sieben Aufnahmen verlangsamt sich die Aufnahmefrequenz etwas Dies liegt an der erforderlichen Zeit f...

Page 29: ...lständigen Durchdrücken des Auslösers darauf dass Entfernungseinstellung Autofokus sofern eingeschaltet und Belichtungsmessung erfolgt sind Einzelheiten zu Belichtungseinstel lung AF und den entsprechenden Anzeigen im Monitor siehe jeweils auf S 42 38 bzw 78 Wird der Auslöser ganz durchgedrückt erfolgt die Aufnahme Hinweise Über das Menüsystem können Tastenquittierungs Rückmelde Töne und Verschlus...

Page 30: ... Schriftzeichen sind weiß Rechts wird die jeweilig aktuelle Einstellung angezeigt Das weiß ausgefüllte Feld in der Laufleiste am linken Rand zeigt an auf welcher der fünf Seiten der Menüliste Sie sich befinden BLÄTTERN IN DER MENÜLISTE obere untere Seite der Kreuztasten oder Einstellwippe drücken AUFRUFEN EINES MENÜPUNKT UNTERMENÜS Rechte Kreuztaste drücken Die Untermenü Liste erscheint Der aktive...

Page 31: ...iste erscheint wieder die bestätigte neue Einstellung wird rechts in der aktiven Menüpunkt Zeile angezeigt Verlassen eines Untermenüs ohne Bestätigung einer Einstellung Linke Kreuztaste oder den Auslöser drücken Mit den Kreuztasten Die Menüliste erscheint wieder die beibehaltene frühere Einstellung wird rechts in der aktiven Menüpunkt Zeile angezeigt Mit dem Auslöser Das Monitorbild des Aufnahme B...

Page 32: ...cheint Oder PLAY Taste drücken Das Monitorbild des Wiedergabebetriebs erscheint Hinweise Das Menü wird üblicherweise an der Position des zuletzt eingestell ten Punktes geöffnet Zu einigen Menüpunkten gibt es Einstellungen in Untermenüs einer zweiten Ebene Einstellungen in diesen Untermenüs werden genau wie oben beschrieben aufgerufen und vorgenommen X U_DE indd 28 20 10 2015 09 26 39 ...

Page 33: ...im Wiedergabe bzw Aufnahme Betrieb EV obere Seite der Kreuztasten für Einstellungen von Belichtungskorrekturen Belichtungsreihen und Blitz Belichtungs korrekturen rechte Seite der Kreuztasten zur Wahl der Blitz Betriebsarten linke Seite der Kreuztasten zum Einschalten des Selbstaus lösers und zur Wahl der Vorlaufzeit Anders als bei den Menüfunktionen können Sie Ihre Einstellungen bei diesen Funkti...

Page 34: ...eder neu eingestellt werden AUTOMATISCHE ABSCHALTUNG DER KAMERA Im Menü Autom Abschaltung und im Untermenü gewünschte Einstellung wählen Wenn diese Funktion aktiviert ist schaltet sie die Kamera nach der gewählten Zeit in den energiesparenden Stand by Betrieb Hinweis Auch wenn sich die Kamera im Stand by Betrieb befindet kann sie jederzeit durch Drücken des Auslösers oder durch Aus und erneutes Ei...

Page 35: ...nd Farbwiedergabe des Monitors verändert werden Helligkeits Einstellungen Im Menü Monitor Helligkeit und im Untermenü gewünschte Einstellung wählen Farb Einstellungen 1 Im Menü Monitor Farbeinstellung wählen Ein Bild mit einem Fadenkreuz erscheint Die Enden des Kreuzes weisen farbige Markierungen für die möglichen Einstellungen auf gelb grün blau und magenta 2 Den anfänglich in der Mitte liegenden...

Page 36: ...sind nur ein Näherungswert da die Dateigröße für komprimierte Bilder je nach fotografiertem Gegenstand stark schwanken kann JPEG AUFLÖSUNG Wenn eines der JPG Formate gewählt wird können Bilder mit fünf verschiedenen Auflösungen Anzahl an Pixeln aufgenommen werden Dies erlaubt eine genaue Abstimmung auf den vorgesehenen Ver wendungszweck bzw auf die Nutzung der vorhandenen Speicherkar ten Kapazität...

Page 37: ...et ist steht diese Einstellung nicht zur Verfügung Feste Voreinstellungen 1 WB Taste drücken 2 Mit oberer unterer Seite der Kreuztasten oder der Einstellwippe gewünschte Einstellung wählen 3 Mit MENU SET oder INFO Taste Einstellung speichern Es stehen zur Verfügung Seite 1 1 Automatisch 2 für Glühlampen Beleuchtung 3 für Außenaufnahmen bei Sonnenschein 4 für Beleuchtung mit elektronischem Blitz Se...

Page 38: ...Mit MENU SET oder INFO Taste Einstellung speichern Die Einstellung kann anschließend mit Farbtemperatur wieder aufgerufen werden Feinabstimmen der Weißabgleich Einstellungen Bei allen Einstellungen steht eine manuelle Feineinstellung zur Verfügung 1 WB Taste drücken 2 Rechte Kreuztaste drücken Ein Bild mit einem Fadenkreuz erscheint Die Enden des Kreuzes weisen farbige Markierungen für die möglich...

Page 39: ...cken und in der Liste zwei Seiten gewünschte Einstellung wählen d h AUTO ISO für die automatische Einstellung oder eine der acht Festeinstellungen Innerhalb der Variante AUTO ISO ist es möglich den zu nutzenden Empfindlichkeitsbereich zu begrenzen um z B das Bildrauschen zu kontrollieren außerdem kann die längste zu nutzende Verschlusszeit festgelegt werden um z B verwackelte Aufnahmen bewegter Mo...

Page 40: ...llen und dunklen Partien bestimmt ob ein Bild eher flau oder brillant wirkt Infolgedessen kann der Kontrast durch Vergrößern oder Verklei nern dieses Unterschiedes beeinflusst werden Die scharfe Abbildung durch die korrekte Entfernungseinstellung zumindest des Hauptmotivs ist eine Voraussetzung für eine gelungene Aufnahme Der Schärfe Eindruck eines Bildes wiederum wird stark von der Kantenschärfe ...

Page 41: ...ättig te Farben und Natürlich für etwas schwächer gesättigte Farben und etwas weicheren Kontrast hinzu kommen zwei Schwarz Weiß Einstellungen S W Natürlich natürlich und S W Hoh Kontr kontrastreich Hinweis Die Einstellungen bei Filmmodus können mit den im vorhergehenden Abschnitt beschriebenen Varianten für Bildeigenschaften noch weiter abgestimmt werden In diesen Fällen sind die Farbwiedergabe Va...

Page 42: ...n das AF System die Entfernung nicht korrekt einstellen z B Die Entfernung zum anvisierten Motiv liegt außerhalb des verfügbaren Bereichs und oder das Motiv ist nicht ausreichend beleuchtet s den nächsten Abschnitt Solche Situationen und Motive werden angezeigt durch Wechsel der Farbe des Rechtecks zu rot mit der 11 Feld Messung durch Wechsel der Anzeige zu einem einzigen roten Rechteck Wichtig De...

Page 43: ...h men empfiehlt es sich normalerweise dass die Augen vollkommen scharf wiedergegeben werden Der etwas größere Messbereich der 1 Feld Messung ist beim Anvisieren weniger kritisch damit einfacher zu handhaben und erlaubt dennoch eine selektive Messung Bei beiden Messmethoden können Sie den AF Rahmen an eine be liebige Stelle des Monitorbildes verschieben z B für eine einfachere Anwendung bei außermi...

Page 44: ...oder den vier linken oder rechten AF Feldern auswählen 1 DELETE FOCUS Taste 1s drücken Alle Anzeigen bis auf die 11 AF Rahmen erlöschen Anfangs haben nur die 9 Rahmen der Mittelgruppe rote Umrisse Rote Dreiecke an allen Seiten zeigen die möglichen Einstellungen an 2 Mit den Kreuztasten gewünschte Rahmengruppe wählen Die jeweiligen Wahlmöglichkeiten werden durch die Dreiecke angezeigt Um zum normal...

Page 45: ...eige eines mittleren Ausschnitts Hintergrund Je größer Einzelheiten des Motivs im Monitor abgebildet werden desto besser kann ihre Schärfe beurteilt werden und umso genauer kann die Entfernung eingestellt werden Diese Lupenfunktion vergrößert einen mittleren Ausschnitt des Monitorbildes 1 Im Menü MF Lupe und im Untermenü gewünschte Einstellung wählen 2 Bildausschnitt bestimmen 3 Entfernungs Einste...

Page 46: ...auch unter schwierigen Bedingungen und somit für die Anwendung in Verbindung mit der Programmautomatik Mittenbetonte Messung Diese Messmethode gewichtet die Mitte des Bildfeldes am stärksten erfasst aber auch alle anderen Bereiche Sie erlaubt insbesondere in Verbindung mit der Messwert Speiche rung gezieltes Abstimmen der Belichtung auf bestimmte Motivteile bei gleichzeitiger Berücksichtigung des ...

Page 47: ...schte Einstellung wählen Hinweis Bei einer Aufnahme mit Blitz kann das Histogramm die endgültige Belichtung nicht darstellen da der Blitz nach der Anzeige gezündet wird Für den normalen Wiedergabebetrieb PLAY Im Menü Wiederg Histogramm und im Untermenü gewünschte Einstellung wählen Wählen Sie eine Variante mit Clipping Funktion wenn zu helle Teile der Aufnahmen gekennzeichnet werden sollen Hinweis...

Page 48: ...tändig die eingestellten bzw von der Automatik vorgegebe nen Verschlusszeiten Blenden und ISO Werte Dies dient insbesondere einer möglichst geringen Abdunkelung der Bildecken wie sie sonst durch die Kombinationen einer Verschlusszeit von 1 2000s mit kleineren Blendenwerten als 3 5 auftreten könnte Sollte die Belichtungsmessung eine solche Einstellungen ergeben reagiert die Kamera darauf wie folgt ...

Page 49: ...BLENDEN KOMBINATIONEN SHIFT Das Verändern der vorgegebenen Werte mit der Shift Funktion verbindet die Sicherheit und Schnelligkeit der vollautomatischen Belichtungssteuerung mit der Möglichkeit jederzeit die von der Kamera gewählte Zeit Blenden Kombination den eigenen Vorstellun gen entsprechend variieren zu können Für kürzere Verschlusszeiten z B bei Sportaufnahmen Einstellwippe nach links drücke...

Page 50: ...automatisch eingestellte Verschlusszeit für die vorgesehene Bildgestaltung angemessen erscheint 4 Auslöser für die Aufnahme ganz durchdrücken BLENDENAUTOMATIK T Die Blendenautomatik steuert die Belichtung automatisch entspre chend der manuell vorgewählten Verschlusszeit Sie eignet sich daher insbesondere für Aufnahmen von bewegten Motiven bei denen die Schärfe der abgebildeten Bewegung das entsche...

Page 51: ...Marke rot angezeigt wird Wenn die eingestellten Werte und oder die Belichtung für die vorge sehene Bildgestaltung angemessen erscheint 4 Auslöser für die Aufnahme ganz durchdrücken MESSWERT SPEICHERUNG Aus Gründen der Bildgestaltung kann es vorteilhaft sein das Haupt motiv nicht in der Bildmitte anzuordnen In solchen Fällen ermöglicht es die Messwert Speicherung mit den Belichtungs Betriebsarten P...

Page 52: ...llte Korrekturwert wird auf der Skala rot angezeigt Während des Einstellens können Sie die Wirkung auf dem entsprechend dunkler oder heller werdenden Monitorbild beobachten 3 Einstellung mit MENU SET Taste INFO Taste oder Auslöser speichern Das Belichtungskorrektur Symbol und der eingestellte Wert erscheinen Hinweise Bei Zeit und Blendenautomatik A T können Belichtungskorrektu ren jederzeit direkt...

Page 53: ...ezeigt 3 Einstellung mit MENU SET INFO Taste oder Auslöser speichern Das Belichtungsreihen Symbol erscheint Hinweise Je nach Belichtungs Betriebsart werden die Abstufungen durch Verändern der Verschlusszeit P A M oder der Blende T erzeugt Die Reihenfolge der Aufnahmen ist korrekte Belichtung Unterbe lichtung Überbelichtung Je nach verfügbarer Verschlusszeit Blenden Kombination kann der Arbeitsbere...

Page 54: ...er Blitz Belichtung wird unmittelbar vor der Aufnahme und dem Hauptblitz ein Messblitz ausgelöst Serienbild Aufnahmen und automatische Belichtungsreihen mit Blitz sind nicht möglich In solchen Fällen erscheint keine Blitz Anzeige und der Blitz wird nicht gezündet Wegen der ggf geringeren Blitzreichweite unter Wasser empfehlen wir das eingebaute Blitzgerät nur bis zu einer Wassertiefe von 5m einzus...

Page 55: ... Durch den Vorblitz der beim Druck auf den Auslöser kurz vor dem Hauptblitz ausgelöst wird verengen sich die Pupillen der in Richtung Kamera blickenden Personen so dass der Effekt verringert wird Manuelle Blitz Zuschaltung Für Gegenlicht Aufnahmen bei denen Ihr Hauptmotiv nicht formatfül lend ist und im Schatten liegt oder in Fällen in denen Sie hohe Kontraste z B bei direkter Sonneneinstrahlung m...

Page 56: ...glicherweise keine längeren Verschlusszeiten unterstützt da in solchen Fällen die Erhöhung der ISO Empfindlichkeit Vorrang hat Die längste Verschlusszeit kann mit Längste Bel Zeit festgelegt werden Automatische Blitz und Vorblitz Zuschaltung mit längeren Verschlusszeiten Für die Kombination der zuletzt beschriebenen Situationen bzw Funktionen Blitz ausgeschaltet OFF BLITZREICHWEITE Der nutzbare Bl...

Page 57: ...d zwischen den beiden Blitz Zeitpunkten BLITZ BELICHTUNGSKORREKTUREN Mit dieser Funktion kann die Blitz Belichtung unabhängig von der Belichtung durch das vorhandene Licht gezielt abgeschwächt oder verstärkt werden z B um bei einer abendlichen Außenaufnahme das Gesicht einer Person im Vordergrund aufzuhellen während die Lichtstimmung erhalten bleiben soll 1 Obere bzw EV Seite der Kreuztasten dreim...

Page 58: ...r Seite 42 beschriebenen Varianten Belichtungssteuerung Dies erfolgt völlig unabhängig von den Einstellungen des Verschluss zeit und Blendenrades Verschlusszeit je nach gewähltem Video Format 1 50s oder 1 60s Blende automatisch Ist eine korrekte Belichtung selbst mit der größten Blende nicht möglich wird automatisch die ISO Empfindlichkeit erhöht unab hängig von einer eventuellen manuellen Einstel...

Page 59: ... des ggf durch Wind verursachten Rauschens bei der Tonaufzeichnung steht Ihnen eine Dämpfungsfunktion zur Verfügung Im Menü Windgeräuschdämpfung und im Untermenü gewünschte Einstellung wählen Hinweise Sowohl die Entfernungseinstellung als auch die Veränderung der Brennweite erzeugen Geräusche die mit aufgezeichnet werden Um dieses zu vermeiden sollten Sie während einer laufenden Aufnahme beides ni...

Page 60: ... durchdrücken Der Ablauf wird durch die blinkende Selbstauslöser LED angezeigt 12s Vorlaufzeit zunächst langsam in den letzten 2s schneller 2s Vorlaufzeit wie oben für die letzten 2s beschrieben Im Monitor wird die verbleibende Zeit zurückgezählt Hinweise Eine bereits ablaufende Vorlaufzeit kann jederzeit durch erneutes Drücken des Auslösers neu gestartet werden Der Abbruch einer bereits ablaufend...

Page 61: ...n Hinweise Beim Formatieren gehen die auf der Karte vorhandenen Daten unwiderruflich verloren Machen Sie es sich deshalb zur Gewohnheit alle Ihre Aufnahmen immer möglichst bald auf einen sicheren Massenspeicher wie z B die Festplatte Ihres Rechners zu überspielen Schalten Sie die Kamera nicht aus während die Speicherkarte formatiert wird Falls die Speicherkarte in einem anderen Gerät wie z B einem...

Page 62: ...peichert die Bildnummern in aufsteigender Reihen fol ge Anfangs werden die zugehörigen Dateien alle in einem Ordner abgelegt Um die Speicherung der Aufnahmen klarer zu strukturieren können Sie jederzeit einen neuen Ordner anlegen um nachfolgende Aufnahmen darin in Gruppen zusammenzufassen Im Menü Bildnummerierung Zurücksetzen wählen und im Untermenü Rücksetzvorgang bestätigen ablehnen Hinweise Die...

Page 63: ... Ihre Einstellun gen für Uhrzeit Datum und Sprache nicht zurückgesetzt BILDSTABILISIERUNG Insbesondere bei schlechten Lichtverhältnissen ist die erforderliche Verschlusszeit selbst bei aktivierter AUTO ISO Funktion möglicherwei se zu lang um scharfe Aufnahmen zu erzielen Die Leica X U bietet eine Funktion bei der selbst bei sehr langen Verschlusszeiten oft noch scharfe Aufnahmen gelingen Im Menü B...

Page 64: ...ls zu dem Zeitpunkt noch nicht alle Aufnahmen der Serie vom Kamera inter nen Zwischenspeicher überschrieben worden sind Diese Kamera speichert Aufnahmen nach dem Standard DCF Design Rule for Camera File System Dateien die nicht mit dieser Kamera aufgenommen wurden können möglicherweise nicht mit ihr wiedergegeben werden In einigen Fällen hat das Monitorbild nicht die gewohnte Qualität oder der Mon...

Page 65: ...ssymbol ist weiß und ist rot unterstrichen 3 Gewählte Funktion mit MENU SET Taste aktivieren Das Abspielen beginnt in Zeitlupe und wird umso schneller je länger die Taste gedrückt gehalten wird Hinweis Aus dieser Ansicht heraus kann das Menü zum Schützen nicht aufgerufen werden Wechseln Sie dazu mit der INFO Taste in eine andere Ansicht Neben der normalen Wiedergabe steht sowohl bei Einzel wie auc...

Page 66: ...stellwippe nach rechts drücken um einen Ausschnitt der Aufnahme bis max 16fach zu vergrößern z B zwecks genauerer Beurteilung Einstellwippe nach links drücken ausgehend von der Normalgrö ße für die gleichzeitige Anzeige von 16 verkleinerten Aufnahmen z B um sich einen Überblick zu verschaffen oder die gesuchte Aufnahme schneller zu finden Aufrufen zusätzlicher Anzeigen bei vergrößerter Wiedergabe ...

Page 67: ...er vergrößert wird desto mehr lässt die Wiedergabequalität nach wegen der proportional geringeren Auflösung Mit anderen Kameratypen erstellte Aufnahmen lassen sich möglicher weise nicht vergrößern Videoaufnahmen können nicht vergrößert werden AUSSCHNITT WÄHLEN Bei einer vergrößerten Aufnahme können Sie den vergrößerten Aus schnitt aus der Mitte heraus verschieben um z B die Wiedergabe außermittige...

Page 68: ...nü Einzelbild wählen 2 MENU SET Taste drücken Nach dem Löschen erscheint die nächste Aufnahme Wenn die Aufnahme geschützt ist wird sie weiterhin angezeigt und kurzzeitig erscheint die Meldung Bild geschützt Alle Aufnahmen löschen 1 Im Löschen Menü Alle wählen 2 MENU SET Taste drücken Ein Untermenü erscheint 3 Gewünschte Option wählen 4 Mit MENU SET Taste oder INFO bestätigen Nach erfolgtem Löschen...

Page 69: ...chte Seite der Kreuztasten drücken Das Schützen Löschschutz aufheben Menü vor der Durchfüh rung verlassen und zum normalen Wiedergabebetrieb zurückkehren PLAY Taste drücken Hinweise Wenn Sie versuchen geschützte Aufnahmen zu löschen erschei nen Warnmeldungen Möchten Sie diese Aufnahmen dennoch löschen entfernen Sie den Schutz wie oben beschrieben Der Löschschutz ist nur in dieser Kamera wirksam Se...

Page 70: ...aktisch sein wenn das Monitorbild nicht als aufrecht stehende Aufnahme gezeigt wird Die Leica X U bietet Abhilfe für dieses Problem Im Menü Anz autom drehen und im Untermenü gewünschte Einstellung wählen Wenn An gewählt wird werden Aufnahmen im Hochformat automatisch aufrecht stehend angezeigt Hinweise Aufnahmen im Hochformat die senkrecht stehend dargestellt werden sind notwendigerweise erheblich...

Page 71: ...n WiFi Speicherkarten wie z B der FlashAir Karte von Toshiba Diese Karten können als WLAN Hotspot arbeiten und ermöglichen so über WiFi und einen Internetbrowser die drahtlose Datenübertragung von der Kamera mit allen WLAN fähigen Geräten wie z B Notebooks Tablets Smartpho nes und anderen Kameras aber auch mit sozialen Netzwerken und Cloud Speicherdiensten Ein Ausschalten der Funktion Im Menü Flas...

Page 72: ...n Bildqualität zu erreichen INSTALLIEREN VON FIRMWARE UPDATES Leica arbeitet permanent an der Weiterentwicklung und Optimierung seiner Produkte Da im Fall von digitalen Kameras sehr viele Funktio nen rein elektronisch gesteuert werden können einige dieser Ver besserungen und Erweiterungen des Funktionsumfangs nachträglich in der Kamera installiert werden Zu diesem Zweck bietet Leica in unregelmäßi...

Page 73: ...0 ERSATZTEILE Bestell Nr Objektivdeckel 423 117 001 024 Blitzschuhabdeckung 423 117 001 010 Tragriemen 423 117 001 014 Lithium Ionen Akku Leica BP DC 81 18706 Akku Schutzhülle 423 089 003 012 Leica BC DC8 Ladegerät inkl Wechselsteckern 423 089 003 008 Netzstecker EU 423 089 003 014 Netzstecker USA Japan 423 089 003 016 Netzstecker GB Hongkong 423 089 003 018 Netzstecker China 423 089 003 020 Netzs...

Page 74: ...gen oder die Aufnahmen stören Sollte die Kamera durch die Einwirkung von elektromagnetischen Feldern fehlerhaft arbeiten schalten Sie sie aus nehmen Sie den Akku heraus und schalten Sie sie danach wieder ein Verwenden Sie die Kamera nicht in der unmittelbaren Nähe von Radiosendern oder Hochspannungsleitungen Deren elektromagnetische Felder können die Bildaufzeichnungen ebenfalls stören Schützen Si...

Page 75: ...Dies ist jedoch keine Fehlfunktion und beeinträchtigt die Bildwiedergabe nicht Sensor Höhenstrahlung z B bei Flügen kann Pixeldefekte verursachen Kondensationsfeuchtigkeit Falls sich Kondensationsfeuchtigkeit auf oder in der Kamera gebildet hat sollten Sie sie ausschalten und für etwa eine Stunde bei Raumtemperatur liegen lassen Haben sich Raum und Kameratempe ratur angeglichen verschwindet die Ko...

Page 76: ... der Schmierstellen vorzubeugen sollte die Kamera etwa alle drei Monate mehrmals ausgelöst werden Empfehlenswert ist auch wiederholtes Verstellen und Benutzen aller anderen Bedienelemente Für das Objektiv Auf der Objektivaußenlinse sollte die Staubbeseitigung mit einem weichen Haarpinsel normalerweise völlig ausreichen Falls sie jedoch stärker verschmutzt ist kann sie mit einem sehr sauberen garan...

Page 77: ...schützen Ein kurzgeschlos sener Akku kann sehr heiß werden und schwere Verbrennungen verursachen Damit der Akku geladen werden kann muss er eine Temperatur zwischen 0 C und 35 C aufweisen ansonsten schaltet sich das Ladegerät nicht ein bzw wieder aus Sollte ein Akku hinfallen überprüfen Sie sofort das Gehäuse und die Kontakte auf etwaige Schäden Das Einsetzen eines beschädig ten Akkus kann seiners...

Page 78: ...te gelegentlich zu formatieren da die beim Löschen entstehende Fragmentierung einiges an Speicherkapazität blockieren kann Aufbewahrung Wenn Sie die Kamera längere Zeit nicht einsetzen empfiehlt sich Folgendes a Kamera ausschalten b Speicherkarte herausnehmen und c Akku entnehmen nach spätestens drei Tagen gehen Uhrzeit und Datum verloren Ein Objektiv wirkt wie ein Brennglas wenn praller Sonnensch...

Page 79: ...ie Aufbewahrung in dicht abgeschlossenen Behältern oder Taschen ist nur empfehlens wert wenn zusätzlich ein Trockenmittel wie z B Silica Gel verwendet wird Bewahren Sie die Kamera zur Vermeidung von Fungus Befall auch nicht längere Zeit in einer Ledertasche auf Notieren Sie die Fabrikationsnummer Ihrer Leica X U weil sie im Verlustfall außerordentlich wichtig ist X U_DE indd 75 20 10 2015 09 26 49...

Page 80: ...Zeitautomatik 46 Betrachten der Aufnahmen siehe Wiedergabebetrieb Bildfrequenz siehe Hauptschalter Bildnummerierung 58 Blitzbetrieb 50 Dateiformat 32 Datenübertragung auf einen Rechner 67 DNG 32 68 Ein Ausschalten siehe Hauptschalter Entfernungseinstellung 38 AF Hifslicht 38 Autofokus 38 Manuelle Einstellung 41 Messmethoden 39 Scharfeinstellhilfe 41 Ersatzteile 69 Farbraum 54 68 Farbsättigung 36 F...

Page 81: ...des Löschschutzes 65 Selbstauslöser 56 Serienaufnahmen siehe Hauptschalter Software 68 Speicherkarte Einsetzen und Herausnehmen 20 Stabilisierung 59 54 Technische Daten 88 Teile Bezeichnung der 12 Tonaufzeichnung 55 Tragriemen 16 Uhrzeit und Datum 30 Unterwasser Betriebsart 7 Vergrößern von Aufnahmen bei der Wiedergabe 62 Videoaufnahmen 54 Vorsichtshinweise 70 Warnhinweise 8 Weißabgleich 33 54 Wie...

Page 82: ...sers nach Druckpunktnahme des Auslösers rot bei Über oder Unterschreitung des Einstellbereichs mit Programm Zeit und Blendenautomatik sonst weiß 3 Hinweis auf veränderte Zeit Blenden Kombination erscheint nur bei Programmautomatik und erfolgter Verschiebung 4 Hinweis auf Programm Shift Möglichkeit Veränderung der Zeit Blenden Kombination auf die Einstellung langer Ver schluss zeiten mit der Einste...

Page 83: ...ktur eingestellt einschließlich Korrekturwert nicht bei manueller Einstellung von Verschlusszeit und Blende 8 Akku Ladezustand ausreichende Kapazität nachlassende Kapazität ungenügende Kapazität Ersatz oder erneutes Aufladen erforderlich 9 Normales Autofokus Messfeld alternativ zu 10 10 Spot Autofokus Messfeld alternativ zu 9 11 Vergrößerter mittlerer Ausschnitt des Bildes alternativ zu 9 10 ersch...

Page 84: ...1600 3200 6400 12500 17 Weißabgleich Erscheint nicht bei Verwendung der Unterwasser Betriebsart Automatisch Kunstlicht Sonne Blitz Wolken Schatten Graukarte 1 Graukarte 2 Farbtemperatur SET Graukarte 1 SET Graukarte 2 Einstellung Farbtemp 18 Histogramm RGB erscheint nur wenn aktiviert in Gelb bei eingeschaltetem Blitzgerät und oder mit längeren Verschlusszeiten als 1 2s sonst in Weiß 19 Blitz Beli...

Page 85: ...matische Blitz Zuschaltung mit längeren Verschlusszeiten Automatische Blitz Zuschaltung mit Vorblitz und längeren Verschlusszeiten 21 Selbstauslöser aktiviert ablaufend 2 Sekunden Vorlaufzeit 12 Sekunden Vorlaufzeit 22 Bildzählwerk verbleibende Bildzahl abgelaufene Videoaufnahmezeit bei fehlender Speicherkapazität blinkt als Warnung 0 23 Hinweis auf eingesetzte Speicherkarte 24 Zusätzlich zu 1 12 ...

Page 86: ...bei Videoaufnahmen 28 Blendenwert s 6 nicht bei Videoaufnahmen 29 Belichtungs Korrekturwert s 7 nicht bei Videoaufnahmen 30 Akku Ladezustand s 8 31 Hinweis auf die Möglichkeit einen Ausschnitt zu vergrößern nicht bei Videoaufnahmen 32 Symbol für Videoaufnahme 33 Symbol für löschgeschützte Aufnahme Bei verkleinerter Wiedergabe von 16 Aufnahmen 34 Angewählte Aufnahme X U_DE indd 82 20 10 2015 09 26 ...

Page 87: ...dergabezeit Laufbalken 35 36 Zusätzlich zu 25 33 nur bei Ausschnittsvergrößerungen durch Drücken der INFO Taste 37 Hinweis auf die Verwendung der Einstellwippe zur Ausschnittsver größerung verkleinerung einschließlich Vergrößerungsfaktor 38 Darstellung von Ausschnittsgröße und lage 37 38 X U_DE indd 83 20 10 2015 09 26 52 ...

Page 88: ...tomatische Belichtungsreihe 41 Datum und Uhrzeit der gezeigten Aufnahme 42 Speicherkarte 43 Bildzählwerk Aufnahme Nummer Gesamtzahl 44 Scharfeinstell Betriebsart s 15 45 Dateiformat Kompressionsrate 46 JPEG Auflösung Video Aufnahmeformat 47 Dateigröße 48 Weißabgleich s 17 49 ISO Empfindlichkeit verwendeter Wert s 16 50 Videoaufnahme X U_DE indd 84 20 10 2015 09 26 52 ...

Page 89: ...nahmen 53 Blitz Belichtungskorrektur einschließlich Korrekturwert 54 Blitz Betriebsart s 21 erscheint ohne Blitz Belichtungskorrektur an dessen Stelle a Keine Anzeige Aufnahme ohne Blitz b Aufnahme ohne Vorblitz c Aufnahme mit Vorblitz X U_DE indd 85 20 10 2015 09 26 53 ...

Page 90: ...Sättigung s S 36 Kontrast s S 36 Blitz Zündzeitpunkt s S 53 Monitor Helligkeit s S 31 Seite 3 Monitor Farbeinstellung s S 31 Aufnahme Histogramm s S 43 Wiederg Histogramm s S 43 Bildnummerierung zurücksetzen s S 58 Autom Wiedergabe s S 60 Autom Abschaltung s S 30 LCD Auto Aussch s S 31 Farbraum s S 58 Seite 4 Datum Uhrzeit s S 30 Windgeräuschdämpfung s S 55 Verschluss Lautstärke s S 30 Piepton s S...

Page 91: ...DE 87 Anhang Seite 5 Formatieren s S 57 Firmware Version s S 68 Benutzerprofil s S 59 X U_DE indd 87 20 10 2015 09 26 53 ...

Page 92: ...0 ISO 3200 ISO 6400 ISO 12500 Weißabgleich automatisch Voreinstellungen für Tageslicht bewölkt Halogenbeleuchtung Schatten elektronischer Blitz zwei manuelle Einstellungen manuelle Farbtemperatur Einstellung UW Betriebsart Mit separater Taste aufrufbar passt Weißabgleich und Verzeichnungskorrektur an die Bedingungen unter Wasser an Autofokus System Kontrastbasiertes Autofokus System Entfernungs Ei...

Page 93: ... 7V Kapazität 1600mAh nach CIPA Standard ca 450 Aufnahmen Ladezeit nach Komplettentladung ca 200 min Modell Nr BP DC8 Hersteller PT SANYO Energy Batam Hergestellt in Indonesien Ladegerät Eingang Wechselspannung 100 240V 50 60Hz 0 2A automatisch umschaltend Ausgang Gleichspannung 4 2V 0 65A Modell Nr BC DC8 Betriebsbedingungen 0 bis 35 C Hersteller Phihong Dongguan Electronics Co Ltd Hergestellt in...

Page 94: ...lefax 49 0 6441 2080 425 la leica camera com LEICA PRODUCT SUPPORT Anwendungstechnische Fragen zu den Leica Produkten einschließlich der ggf mitgelieferten Software beantwortet Ihnen schriftlich telefonisch oder per E Mail die Product Support Abteilung der Leica Camera AG Auch für Kaufberatungen und die Bestellung von Anleitungen ist er Ihr Ansprechpartner Alternativ können Sie Ihre Fragen ebenso ...

Page 95: ...Leica X U Instructions X U_EN indd 91 20 10 2015 09 28 57 ...

Page 96: ...o that you can make the most of your Leica X U PACKAGE CONTENTS Please check the scope of included accessories for completeness before using your Leica X U for the first time a Leica BP DC8 rechargeable battery b Battery case c BC DC8 battery charger with interchangeable plugs d Carrying strap e Lens cap with safety strap f Accessory shoe cover This product is licensed under the AVC Patent Portfol...

Page 97: ...t into an outlet on a circuit different from that to which the receiver is connected Consult the dealer or an experienced radio TV technician for help FCC Caution To assure continued compliance follow the attached installation instructions and use only shielded interface cables with ferrite core when connecting to computer or peripheral devices Any changes or modifications not expressly approved b...

Page 98: ...ater impacting the camera with high pressure e g when jumping or fall ing into the water with the camera under waterfalls hose water or high pressure water cannon impact etc The camera will maintain its water and dust resistance only within the temperature range of 0 C to 40 C 32 104 F Please ensure that the camera will only be operated and stored under permissible conditions i e not in direct sun...

Page 99: ...ver of the battery compartment memory card slot only after all foreign particles have been removed and the camera is completely dry After opening the cover Perform a careful visual inspection of the door the seal around the battery compartment and the memory card slot Any remaining water or any visible moisture droplets and any foreign particles e g sand or hair must be removed immediately with a ...

Page 100: ... particles Tiny air bubbles escaping from the camera housing are normal and not sign of a fault Wipe the camera dry after cleaning and leave it to dry out completely in a well ventilated and shady location Best would be to place it on a clean dry cloth Any remaining moisture in any of the openings can then safely escape Never use hot air e g a hair dryer for drying Open the door of the battery com...

Page 101: ...ing Disabling the Function Press the cross pad downward With the underwater mode enabled will appear to the left of the header and the display for the white balance setting will disappear All other camera functions remain available during underwater photography or video recording Another important point to remember is that the available light diminishes with increasing depth distance and that part...

Page 102: ... accessories to prevent faults short circuits or electric shock Do not attempt to remove parts of the housing covers repairs must be done at authorized service centers only LEGAL INFORMATION Please ensure that you strictly observe copyright laws The recording and publication of pre recorded media such as tapes CDs or other published or broadcast material may contravene copyright laws This also app...

Page 103: ...Messages Camera Manufacturing Date The manufacturing date of your camera is printed on the label on the Guarantee Card and or on the packaging The date format used is Year Month Day X U_EN indd 99 20 10 2015 09 28 58 ...

Page 104: ...ain Switch 114 Frame Rate 114 Shutter Button 115 Menu Controls 116 Basic Camera Settings Menu Language 120 Date Time 120 Automatic Camera Shutdown 120 Key Tones and Shutter Sounds 120 Monitor Settings 121 Basic Image Settings File Format Compression Rate 122 JPEG Resolution 122 White Balance 123 ISO Sensitivity 125 Image Properties 126 Picture Mode Distance Setting 128 Automatic Distance Setting A...

Page 105: ...umbers 148 User Profiles 149 Image Stabilization 149 Playback Mode Playback Modes 150 Standard Playback 150 Video Playback 151 Image Selection 152 Enlarging Images Simultaneous Playback of 16 Images 152 Detail Selection 153 Deleting Images Recordings 154 Image Protection Clearing Delete Protection 155 Viewing Pictures in Portrait Format 156 Miscellaneous Data Transfer to a PC 157 Wireless Data Tra...

Page 106: ...enu to access the menu for the distance metering method to activate the AF metering range frame 18 PLAY button to activate the continuous playback mode to return to full 1 1 picture review 19 Direction buttons to set distances manually to scroll through menus and sub menus to set a value for exposure compensation bracketing and flash exposure compensation to zoom in out of viewed images to set lon...

Page 107: ... 22 Status LED a Flashing Distance setting not available reading writeing of picture data b Continuously on Distance and exposure setting completed and saved 23 Monitor Bottom view 24 Door for battery compartment memory card slot with a Locking unlocking lever b Locking unlocking slider 25 Tripod thread A DIN 4503 26 Memory card slot 27 Battery compartment 28 Battery locking slider X U_EN indd 103...

Page 108: ...ed pages Please take particular note of the information about underwater use on pages 94 97 Preparation 1 Attach an appropriate mains plug to the charger see p 109 2 Insert the battery in the charger see p 109 3 Connect the charger to a mains socket 4 Set the main switch of the camera to OFF see p 114 5 Insert the charged battery into the camera see p 110 6 Insert the memory card see p 112 7 Remov...

Page 109: ...ng 6 Press the shutter button to the first pressure point to activate and save focusing and exposure metering see p 115 7 Push the shutter button all the way down to take the picture Viewing photographs Press the PLAY button To view other pictures Press right or left on the cross pad Zooming in Press the direction button right see p 152 Deleting pictures Press the DELETE FOCUS button and select th...

Page 110: ...e instructions may result in an explosion The batteries must not be exposed to sunlight heat humidity or condensation for extended periods Batteries must not be placed in a microwave oven or in a high pressure vessel as this may cause an explosion Never throw batteries into a fire as this may cause an explosion Damp or wet batteries must not be charged or used in the camera under any circumstances...

Page 111: ...e to the batteries and in extreme cases serious or life threatening injuries The charger supplied should be used exclusively for charging this battery type Do not attempt to use it for other purposes Ensure that the power socket used is freely accessible Heat is generated during charging Therefore batteries must not be charged in small enclosed or unventilated spaces The battery and charger must n...

Page 112: ...humidity To maximize the life of the battery it should not be exposed to extremely high or low temperatures for long periods e g in a parked car in summer or winter Even under perfect conditions of use every battery has a limited service life After several hundred charging cycles operating times become significantly shorter In line with the applicable regulations batteries should be disposed of at...

Page 113: ...ocal sockets Plug Attaching Removing 1 2 Note The charger automatically adjusts to the relevant mains voltage PLACE THE BATTERY IN THE CHARGER 1 2 CHARGE STATUS DISPLAY Correct charging is indicated by the red status LED When it turns green the battery is fully charged X U_EN indd 109 20 10 2015 09 29 00 ...

Page 114: ...Y MEMORY CARD Turn off the camera i e set the main switch to OFF Open the battery compartment memory card slot Important Do not open the battery compartment door underwater 2 1 Inserting the battery Click X U_EN indd 110 20 10 2015 09 29 03 ...

Page 115: ...amage the memory card Charge level display The charge level of the battery is indicated on the monitor see p 168 Notes Remove the battery if you will not be using the camera for a long period of time The date and time must be reset within 2 days after the capacity of the built in backup battery in the camera has expired X U_EN indd 111 20 10 2015 09 29 04 ...

Page 116: ...EN 112 Preparation Inserting the memory card You can use SD SDHC or SDXC memory cards in your Leica X U click Removing the memory card 1 2 click X U_EN indd 112 20 10 2015 09 29 06 ...

Page 117: ...y Video recordings in particular require a high write speed Do not open the door and do not remove the memory card or the battery while the status LED is lit to indicate that the camera is accessing the memory Otherwise the data on the card may be destroyed and malfunctions can occur in the camera As electromagnetic fields electrostatic charges and defects in the camera or the card can lead to dam...

Page 118: ...y one picture is taken If the main switch is set to C and the self timer is used at the same time only a single picture is taken The maximum picture frequency of 5 fps is only available with shutter speeds of 1 60s or faster1s 1 4s at 3 fps After a series with the maximum number of 7 pictures the frequency with which they are taken declines slightly This is due to the time required to transfer the...

Page 119: ... again Before pressing the shutter button all the way down check that the distance setting autofocus if active and exposure metering are complete for details of exposure setting AF and the corresponding displays on the monitor refer to p 132 128 and 168 Pressing the shutter button all the way down triggers exposure Notes The menu system can be used to select or set key acknowledg ment response ton...

Page 120: ... characters in white The relevantly current setting is displayed on the right The white field in the scrollbar on the left edge indicates which of the five pages of the menu list you are currently on SCROLLING THROUGH THE MENUS Press up down on the cross pad or use the direction buttons OPENING A SUB MENU OPTION Press the cross pad downward The sub menu list appears The active sub menu option is u...

Page 121: ...ppears again and the confirmed new setting is shown on the right in the active menu option line Exiting a sub menu without confirming a setting Press left on the cross pad or the shutter button With the cross pad The menu list appears again and the retained previous setting is shown on the right in the active menu option line With the shutter button The monitor screen for picture mode appears X U_...

Page 122: ...image for picture mode appears or Press the PLAY button The monitor image for playback mode appears Notes The menu is normally opened at the position of the last option set For some options there are settings in a second level of sub menus Settings in these sub menus are opened and made in exactly the same way as described above X U_EN indd 118 20 10 2015 09 29 11 ...

Page 123: ...ing method only in playback picture mode EV up on cross pad for exposure compensation automatic bracketing and flash exposure compensation settings right on cross pad for selecting the flash modes left on cross pad for activating the self timer and selecting the delay time Other than with the menu functions the settings for these functions can be confirmed with the shutter button by pressing to th...

Page 124: ... time they have to be reset AUTOMATIC CAMERA SHUTDOWN Select Auto Power Off in the menu and then make the desired setting in the sub menu If this function is active the camera switches to energy saving standby mode after the selected time Note When the camera is in standby mode it can be turned on at any time by pressing the shutter button or by turning it off and on via the main switch KEY TONES ...

Page 125: ...r rendering of the monitor can be adjusted Brightness Settings Select Monitor Brightness and then make the desired setting in the sub menu Color Settings 1 Select Monitor Color Adjustment from the menu An image with cross hairs appears The ends of the cross have color markings for the possible settings yellow green blue and magenta 2 Move the cursor which is initially in the center to the desired ...

Page 126: ... are an approximation as the file size for compressed images can vary considerably depending on the subject of the photograph JPEG RESOLUTION If one of the JPG formats is selected pictures can be taken with five different resolutions numbers of pixels This allows you to adjust the setting precisely to the intended use or to the available memory card capacity Select JPEG Resolution from the menu an...

Page 127: ...B button 4 Select the required setting by pressing up down on the cross pad or the use the direction buttons 5 Save your settings via the MENU SET or INFO button The following are available Page 1 1 Automatic 2 for incandescent lighting 3 for outdoor pictures in sunlight 4 for illumination with electronic flash Page 2 5 for outdoor pictures with cloudy sky 6 for outdoor pictures with the main subj...

Page 128: ...your settings by pressing the MENU SET or the INFO button The settings can then be retrieved using Color temperature Fine Tuning of White Balance Settings A manual fine tuning function is available for all settings 1 Press the WB button 2 Press the cross pad downward An image with cross hairs appears The ends of the cross have color markings for the possible settings yellow green blue and magenta ...

Page 129: ... button and select the desired setting in the two page list i e AUTO ISO for the automatic setting or one of the eight fixed settings Within the AUTO ISO option it is possible to limit the sensitivity range to be used e g to control noise and the slowest shutter speed to be used can also be specified e g to prevent blurred pictures of moving subjects 1 Select Auto ISO Settings in the menu 2 Select...

Page 130: ...e determines whether it has a more flat or brilliant effect The contrast can therefore be influenced by increasing or reducing this difference Using the correct distance setting or focus at least of the main subject is prerequisite for a successful picture The impression of a picture being in focus is to a great extent determined by its edge sharpness i e by how small the transition area between l...

Page 131: ...d Vivid for high saturation colors and Natural for slightly less color saturation and softer contrast and there are two monochrome settings as well B W Natural and B W High Contrast rich contrast Note The settings for Film Mode can be further fine tuned using the image property options described in the previous section The color rendering variations are then marked with an asterisk e g Standard to...

Page 132: ...em is unable to set the distance correctly e g when The distance to the subject you are aiming at is outside the available range and or The subject is not sufficiently illuminated see next section Such situations and subjects are indicated by The color of the rectangle changing to red The 11 field metering display changing to a single red rectangle Important The shutter button is not locked regard...

Page 133: ...ject For portrait close ups it is usually recommended to have a sharp focus on the eyes The slightly longer single field measuring range is less critical when focusing and therefore easier to handle while still allowing selective measuring Both measuring methods allow you to shift the AF frame to any point on the monitor screen e g for simplified use for off center subjects 1 Hold the DELETE FOCUS...

Page 134: ...pper or lower or the four left or right AF fields 1 Hold the DELETE FOCUS button pressed for 1s All displays apart from the 11 AF frames disappear Initially only the 9 frames in the central group have red outlines Red triangles on all sides indicate the possible settings 2 Use the cross pad to select the desired frame group The selections available are indicated by the triangles To return to the n...

Page 135: ...n of the subject Reason The larger the details of the subject are shown in the monitor the better you can assess their sharpness and the more accurately you can set the distance This Assist Function enlarges a central section of the monitor image 1 Select MF Assist in the menu and then select the desired setting in the sub menu 2 Determine the trimming 3 Turn the distance setting ring on the lens ...

Page 136: ...r difficult conditions and therefore for the cameras automatic mode Center Weighted Metering This metering method allocates the highest weighting to the center of the image field but also records all other areas Particularly when used in conjunction with metering memory lock it allows the exposure to be selectively adjusted to specific sections of the subject while simultaneously taking into accou...

Page 137: ...the setting in the sub menu Note For a picture with flash the histogram cannot represent the final exposure as the flash is fired after it is displayed For regular playback mode PLAY Select Play Histogram in the menu and then choose the required setting in the sub menu Select an option with a clipping function if you want excessively bright parts of the pictures to be indicated Notes In picture mo...

Page 138: ...just the set exposure shutter and ISO values as well as preset ones to achieve the best possible image quality The image corners will be as well lit as possible as darker corners can often be the result of the combination of a shutter speed of 1 2000s with exposure values under 3 5 The camera will react to such a setting as follows Automatic program P correction occurs via an automatic shift Apert...

Page 139: ...hange the combination before taking the picture CHANGING THE PRESET SHUTTER SPEED APERTURE COMBINATIONS SHIFT Changing the preset values using the Shift function combines the security and speed of fully automatic exposure control with the freedom to adjust the speed aperture combination selected by the camera to your own preferences at any time For faster speeds e g for sports shots press the left...

Page 140: ...omatically set shutter speed seems appropriate for the intended composition 4 Press the shutter button all the way down to take the picture SHUTTER SPEED PRIORITY T Shutter speed priority mode sets the exposure automatically according to the manually selected shutter speed It is therefore particularly suitable for pictures of moving subjects where the sharpness of the movement depicted is a critic...

Page 141: ... displayed in red If the set values and or the exposure seems appropriate for the intended composition 4 Push the shutter button all the way down to take the photo METERING MEMORY LOCK For composition reasons it can be beneficial not to have the main subject in the center of the picture In that case the metering memory lock function in P T and A exposure modes and with AF single field and spot met...

Page 142: ... the scale During setting you can observe the effect on the monitor image which gets darker or lighter 3 Press the MENU SET INFO or shutter button to save the setting The exposure compensation symbol and the set value are displayed Notes With aperture priority and shutter speed priority A T enabled exposure corrections can be carried out at any time directly using the setting rings i e without hav...

Page 143: ...e MENU SET INFO or shutter button to save the setting The bracketing symbol appears Notes Depending on the exposure mode the graduations are produced by changing the shutter speed P A M or the aperture T The sequence of the exposures is correct exposure underexpo sure overexposure Depending on the available shutter speed aperture combination the working range of the automatic bracketing function m...

Page 144: ...ash is triggered before the main flash to determine flash exposure Serial exposures and automatic bracketing with flash are not available For these the flash display will not appear and no flash will be triggered We recommend using the integrated flash unit underwater only for depths up to 5m 16ft due to the limited flash range In greater depths the use of an external underwater capable flash unit...

Page 145: ...photographs indoors The pre flash which is triggered shortly before the main flash when you press the shutter button narrows the pupils of people looking at the camera thereby reducing the effect Automatic Flash Activation For back lit pictures where your main subject does not fill the entire frame and is in shadow or in situations where you want to mitigate high contrasts e g due to direct sunlig...

Page 146: ...possible that the camera may not support slower shutter speeds as in such cases the increase in ISO sensitivity takes precedence The minimum shutter speed can be specified using Slowest Speed Automatic flash and pre flash activation with slower shutter speeds For a combination of the situations and functions described above Flash Disabled OFF FLASH RANGE The available flash range depends on the ap...

Page 147: ...between the two flash firing points FLASH EXPOSURE COMPENSATION This function can be used to selectively reduce or strengthen the flash exposure regardless of the exposure from available light e g in a picture taken in the evening to lighten the face of a person in the foreground while retaining the lighting atmosphere 1 Press up or EV on the cross pad three times The relevant scale appears 2 Set ...

Page 148: ...ed on page 132 Exposure Control Carried out completely independently of the settings with the shutter speed and aperture dial Shutter speed Depending on the selected video format 1 50s or 1 60s Aperture Automatic If a correct exposure is not possible even with the maximum aperture the ISO sensitivity is automatically increased regardless of any manual setting Color Space Video recordings operate o...

Page 149: ...orded in stereo using the built in microphones To reduce any noise caused by wind a damping function is available Select Wind noise cancellation in the menu and then the required setting in the sub menu Notes Focusing and zooming cause noise which will also be recorded Try and avoid using these functions during an ongoing recording Due to sound transmission characteristics in water it is not advis...

Page 150: ...shutter button all the way down to take the picture The countdown is indicated by the flashing self timer LED 12s delay time slowly at first faster for the last 2s 2s delay time As described above for the last 2s The remaining time is counted down in the monitor Notes A delay time in progress can be restarted at any time by pressing the shutter button again The only way to cancel a delay time in p...

Page 151: ...he sub menu Notes Formatting will cause all data on the card to be irretrievably lost We therefore recommend that you make a habit of transferring all your pictures to a secure mass storage medium e g the hard drive on your computer as soon as possible Do not turn the camera off while the memory card is being formatted If the memory card has been formatted in another device such as a computer you ...

Page 152: ...ibrated working environ ments CREATING NEW FOLDER NUMBERS Your Leica X U saves the picture numbers in ascending order Initially the relevant files are all stored in one folder To structure the storage of pictures more clearly you can create a new folder at any time so that subsequent pictures can be grouped together Select Reset Image Numbering from the menu and confirm reject the reset process in...

Page 153: ...he factory settings your settings for date time and language are not reset IMAGE STABILIZATION In poor lighting conditions even with the AUTO ISO function activated the selected shutter speed may be too slow to produce sharp pictures Your Leica X U offers a function that generates sharp pictures at slower shutter speeds as well Select Image Stabilization in the menu and then the desired setting in...

Page 154: ... if all pictures in the series have not yet been transferred from the camera s internal buffer memory This camera stores pictures in line with the DCF standards Design Rule for Camera File System It may not be possible to view files created on another device on this camera In some cases the monitor image may not have the usual quality or the monitor will remain blank and only display the file name...

Page 155: ...s The currently active function symbol is white and is underlined in red 3 Activate the selected function by pressing MENU SET Playback begins in slow motion and gets faster the longer the button is held down Note The protection menu cannot be opened from this view Toggle to another view by pressing the INFO button In addition to normal review mode for both single pictures and video recordings a f...

Page 156: ...GES SIMULTANEOUSLY Press the right direction button to enlarge a detail of the picture up to 16x to study it in more detail Press the left direction button starting from normal size to simultaneously display 16 reduced pictures to get an overview or to find the image you are looking for Accessing Additional Displays when Viewing a Zoomed Image Press the INFO button You will see The zoom factor The...

Page 157: ...cannot be opened The more the picture is enlarged the more the reproduction quality deteriorates due to the proportionately lower resolution It may not be possible to enlarge pictures taken with other camera types Video recordings cannot be zoomed SELECTING AN IMAGE DETAIL In an enlarged picture you can move the enlarged detail from the center e g to check the reproduction of off center subject de...

Page 158: ...ngle in the Delete menu 2 Press the MENU SET button After deleting the next picture appears If the picture is protected it continues to be displayed and the message This is protected appears briefly Deleting All Images 1 Select All in the Delete menu 2 Press the MENU SET button A sub menu appears 3 Select the desired option 4 Confirm by pressing the MENU SET or INFO button After deleting the messa...

Page 159: ...ages from the Protect Delete Menu Press left right on the cross pad Exiting the Protect Delete Menu Without Action to Return to Normal Review Mode Press the PLAY button Notes If you attempt to delete protected pictures warning messages appear If you still want to delete these pictures clear the protection as described above Protection is only effective on this camera Even protected pictures are de...

Page 160: ...he camera held horizontally if the monitor image is not displayed as an upright picture Your Leica X U offers a remedy for this problem Select Auto Rotate Display in the menu and then the relevant setting in the sub menu If On is selected portrait format pictures are automatically displayed upright Notes Portrait format pictures displayed upright are necessarily significantly smaller This function...

Page 161: ...hAir by Toshiba These cards can be used as a WLAN hotspot allowing a wireless transmission of data from the camera to any WLAN capable device like notebooks tablets smartphones and other cameras but also social networks and cloud based storage services via WiFi and a browser Enabling Disabling the Function Select FlashAir in the menu and then the required setting in the sub menu Notes Please remem...

Page 162: ...e best possible image quality INSTALLING FIRMWARE UPDATES Leica is constantly working on developing and optimizing its products As digital cameras have many functions that are controlled electroni cally some of these improvements and enhancements to the functions can be installed on the camera at a later date To do this Leica provides firmware updates at irregular intervals which you can convenien...

Page 163: ...423 117 001 024 Accessory shoe cover 423 117 001 010 Carrying strap 423 117 001 014 Lithium ion rechargeable battery Leica BP DC 81 18706 Battery protection case 423 089 003 012 Leica BC DC8 charger incl replacement plugs 423 089 003 008 EU mains plug 423 089 003 014 USA Japan mains plug 423 089 003 016 GB Hong Kong mains plug 423 089 003 018 China mains plug 423 089 003 020 Korea mains plug 423 0...

Page 164: ... immediate vicinity of radio transmitters or high voltage power lines Their magnetic fields can also interfere with picture recordings Protect the camera from contact with insect sprays and other aggressive chemicals Benzene cleaning solvent thinner and alcohol must not be used for cleaning Certain chemicals and liquids can damage the camera s housing or the surface finish As rubber and plastics s...

Page 165: ...u should turn it off and leave it to stand at room temperature for around an hour Once the camera temperature has adjusted to room temperature the condensation will disappear by itself If the camera is exposed to significant temperature fluctuations condensation can form on the monitor Wipe it off carefully with a soft dry cloth X U_EN indd 161 20 10 2015 09 29 18 ...

Page 166: ...vent the lubrication points becoming gummed up the camera shutter should be operated several times every three months It is also recommended that you repeatedly move and use all other controls Lens Care Using a soft bristled brush should generally be sufficient to remove dust from the outer lens elements Use a clean soft cloth to remove stubborn dirt residue in a circular motion from the inside of...

Page 167: ...ected against contact with metal objects such as paper clips or jewelry A short circuited battery can get very hot and cause severe burns For the battery to charge it must have a temperature of between 0 35 C 32 95 F otherwise the charger does not turn on or turns off again If a battery is dropped check the casing and the contacts immediately for any damage Using a damaged battery can damage the c...

Page 168: ...ve fragmented memory space occurring after image deletion and to free up all available space Storage If you are not using the camera for a longer period of time we recommend that you a Turn off the camera b remove the memory card and c remove the rechargeable battery the stored date and time will be lost after a maximum of three days A lens works like a magnifying glass if bright sunlight shines o...

Page 169: ...ch as possible Storage in airtight containers or cases is recommended only if a desiccant such as silica gel is used Do not store the camera in a leather case for extended periods of time to prevent fungal growth Note down the serial number of your Leica X U as you will need this is extremely important information in case of loss X U_EN indd 165 20 10 2015 09 29 18 ...

Page 170: ...1 Metering methods 129 DNG 122 158 Enlargement of pictures during review 152 Exposure control 132 Aperture priority 136 Automatic program 135 Bracketing function automatic 139 Exposure compensation 138 Manual settings 137 Metering methods 132 Shutter speed priority 136 File format 122 Film styles 127 Firmware updates 158 Flash operation 140 Formatting the memory card 147 Histogram 133 Image detail...

Page 171: ... Care 180 Repairs Leica Customer Care 180 Replacements 159 Resetting all individual menu settings 149 Resolution 122 144 Self timer 146 Serial exposures see main switch Sharpness 126 Shutter button see also Technical data 115 Software 158 Sound recording 145 Sounds key acknowledgment response tones 120 Stabilization 149 144 Storage 164 Technical data 178 Time and date 120 Transferring data to a PC...

Page 172: ... button after pressing the shutter button to the pressure point red if outside the setting range in automatic program aperture priority or shutter speed priority modes otherwise white 3 Indicates a changed shutter speed aperture combination appears only with automatic program and shift 4 Indicates program shift option change of shutter speed aperture combination slower shutter speed setting using ...

Page 173: ...d priority modes otherwise white 7 Exposure compensation set including compensation value not with manual shutter speed and aperture setting 8 Battery charge level Sufficient capacity Falling capacity Insufficient capacity Replacement or recharging required 9 Normal autofocus metering field alternative to 10 10 Spot autofocus metering field alternative to 9 11 Enlarged central detail of picture al...

Page 174: ... 800 1600 3200 6400 12500 17 White balance Not available in underwater mode Automatic Incandescent Daylight Flash Cloudy Shade Greycard 1 Greycard 2 Color temperature SET Greycard 1 SET Greycard 2 Set Color temperature 18 Histogram RGB appears only if activated in yellow with flash unit turned on and or with shutter speeds slower than 1 2 s otherwise in white 19 Flash exposure compensation set inc...

Page 175: ...h Automatic flash activation with slower shutter speeds Automatic flash activation with pre flash and slower shutter speeds 21 Self timer activated running 2 seconds delay 12 seconds delay 22 Picture counter pictures remaining Elapsed video recording time 0 will flash in case of insufficient memory capacity 23 Indicates memory card inserted 24 In addition to 1 12 by pressing the INFO button again ...

Page 176: ...ilable for video recordings 28 Aperture value s 6 not available for video recordings 29 Exposure compensation value s 7 not available for video recordings 30 Battery charge level see 8 31 Indicates the option of enlarging a detail not available for video recordings 32 Symbol for video recording 33 Symbol for protected picture With reduced view of 16 pictures 34 Selected image X U_EN indd 172 20 10...

Page 177: ... 36 Elapsed playback time progress bar 35 36 In addition to 25 33 only for enlarged details by pressing the INFO button 37 Indicates the use of the direction buttons for enlarging reducing a detail including the enlargement factor 38 Display of detail size and position 37 38 X U_EN indd 173 20 10 2015 09 29 21 ...

Page 178: ...number 40 Automatic bracketing 41 Date and time for picture shown 42 Memory card 43 Image counter image number total number 44 Focusing mode see 15 45 File format compression rate 46 JPEG resolution video recording format 47 File size 48 White balance see 17 49 ISO sensitivity value used see 16 50 Video recording X U_EN indd 174 20 10 2015 09 29 21 ...

Page 179: ... video recordings 53 Flash exposure compensation including compensation value 54 Flash mode see 21 appears without flash exposure compensation a No display Picture without flash b Picture without pre flash c Picture with pre flash X U_EN indd 175 20 10 2015 09 29 21 ...

Page 180: ...p 126 Saturation see p 126 Contrast see p 126 Flash Sync see p 143 Monitor Brightness see p 121 Page 3 Monitor Color Adjustment see p 121 Rec Histogram see p 133 Play Histogram see p 133 Reset Image Numbering see p 148 Auto Review see p 150 Auto Power Off see p 120 Auto LCD Off see p 121 Color Space see p 148 Page 4 Date time see p 120 Wind Noise cancellation see p 145 Shutter Volume see p 120 Aco...

Page 181: ...EN 177 Appendix Page 5 Format see p 147 Firmware Version see p 158 User Profile see p 149 X U_EN indd 177 20 10 2015 09 29 21 ...

Page 182: ...ds ISO Range Automatic ISO 100 ISO 200 ISO 400 ISO 800 ISO 1600 ISO 3200 ISO 6400 ISO 12500 White Balance Automatic daylight cloudy halogen lighting shadow electronic flash two manual settings manual color temperature setting UW Mode Accessible via separate button adapts white balance and distortion correction to underwater conditions Autofocus System Contrast based Distance Settings Range From 20...

Page 183: ...dard approx 450 exposures charging time after deep discharge approx 200 min Model No BP DC8 manufacturer PT SANYO Energy Batam manufactured in Indonesia Charger Input 100 240V AC 50 60 Hz 0 2A automatic switchover output 4 2V DC 0 65A Model No BC DC8 operating conditions 0 35 C 32 95 F Manufacturer Phihong Dongguan Electronics Co Ltd Made in China Housing Plastic core aluminum upper and lower cove...

Page 184: ...pport Software Support Am Leitz Park 5 D 35578 Wetzlar Germany Telephone 49 0 6441 2080 111 108 Fax 49 0 6441 2080 490 info leica camera com software support leica camera com LEICA CUSTOMER CARE The Leica Camera AG Customer Care department or the repair service provided by authorized Leica agents in your country are available for service maintenance and repairs of your Leica equipment see the Garr...

Page 185: ...93 628 X 15 AX B Leica Camera AG I Am Leitz Park 5 I 35578 WETZLAR I DEUTSCHLAND Telefon 49 0 6441 2080 0 I Telefax 49 0 6441 2080 333 I www leica camera com ...

Reviews: