background image

Rugby 620, Safety Directions

10

1.6

Laser Classification

1.6.1

General

General

The following chapters provide instructions and training information about laser safety 
according to international standard IEC 60825-1 (2007-03) and technical report IEC TR 
60825-14 (2004-02). The information enables the person responsible for the product 
and the person who actually uses the equipment, to anticipate and avoid operational 
hazards. 

1.6.2

Rugby 620

General

The rotating laser built into the product produces a visible laser beam which emerges 
from the rotating head.

The laser product described in this section is classified as laser class 2 in accordance 
with:
• IEC 60825-1 (2007-03): "Safety of laser products"
• EN 60825-1 (2007-10): "Safety of laser products"

These products are safe for momentary exposures but can be hazardous for deliberate 
staring into the beam. The beam may cause dazzle, flash-blindness and after-images, 
particularly under low ambient light conditions.

Rugby 620:

CAUTION

From a safety perspective, class 2 laser products are not inherently safe for the eyes.

Precautions:

1) Avoid staring into the beam.
2) Avoid pointing the beam at other people.

According to IEC TR 60825-14 (2004-02), products classified as laser class 1, 
class 2 and class 3R do not require:

• laser safety officer involvement,
• protective clothes and eyewear,
• special warning signs in the laser working area

if used and operated as defined in this User Manual due to the low eye hazard 
level.

National laws and local regulations could impose more stringent instructions 
for the safe use of lasers than IEC 60825-1 (2007-03) and IEC TR 60825-14  
(2004-02).

Description

Value

Maximum peak radiant power

2.7 mW ± 5%

Pulse duration (effective)

1.1 ms

Pulse repetition frequency

10 rps

Beam divergence

< 1.5 mrad

Wavelength

635 nm 

±

 10 nm

Summary of Contents for Rugby 620

Page 1: ...Leica Rugby 620 User Manual Version 1 0 English...

Page 2: ...s increases your efficiency and keeps you and your equipment instantly updated with the latest information from Leica Geosystems Type _______________ Serial No _______________ Name Description Format...

Page 3: ...e Leica Geosystems Campus Information Knowledge Training Study the latest online training material or download training material on your products Keep up to date with the latest News on your products...

Page 4: ...2 4 Setup 16 3 Operation 17 3 1 Buttons 17 3 2 LED Indicators 17 3 3 Turning on and off the Rugby 18 3 4 Automatic Mode 18 3 5 Manual Mode 19 3 6 Elevation Alert H I Function 20 4 Receivers 21 4 1 Ro...

Page 5: ...gby 620 Table of Contents 5 10 Technical Data 38 10 1 Conformity to National Regulations 38 10 2 General Technical Data of the Laser 38 11 Lifetime Manufacturer s Warranty 40 12 Accessories 41 Index 4...

Page 6: ...ION and NOTICE are standardized signal words for iden tifying levels of hazards and risks related to personal injury and property damage For your safety it is important to read and fully understand th...

Page 7: ...lations 1 3 Limits of Use Environment Suitable for use in an atmosphere appropriate for permanent human habitation not suitable for use in aggressive or explosive environments DANGER Local safety auth...

Page 8: ...ease the risk of being struck by lightning Precautions Do not use the product in a thunderstorm WARNING Inadequate securing of the working site can lead to dangerous situations for example in traffic...

Page 9: ...ravention of the regulations exposing themselves and third parties to the risk of severe injury and rendering the environment liable to contamination Precautions Product specific treatment and waste m...

Page 10: ...but can be hazardous for deliberate staring into the beam The beam may cause dazzle flash blindness and after images particularly under low ambient light conditions Rugby 620 CAUTION From a safety per...

Page 11: ...tipulated by the guide lines and standards When using computers or other electronic equipment pay atten tion to the information about electromagnetic compatibility provided by the manufac turer CAUTIO...

Page 12: ...roducts without radio WARNING WARNING Changes or modifications not expressly approved by Leica Geosystems for compliance could void the user s authority to operate the equipment This equipment has bee...

Page 13: ...d Eye 140 This device complies with part 15 of the FCC Rules Operation is subject to the following two conditions 1 This device may not cause harmful interference and 2 this device must accept any int...

Page 14: ...y automatically levels to create an accurate horizontal plane of laser light Once the Rugby has levelled the head will start rotating and the Rugby is ready for use 30 seconds after the Rugby has comp...

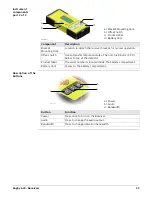
Page 15: ...tery compartment e Charge jack for Li Ion battery pack 005783_001 a b c d e a Rugby laser b Rod eye receiver mounted on the bracket c Li Ion battery pack or Alkaline battery pack d 2x AA cell battery...

Page 16: ...wn away from the laser Setting up on a Tripod Attach the Rugby securely to a tripod or laser trailer or mount on a stable level surface Always check the tripod or laser trailer before attaching the Ru...

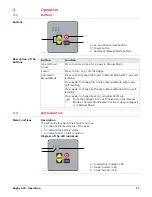
Page 17: ...Up and Down Arrow Press to enter a slope for an axis in Manual Mode Power Press to turn on or off the Rugby Automatic Manual Mode Press once to change the X axis to Manual Mode with Y axis self levell...

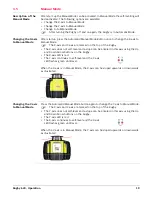
Page 18: ...ion of the laser beam to ensure consistent and accurate work 3 4 Automatic Mode Description of the Automatic Mode The Rugby always starts up in Automatic Mode In Automatic Mode the Rugby automatically...

Page 19: ...Press the Automatic Manual Mode button again to change the Y axis to Manual Mode The X axis and Y axis are marked on the top of the Rugby The X axis does not self level and a slope can be entered in t...

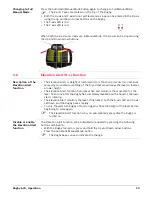
Page 20: ...oth the X axis LED and Y axis LED flash and the Rugby beeps rapidly To stop the alert turn Rugby off and on again Check the height of the laser before beginning to work again The Elevation Alert funct...

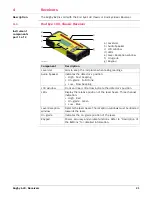
Page 21: ...udio Speaker Indicates the detector s position High Fast beeping On grade Solid tone Low Slow beeping LCD window Front and rear LCD arrow indicate the detector s position LEDs Display the relative pos...

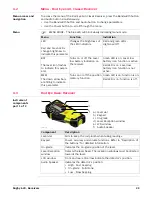
Page 22: ...normal operation Offset notch Use to transfer reference marks The notch is 85 mm 3 35 below to top of the detector Product label The serial number is located inside the battery compartment Battery doo...

Page 23: ...nction is active The laser icon flashes to indicate this param eter Red LED is on Laser low battery icon function is not active MEM Turns on or off the position memory function Green LED is on functio...

Page 24: ...le Location to attach the receiver bracket for normal operation Offset notch Use to transfer reference marks The notch is 45 mm 1 75 below to top of the detector Battery door Access to the battery com...

Page 25: ...5 Set the base of the rod on a known point for the finished height of forms 6 Adjust the height of the receiver on the rod until the on grade centre line position is indicated on the receiver by the...

Page 26: ...5 Set the base of the rod on a known point for the finished grade 6 Adjust the height of the receiver on the rod until the on grade centre line position is indicated on the receiver by the centre bar...

Page 27: ...he height of the receiver on the rod until the on grade centre line position is indicated on the receiver by the centre bar the green flashing LED a solid audio tone 6 Move the rod and the attached re...

Page 28: ...new batteries or batteries that have been stored for a long time three months it is effectual to make only one charge discharge cycle For Li Ion batteries a single discharging and charging cycle is s...

Page 29: ...ully charged 5 When the battery pack is fully charged disconnect the charger plug from the charge jack 6 Slide the locking mechanism to the centre position to prevent dirt from getting into the chargi...

Page 30: ...ery compartment to the right and open the cover of the battery compartment 2 To remove the batteries Remove the batteries from the battery compartment To insert the batteries Insert the batteries into...

Page 31: ...should only be performed by a qualified individual that understands basic adjustment principles It is recommended to perform this procedure with two people on a relatively flat surface 7 1 Checking th...

Page 32: ...ree times then flashes slowly until level When the Rugby is level the X axis LED is on but does not flash The Y axis LED is off 7 Mark the position of the beam 8 Rotate the laser 180 and allow it to s...

Page 33: ...Up and Down Arrow buttons to increment the laser beam up and down Each increment is indicated by a flash of the X axis LED and a beep from the audio indicator 2 Continue to press the Up and Down Arrow...

Page 34: ...evel the Rugby within the 5 degree self levelling range This alert will also be displayed any time the unit is tipped more than 45 from level After two minutes in the alert condition the unit will shu...

Page 35: ...hange the receiver batteries Elevation Alert function is not working The Elevation Alert function is disabled The Elevation Alert function is enabled or disabled by pressing the following button combi...

Page 36: ...adjustment Periodically carry out test measurements and perform the field adjustments indicated in the User Manual particularly after the product has been dropped stored for long periods or transport...

Page 37: ...er liquids these can attack the polymer components Damp products Dry the product the transport container the foam inserts and the accessories at a temperature not greater than 40 C 104 F and clean the...

Page 38: ...i Ion battery pack takes a maximum of five hours Use only high quality alkaline batteries to achieve operating time Hereby Leica Geosystems AG declares that the product s is are in compliance with the...

Page 39: ...ature 20 C to 50 C 4 F to 122 F 40 C to 70 C 40 F to 158 F Protection IPX7 IEC 60529 Dust tight Protected against continuous immersion in water Type Li Ion battery charger Input voltage 100 V AC 240 V...

Page 40: ...faults in materials or manufacturing for the entire life of the product Three Years No Costs Guaranteed service should the product become defective and require servicing under normal conditions of use...

Page 41: ...s a backup for the unit s battery or to charge in a vehicle It is only usable with a rechargeable battery pack Length 2 metres 6 5 feet A150 Alkaline Battery Pack 790419 The A150 alkaline battery pack...

Page 42: ...nition of Use 7 Description of the system 14 Dimensions Of laser 38 Documentation 2 E Elevation alert 20 Environmental specifications Laser 39 F FCC Statement 12 I Indicators LED Level status 18 Instr...

Page 43: ...Rugby 620 Index 43 T Temperature Laser Operating 39 Storage 39 Temperature charging internal battery 28 Troubleshooting 34 U User Manual Validity of 2 W Warranty 40 Weight Instrument 38...

Page 44: ...ystems AG Heinrich Wild Strasse CH 9435 Heerbrugg Switzerland Phone 41 71 727 31 31 www leica geosystems com 799725 1 0 0en Original text Published in Switzerland 2013 Leica Geosystems AG Heerbrugg Sw...

Reviews: