background image

- 16 -

Preparation

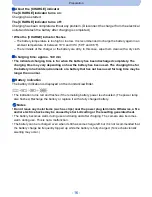
About the [CHARGE] indicator

The [CHARGE] indicator turns on:

Charging has started.

The [CHARGE] indicator turns off:

Charging has been completed without any problem. (Disconnect the charger from the electrical 
outlet and detach the battery after charging is completed.)

When the [CHARGE] indicator flashes

The battery temperature is too high or too low. It is recommended to charge the battery again in an 
ambient temperature of between 10

o

C and 30

o

C (50

o

F and 86

o

F).

The terminals of the charger or the battery are dirty. In this case, wipe them clean with a dry cloth.

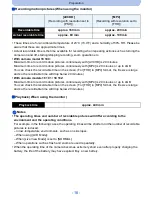
Charging time: approx. 140 min

The indicated charging time is for when the battery has been discharged completely. The 
charging time may vary depending on how the battery has been used. The charging time for 
the battery in hot/cold environments or a battery that has not been used for long time may be 
longer than normal.

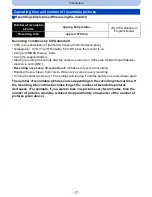
Battery indication

The battery indication is displayed on the monitor/viewfinder.

The indication turns red and flashes if the remaining battery power is exhausted. (The power lamp 
also flashes) Recharge the battery or replace it with a fully charged battery.

Notes

Do not leave any metal items (such as clips) near the power plug terminals. Otherwise, a fire 
and/or electric shocks may be caused by short-circuiting or the resulting generated heat.

The battery becomes warm during use and during and after charging. The camera also becomes 
warm during use. This is not a malfunction.

The battery can be recharged even when it still has some charge left, but it is not recommended that 
the battery charge be frequently topped up while the battery is fully charged. (Since characteristic 
swelling may occur.)

Summary of Contents for V-LUX 4

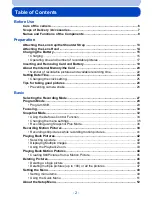
Page 1: ...LEICA V LUX 4 Instructions About downloading Adobe Photoshop Lightroom see page...

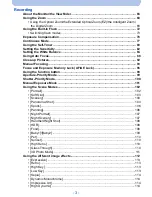
Page 2: ...ures 26 Preventing camera shake 26 Basic Selecting the Recording Mode 27 Program Mode 28 Program Shift 29 Focusing 30 Snapshot Mode 32 Using the Defocus Control Function 34 Changing the menu settings...

Page 3: ...cusing 93 Focus and Exposure Memory Lock AF AE Lock 96 Using the function button 98 Aperture Priority Mode 99 Shutter Priority Mode 100 Manual Exposure Mode 101 Using the Scene Modes 102 Portrait 102...

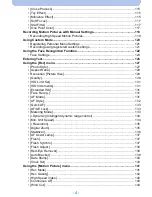
Page 4: ...the Rec menu 127 Photo Style 127 Aspect Ratio 128 Resolution Picture Size 129 Quality 130 ISO Limit Set 131 ISO Increments 131 Extended ISO 131 Face Recog 131 AF Mode 131 AF Style 132 Quick AF 133 AF...

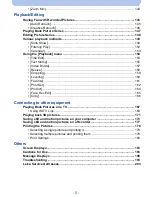
Page 5: ...ng 160 Favorite 161 Print Set 162 Protect 164 Face Rec Edit 165 Copy 166 Connecting to other equipment Playing Back Pictures on a TV 167 Using HDTV Link 169 Playing back 3D pictures 171 Saving still a...

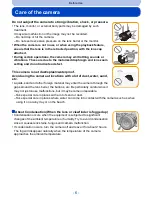
Page 6: ...e camera at locations with a lot of dust water sand etc Liquids sand and other foreign material may enter the camera through the gaps around the lens barrel the buttons etc Be particularly careful sin...

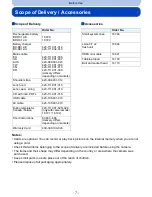
Page 7: ...2 U 18 728 18 729 Small system case 18 746 Battery charger BC DC12 E BC DC12 U 423 111 001 012 423 111 002 010 Leica CF 22 flash unit 18 694 Mains cable EU UK AUS TW CN KR 423 111 001 006 423 111 001...

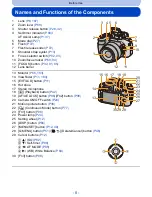
Page 8: ...Viewfinder P11 183 15 EVF LCD button P11 16 Hot shoe 17 Stereo microphone 18 Playback button P42 19 AF AE LOCK button P96 Fn2 button P98 20 Camera ON OFF switch P24 21 Motion picture button P38 22 Co...

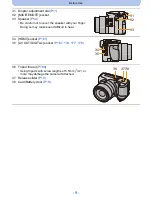
Page 9: ...with your finger Doing so may make sound difficult to hear 34 HDMI socket P167 35 AV OUT DIGITAL socket P167 174 177 178 36 Tripod thread P189 Using tripods with screw lengths of 5 5mm 7 32q or more...

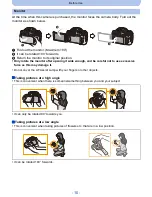
Page 10: ...r after opening it wide enough and be careful not to use excessive force as this may damage it Do not cover the AF Assist Lamp with your fingers or other objects Taking pictures at a high angle This i...

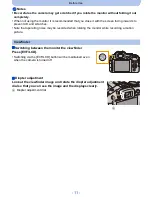
Page 11: ...scratches Note that operating noise may be recorded when rotating the monitor while recording a motion picture Switching between the monitor the viewfinder Press EVF LCD Switching via the EVF LCD butt...

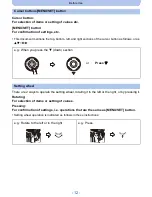
Page 12: ...ways to operate the setting wheel rotating it to the left or the right or by pressing it Rotating For selection of items or setting of values Pressing For confirmation of settings i e operations that...

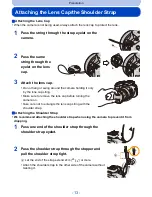
Page 13: ...the lens cap string Make sure to remove the lens cap before turning the camera on Take care not to entangle the lens cap string with the shoulder strap Attaching the Shoulder Strap We recommend attach...

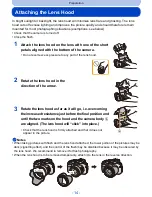
Page 14: ...lens hood in the direction of the arrow 3 Rotate the lens hood as far as it will go i e overcoming the increased resistance just before the final position and until the two marks on the hood and the...

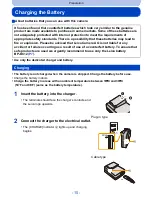
Page 15: ...kets Some of these batteries are not adequately protected with internal protection to meet the requirements of appropriate safety standards There is a possibility that these batteries may lead to fire...

Page 16: ...s been used The charging time for the battery in hot cold environments or a battery that has not been used for long time may be longer than normal Battery indication The battery indication is displaye...

Page 17: ...ng the zoom lever from Tele to Wide or vice versa in every recording Turning the camera off every 10 recordings and leaving it until the battery has cooled down again The number of recordable pictures...

Page 18: ...29 minutes or up to 4GB You can check the recordable time on the screen For FHD in MP4 format the file size is large and so the recordable time will drop below 29 minutes Playback When using the moni...

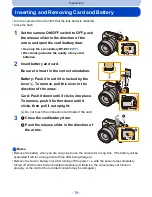
Page 19: ...r in the direction of the arrow Card Push it down until it clicks into place To remove push it further down until it clicks then pull it out upright B Do not touch the connection terminals of the card...

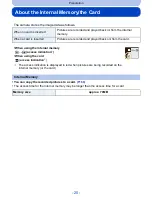
Page 20: ...as follows When no card is inserted Pictures are recorded and played back in from the internal memory When a card is inserted Pictures are recorded and played back on from the card When using the inte...

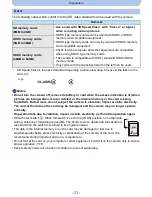
Page 21: ...restored when the switch is returned to its original position The data in the internal memory or on the card may be damaged or lost due to electromagnetic fields static electricity or breakdown of the...

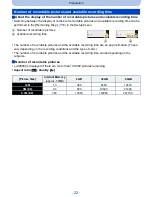
Page 22: ...ng on the recording conditions and the type of card The number of recordable pictures and the available recording time varies depending on the subjects Number of recordable pictures i99999 is displaye...

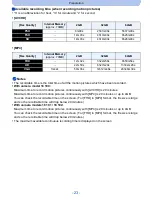
Page 23: ...ize is large and so the recordable time will drop below 29 minutes With camera models 18 191 18 192 Maximum time to record motion pictures continuously with MP4 is 29 minutes or up to 4GB You can chec...

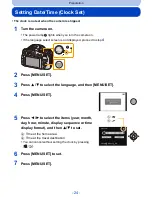
Page 24: ...is not displayed proceed to step 4 2 Press MENU SET 3 Press 3 4 to select the language and then MENU SET 4 Press MENU SET 5 Press 2 1 to select the items year month day hour minute display sequence o...

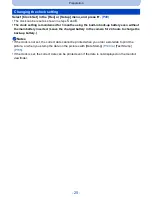
Page 25: ...ry inserted Leave the charged battery in the camera for 24 hours to charge the back up battery Notes If the clock is not set the correct date cannot be printed when you order a store lab to print the...

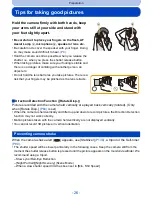
Page 26: ...picture appears on the monitor viewfinder We recommend using a tripod Slow sync Red Eye Reduction Night Portrait Night Scenery Scene Mode When a slow shutter speed limit has been set in Min Shtr Speed...

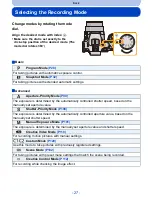
Page 27: ...ly controlled shutter speed based on the manually set aperture value Shutter Priority Mode P100 The exposure is determined by the automatically controlled aperture value based on the manually set shut...

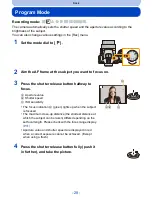
Page 28: ...erture value B Shutter speed C ISO sensitivity The focus indication D green lights up when the subject is focused The maximum close up distance the shortest distance at which the subject can be taken...

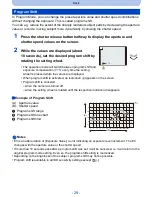
Page 29: ...tivated an indication A appears on the screen Program shift is canceled when the camera is turned off when the setting wheel is rotated until the respective indication disappears Example of Program Sh...

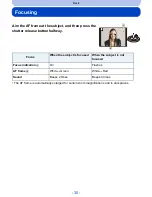
Page 30: ...y The AF frame is automatically enlarged for certain zoom magnifications and in dark places Focus When the subject is focused When the subject is not focused Focus indication A On Flashes AF frame B W...

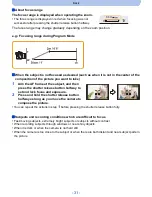
Page 31: ...bject and then press the shutter release button halfway to set and lock focus and exposure 2 Press and hold the shutter release button halfway as long as you move the camera to compose the picture You...

Page 32: ...Quick AF i Dynamic i Resolution i ZOOM Stabilizer AF Assist Lamp Red Eye Removal Continuous AF Zoom Mic Image quality is fixed to A 1 Set the mode dial to 2 Press the shutter release button halfway t...

Page 33: ...ected R is displayed in the top right of and Due to conditions such as the ones below different scene modes may be identified for the same subject Subject conditions When the face is bright or dark th...

Page 34: ...Depending on the backlighting conditions backlighting may not be detected correctly You can easily set the blurriness of the background while checking the screen 1 Press the setting wheel to display...

Page 35: ...set to ON and there is for example strong contrast between the background and the subject multiple still pictures are recorded with differing exposures and combined to create a single still picture ri...

Page 36: ...ghtness When is set Red Eye Removal is enabled The shutter speeds will be slower during or You can adjust the brightness and the color balance in addition to the Snapshot Mode function 1 Press MENU SE...

Page 37: ...the setting to the default state AUTO 4 Press MENU SET or the setting wheel to set Note If you turn the camera off or switch another recording mode the adjusted slider position returns to the default...

Page 38: ...psed recording time It is recommended that you close the flash when recording motion pictures You can record motion pictures fitting each recording mode Release the motion picture button right after y...

Page 39: ...ded motion pictures can be saved and played back using this camera or the available software P173 1 With camera model 18 190 2 With camera models 18 191 18 192 3 This means the highest quality for thi...

Page 40: ...ll change dramatically Even if the aspect ratio setting is the same in still and motion pictures the angle of view may change at the start of the motion picture recording When Video Rec Area P57 is se...

Page 41: ...with the electronic shutter so the recorded still picture may appear distorted Pictures will be recorded with a resolution of 3 5M 16 9 The picture quality may be different than 3 5M 16 9 of standard...

Page 42: ...Image File Format Files which do not comply with the DCF standard cannot be played back The lens barrel retracts about 15 seconds after switching from recording to playback mode Pictures recorded with...

Page 43: ...ject during the recording and can enlarge the image with that part as the center Press FOCUS during image playback The focused part of the subject may not be at the center of the enlargement when it i...

Page 44: ...ayback time With camera model 18 190 Motion pictures recorded with Miniature Effect in Creative Control Mode play back at approximately 8 times speed With camera models 18 191 18 192 Motion pictures r...

Page 45: ...xit the menu after it is executed Notes The picture is saved with the following resolutions You may not be able to save still pictures from a motion picture taken on other equipment Still pictures cre...

Page 46: ...less of whether it is recorded on the internal memory or the card Pictures that do not comply with the DCF standard or those that are protected cannot be deleted Press Select the picture to be deleted...

Page 47: ...2 Press 3 4 to select Delete Multi or Delete All and then MENU SET Delete All A confirmation screen is displayed The pictures are deleted by selecting Yes It is possible to delete all pictures except...

Page 48: ...ncludes settings for the coloring sensitivity aspect ratio resolution and other aspects of the pictures you are recording Motion Picture P141 to 144 This menu includes settings for the Rec Mode Rec Qu...

Page 49: ...press the shutter release button halfway Setting menu items 2 Press 3 4 or rotate the setting wheel to select the menu item It will switch to the next page when you reach the bottom It will also swit...

Page 50: ...ress 2 2 Press 4 or rotate the setting wheel to select the Setup menu icon 3 Press 1 or the setting wheel Select a menu item next and set it Note There are functions that cannot be set or used dependi...

Page 51: ...etting wheel You can also set the Quick Menu with the setting wheel without changing your position or the camera angle when using the viewfinder 1 Press Q MENU in the Recording Mode 2 Rotate the setti...

Page 52: ...rence from the home area Clock Set World Time Set the time in your home area and travel destination You can display the local times at the travel destinations and record them on the pictures you take...

Page 53: ...will be reflected Travel Date Departure date and return date of the trip as well as the name of the travel destination can be set You can display the number of days that have passed when playing back...

Page 54: ...f the AF AE LOCK button can be switched between AF AE Lock and Fn function AF AE LOCK Fn2 Fn Button Set Certain menu items can be assigned to the function button You may find it convenient to register...

Page 55: ...sage time is reduced Refer to P66 for details LCD Display Viewfinder Brightness color or red or blue tint of the monitor viewfinder is adjusted Brightness Adjusts the brightness Contrast Saturation Ad...

Page 56: ...the size the slope and the balance of the subject In Panorama Shot in Scene Mode the guideline is not displayed LCD Disp Style This will set the display style of the monitor Viewfinder style Monitor...

Page 57: ...ing software used in computers etc Histograms are not displayed in the following cases Snapshot Mode Multi Playback When recording motion pictures Playback Zoom When an HDMI mini cable is connected Ca...

Page 58: ...ble recording time for motion pictures Highlight When the Auto Review function is activated or when playing back white saturated areas appear flashing in black and white This does not affect the recor...

Page 59: ...ed MF positions and resumed MF positions might be different Refer to P94 for details Lens Resume The camera memorizes a zoom position and an MF Manual Focus position when it is turned off Zoom Resume...

Page 60: ...e is set to ECO the image quality on the recording screen may be worse than when it is set to NORMAL but this does not affect the recorded image When Live View Mode is set to NORMAL the battery usage...

Page 61: ...der number reaches 999 the number cannot be reset We recommend formatting the card P65 after saving the data on a computer or elsewhere To reset the folder number to 100 format the internal memory or...

Page 62: ...ettings for Baby1 Baby2 and Pet in Scene Mode The Travel Date setting Departure date return date destination The World Time setting The Cust Set Mem setting Position memorized in Lens Resume Menu Resu...

Page 63: ...he type of TV W 16 9 When connecting to a 16 9 screen TV X 4 3 When connecting to a 4 3 screen TV This will work when the AV cable is connected HDTV Link This sets the camera so it can be controlled b...

Page 64: ...k Allows checking which version of firmware is on the camera Press MENU SET on the version display screen to display information about the software on the camera Rotate Disp This mode allows you to di...

Page 65: ...or a Leica agency If you set a different language by mistake select from the menu icons to set the desired language The Stabilizer function is switched between ON and OFF every time MENU SET is press...

Page 66: ...and viewfinder style for each of the monitor and the Viewfinder display screen using LCD Disp Style and EVF Disp Style in the Setup menu You can switch between available recording time and number of...

Page 67: ...e histogram will be displayed 2 The name of the registered person in Face Recog is displayed when DISP is pressed In Playback Mode E Normal display F Display with recording information 1 G No display...

Page 68: ...engths without the image quality deteriorating Changing the zoom speed The zoom speed becomes slower when the rotation angle is small and faster when it is large A Fast B Slow Storing the zoom positio...

Page 69: ...e zoom focus rocker set Side Lever in the Setup menu to ZOOM P54 You can operate the zoom at 2 speeds The zoom speed becomes slower when the sliding distance is small and faster when it is large You c...

Page 70: ...ar Example 0 3m 1p Feature Optical Zoom Extended Optical Zoom EZ Maximum magnification 24k 46 9k 1 Picture quality No deterioration No deterioration Conditions None Picture Size with P129 is selected...

Page 71: ...eblur Snapshot Mode When Continuous Mode is set to or Toy Effect Creative Control Mode Panorama Shot HDR High Sens 3D Photo Mode Scene Mode When recording motion pictures When Quality is set to or The...

Page 72: ...nto place Notes Be sure to close the flash when it is not in use The flash setting is fixed to while the flash is closed Be careful not to pinch your fingers when you close the flash Be sure to keep t...

Page 73: ...en your subject is back lit or under fluorescent light Slow Sync Red Eye 2 The flash is automatically fired when the recording conditions make it necessary Also the appropriate longer shutter speeds f...

Page 74: ...itial setting is displayed The flash mode may change if the recording mode is changed Reset the flash mode again if necessary The flash mode is memorized even if the camera is turned off However the S...

Page 75: ...the flash immediately after it is fired the first time prior to taking pictures with AUTO Red Eye Reduction etc It causes a malfunction Recording a subject from too close or without sufficient flash i...

Page 76: ...camera is turned off The compensation range may be limited depending on the brightness of the subject 1 Press the setting wheel to set Exposure Compensation to a selected state A Exposure Compensatio...

Page 77: ...utter release button is pressed The frame rate frequency can be selected to match the recording conditions or subjects 1 Press 2 Press 2 1 to select the frame rate and then MENU SET A description of t...

Page 78: ...us is fixed to that for the first picture When or is set the focus is adjusted for each picture Exposure and White Balance are adjusted for each picture 100 1 5 5 12 Focus exposure and White Balance a...

Page 79: ...Focus Star Filter Creative Control Mode Panorama Shot Handheld Night Shot HDR 3D Photo Mode Scene Mode The zoom cannot be used when recording a series of continuous pictures Depending on the operatin...

Page 80: ...is taken 2 seconds after the shutter release button is pressed This setting is a convenient way to avoid the effects of camera shake caused by pressing the shutter release button e g when using a tri...

Page 81: ...ecommend using a tripod when recording with the self timer Depending on the recording conditions the interval between the exposures may become longer than 2 seconds when 10s 3pictures is selected It i...

Page 82: ...tended ISO P131 is set Settings Description of settings AUTO The ISO sensitivity is automatically adjusted according to the brightness Maximum 1600 1 The ISO sensitivity is adjusted according to the m...

Page 83: ...ng is fixed to AUTO in the following cases Creative Control Mode The setting is fixed to in the following cases Sports Baby1 Baby2 Pet Scene Mode You cannot select in Shutter Priority mode You cannot...

Page 84: ...be correct for subjects beyond the flash range The White Balance setting is memorized even if the camera is turned off However the White Balance setting for a Scene Mode returns to AWB when the Scene...

Page 85: ...the White Balance by metering 1 Select or and then press 1 2 Aim the camera at a sheet of white paper etc so that the frame in the center is filled by the white object only and then press MENU SET The...

Page 86: ...green or M magenta _ green or magenta appears beside the White Balance icon on the screen Select the central point if you do not want a fine adjustment The White Balance fine adjustment setting is re...

Page 87: ...the White Balance procedure and 3 4 2 1 to set the bracket 2 1 Horizontal A to B 3 4 Vertical Gi to Mj 2 Press MENU SET Notes is displayed on the screen when it is set The White Balance Bracketing set...

Page 88: ...ome Only or can be set during Creative Video Mode AF Mode is fixed to in the following cases Miniature Effect Creative Control Mode High Speed Video Creative Video Mode Settings Description of setting...

Page 89: ...ture taking conditions including the following cases the face detection function may fail to work making it impossible to detect faces AF Mode is switched to while motion pictures are taken When the f...

Page 90: ...AF AE LOCK is pressed again Notes When the AF lock fails the AF tracking frame will turn red and then disappear Perform AF lock again In the following cases operates as When the subject is not specifi...

Page 91: ...etting wheel to change the size of the AF frame Setting wheel rotated to the right Enlarges the frame Setting wheel rotated to the left Reduces the frame It can be changed to 4 different sizes 3 Press...

Page 92: ...cus indication lights up When a subject is close to the camera the depth of field i e the area rendered sharply is significantly reduced Therefore if the distance between the camera and the subject is...

Page 93: ...F is displayed on the screen 2 Press the setting wheel to set MF to a selected state Enabled operation will switch every time the setting wheel is pressed 3 Rotate the setting wheel to display the foc...

Page 94: ...mmended when making slight adjustments MF Assist If MF Assist P59 in the Setup menu is set to ON the displayed image is enlarged as soon as focusing is performed If you press MENU SET while the enlarg...

Page 95: ...ubject is known and remains the same One shot AF You can focus on the subject with Auto Focus by pressing the FOCUS button during Manual Focus This is convenient for prefocusing Notes If you use the z...

Page 96: ...unction set AF AE LOCK Fn2 in the Setup menu to AF AE LOCK P54 1 Aim the AF frame at the main subject 2 Press AF AE LOCK to fix the focus and exposure settings This does not work when AF tracking is a...

Page 97: ...ed settings are canceled when zooming is performed after locking Perform the locking again The exposure setting remains locked even if the brightness of the subject changes after locking The subject c...

Page 98: ...Button Set in the Setup menu P49 2 Press 3 4 to select the button to assign and then press MENU SET 3 Press 3 4 to select the function to assign and then press MENU SET Exit the menu after it is set...

Page 99: ...al to 2 Rotate the setting wheel to set the aperture value A Aperture Value B Shutter speed aperture combination The operation mode will switch between aperture and exposure compensation setting every...

Page 100: ...otate the setting wheel to set the shutter speed A Shutter Speed B Shutter speed aperture combination The operation mode will switch between shutter speed and exposure compensation setting operation e...

Page 101: ...ster shutter speed when the subject is too bright or to a lower number and or a slower shutter speed if it is too dim The aperture value and the shutter speed displayed on the screen turn red when the...

Page 102: ...ing a Scene Mode explanations about each Scene Mode are displayed Note To change the Scene Mode press MENU SET and then 1 and return to step 2 above When taking pictures of people outdoors during the...

Page 103: ...nique for Soft Skin Mode To make this mode more effective 1 Use the longest possible focal length rotate the zoom lever towards T 2 Move close to the subject to make this mode more effective Notes If...

Page 104: ...rding Recording can also be canceled by keeping the camera still while recording Panorama Shot Recording from left to right Move the camera in a single panning motion for about 8 seconds Move the came...

Page 105: ...picture may not be able to be created or the pictures may not be combined properly when recording the following subjects or under the recording conditions below Subjects with a single uniform color o...

Page 106: ...is pressed Technique for Panning Mode To obtain good pictures in Panning Mode turn the camera in a horizontal plane as you take the pictures We recommend that you do not follow the subject with the ca...

Page 107: ...on may remain locked max about 8 sec after taking the picture because of signal processing This is not a malfunction Noise may become visible when you take pictures in dark places This mode allows you...

Page 108: ...n minimize the loss of gradations in bright areas and dark areas when the contrast is large What Is HDR HDR stands for High Dynamic Range and refers to a technique for expressing a wide contrast range...

Page 109: ...or name When the birthday or name is set Age or Name is automatically set to ON If ON is selected when the birthday or name has not been registered the setting screen appears automatically 4 Press ME...

Page 110: ...imizes blurring due to moving subjects and enables you to take pictures of these subjects in dimly lit rooms Resolution and aspect ratio Select a resolution of 3M 4 3 2 5M 3 2 2M 16 9 or 2 5M 1 1 This...

Page 111: ...the shutter release button halfway then press it fully and move the camera When you start recording with the subject slightly to the right of the center the subject will be close to the center in the...

Page 112: ...even if the camera is turned off White Balance will be fixed to AWB and Sensitivity will be fixed to AUTO In Miniature Effect of Creative Control Mode Defocus Control cannot be used Adjust the effect...

Page 113: ...overall image This effect adds a dark and relaxing feel to the overall image and enhances bright parts Expressive Items that can be set Freshness Understated colors Pop colors Retro Items that can be...

Page 114: ...dramatic contrast look This effect produces the optimum brightness for both dark and bright areas of the image Sepia Items that can be set Contrast Low High Dynamic Monochrome Items that can be set C...

Page 115: ...urs peripheral areas to give the impression of a diorama Cross Process Items that can be set Color Green tone Blue tone Yellow tone Red tone Select the color to enhance and press MENU SET Toy Effect I...

Page 116: ...190 Approximately 1 8 of the time period is recorded If you record for 8 minutes the resulting motion picture recording will be approximately 1 minute long The displayed available recording time is ap...

Page 117: ...usual Star Filter Items that can be set Length of the rays Short Long Note The display of the recording screen will be delayed more than usual and the screen will look as if frames are dropping One Po...

Page 118: ...re time per frame will increase Depending on the movement of the subject this may result in blurring in the frames 2 During recording if you set the focusing mode to anything but Manual Focus with the...

Page 119: ...erned by the naked eye at the rate of up to 200 1 240 2 frames second 1 With camera model 18 190 2 With camera models 18 191 18 192 Motion pictures are recorded in MP4 1 Set the mode dial to 2 Press 3...

Page 120: ...tered settings The initial setting of the Program Mode is registered as the custom settings initially Example of registering the settings of the recording mode and menus etc to 1 Make the settings 2 R...

Page 121: ...it is executed You can easily call up the settings you have registered using Cust Set Mem Set the mode dial to or A Custom setting display When the mode dial is set to press 3 4 to select the custom s...

Page 122: ...de Face Recog picture information can be attached to only the first picture Face Recog does not guarantee secure recognition of a person Face Recognition may take more time to select and recognize dis...

Page 123: ...appears for taking face images Face Settings Point of recording when registering the face images The subject should face the camera with eyes open and mouth closed making sure the outline of the face...

Page 124: ...ess 4 to select SET and then MENU SET 2 Press 2 1 to select the items Year Month Day 3 4 to set and then MENU SET Focus Icon Changes the displayed focus icon when the subject is focused Press 3 4 to s...

Page 125: ...it or delete and then MENU SET 4 Press 3 4 to select the item and then MENU SET Exit the menu after it is set Changing or deleting the information for a registered person Item Description of settings...

Page 126: ...1 Baby2 Pet Name Face Recog 2 Press 3 4 2 1 to select text and then MENU SET to register Move the cursor to and then press MENU SET to switch text between A capitals a lower case 1 numbers and special...

Page 127: ...our desire Photo Style Settings Description of settings Standard This is the standard setting Vivid Brilliant effect with high saturation and contrast Natural Soft effect with low contrast Monochrome...

Page 128: ...nting or the playback method Note The ends of the recorded pictures may be cut at printing so check before printing P200 Item Effect Contrast r Increases the difference between the bright and dark par...

Page 129: ...not displayed For details regarding modes in which Extended Optical Zoom cannot be used refer to P71 Pictures may appear in mosaic depending on the subject and the recording conditions You cannot set...

Page 130: ...ve RAW files in a file format JPEG TIFF etc that can be displayed on your computer etc develop them and edit them using the available software P173 images are recorded with a smaller data volume than...

Page 131: ...le when Extended ISO is set Note When the setting is changed from 1 3 EV to 1 EV the sensitivity will be set to value closest to the one set with 1 3 EV The set value will not be restored when the set...

Page 132: ...is set automatically and locked when the shutter release button is pressed halfway Pictures can only be taken if focusing is successful AFF Movement cannot be predicted Children pets etc AFF is an ab...

Page 133: ...AF in the following cases Panning Night Portrait Night Scenery Handheld Night Shot Scene Mode Soft Focus Creative Control Mode When using Manual Focus Refer to P96 for details Applicable modes You can...

Page 134: ...free pictures of moving subjects Settings AUTO 1 250 1 125 1 60 1 30 1 15 1 8 1 4 1 2 1 Notes This mode should usually be set to AUTO to take pictures When you select a minimum shutter speed other th...

Page 135: ...Zoom Applicable modes With this mode you can enlarge subjects even more than with the Optical Zoom the Extended Optical Zoom or the Intelligent Zoom Settings ON OFF Note Refer to P68 for details i Re...

Page 136: ...ording motion pictures When Rec Mode is set to VGA in MP4 The stabilizer function may not be effective in the following cases Make sure to hold the camera steady while pressing the shutter release but...

Page 137: ...a problem with the performance of the camera AF Assist Lamp is fixed to OFF in the following cases Scenery Panning Night Scenery Handheld Night Shot Sunset Glass Through Scene Mode Refer to P72 for de...

Page 138: ...is adjusted Applicable modes When the Red Eye Reduction is selected Red Eye Removal is performed whenever the flash is used The camera automatically detects red eye and corrects the picture Settings O...

Page 139: ...compensation value the pictures taken are based on this value The exposure may not be compensated with Auto Bracketing depending on the brightness of the subject In Shutter Priority and manual exposu...

Page 140: ...es The clock is not set The Quality option is set to The setting is fixed to OFF in the following cases When recording motion pictures When using Auto Bracketing Panorama Shot 3D Photo Mode Scene Mode...

Page 141: ...following cases Panorama Shot 3D Photo Mode Scene Mode Soft Focus Star Filter Creative Control Mode Applicable modes This mode allows setting the data format of motion pictures Rec Mode Settings Desc...

Page 142: ...r definite period of time is changed automatically depending on the subject being recorded Therefore the recording time is shortened when a subject with fast movement is recorded 1 With camera model 1...

Page 143: ...licable modes With this mode the focus setting is continuously adjusted according to the targeted subject Settings ON OFF Note Set this function to OFF if you wish to fix the focus on the position whe...

Page 144: ...s Coupled to the zoom operation this mode delivers clear recordings of far sounds with tele and surrounding sounds with wide Settings ON OFF Notes When set to ON and performing zoom the operation soun...

Page 145: ...ress 3 4 to select Auto Retouch and then MENU SET 3 Press 3 4 to select ON and then MENU SET A confirmation screen is displayed It is executed when Yes is selected Notes Depending on the picture noise...

Page 146: ...Cross Process Toy Effect Miniature Effect Soft Focus Star Filter One Point Color A confirmation screen is displayed It is executed when Yes is selected If you press MENU SET while the following items...

Page 147: ...elete all pictures except one that picture will be saved as a single picture instead of as a picture series group Press 2 1 to select a picture with a picture series icon and then 3 Operations when co...

Page 148: ...otect P164 setting to a picture in the picture series group the number of settings number of settings and total number when Print Set is set is displayed on the icon for the first picture of each grou...

Page 149: ...aving a fixed interval between each of the pictures You can also put together a slide show composed of only still pictures only motion pictures only 3D pictures etc We recommend this feature when you...

Page 150: ...next NATURAL SLOW SWING URBAN OFF AUTO When URBAN has been selected the picture may appear in black and white as a screen effect AUTO can be used only when Category Selection has been selected The pic...

Page 151: ...es during a slide show Motion pictures Picture series group Panorama pictures Settings Description of settings Duration 1 SEC 2 SEC 3 SEC 5 SEC Repeat ON OFF Sound AUTO Music is played when the still...

Page 152: ...ethod to play back 3D Play pictures in 3D Category Selection This mode allows you to search images by Scene Mode or other categories such as Portrait Scenery or Night Scenery and sort the pictures int...

Page 153: ...ot set in the camera the recording date is set as the 1st January 2012 If you take pictures after setting the travel destination in World Time the pictures are displayed by the dates at the travel des...

Page 154: ...e Edit in the Playback menu P49 2 Press 3 4 to select Single or Multi and then MENU SET 4 Enter the text P126 Exit the menu after it is set Notes To delete the title erase all the text in the text inp...

Page 155: ...DISP to set repeat and then press MENU SET to set The setting is canceled when DISP is pressed again Single Multi Press 2 1 to select the picture Press 3 4 2 1 to select the pictures Settings Descript...

Page 156: ...i The picture quality may deteriorate when text stamping is carried out Depending on the printer being used some characters may be cut at printing Check before printing When text is stamped onto the i...

Page 157: ...motion pictures by using Calendar or Video Only in the Filtering Play Motion pictures with a short recording time cannot be split Video Divide 1 Select Video Divide in the Playback menu P49 2 Press 2...

Page 158: ...ures Pictures with date or text stamped Pictures taken with or Resize 2 Press 3 4 to select Single or Multi and then MENU SET 3 Select the picture and the resolution Single setting 1 Press 2 1 to sele...

Page 159: ...ipment Information regarding the Face Recognition in the original picture will not be copied to images having undergone Cropping The Cropping feature is disabled during the following conditions Motion...

Page 160: ...when Yes is selected Exit the menu after it is executed Notes The quality of the image may deteriorate when leveling is performed It may not be possible to perform leveling on images recorded with oth...

Page 161: ...Favorite settings 1 Select Favorite on the Playback menu 2 Press 3 4 to select Cancel and then MENU SET A confirmation screen is displayed It is executed when Yes is selected Exit the menu after it i...

Page 162: ...t Print Set for a picture series group the print setting for the number of prints will be applied to every picture in the group 1 Select Print Set in the Playback menu P49 4 Press 3 4 to set the numbe...

Page 163: ...to print the date For further information ask at your photo printing store or refer to the instructions for the printer The date cannot be printed on pictures with date or text stamped Notes The numbe...

Page 164: ...t setting may not be effective on other equipment Even if you protect pictures in the internal memory or a card they will be deleted if the internal memory or the card is formatted Even if you do not...

Page 165: ...cture will not be categorized using Face Recognition in Category Selection in Filtering Play You cannot edit the Face Recognition information of protected pictures Face Rec Edit 2 Press 3 4 to select...

Page 166: ...turn the camera off at any point during the copying process Notes If a picture exists with the same name folder number file number as the picture to be copied in the copy destination when is selected...

Page 167: ...camera and a TV Make sure the plugs are aligned correctly and that they are inserted straight Otherwise the connectors may be bent out of shape which may cause trouble Preparations Turn the camera and...

Page 168: ...n pictures are displayed they may not be displayed properly depending on the type of TV You can view pictures on TVs in other countries regions which use the NTSC or PAL system when you set Video Out...

Page 169: ...n the camera will be limited Using HDTV Link What is HDTV Link HDMI This function allows you to use the remote control unit of compatible TVs for easy operations when the camera has been connected to...

Page 170: ...n the HDMI terminal on the TV the input channel may not switch automatically In this case use the remote control for the TV to switch the input channel For details on how to switch input please read t...

Page 171: ...the playback screen will be displayed Refer to P169 for details For the pictures recorded in 3D 3D will appear on the thumbnail display at playback Play back as a 3D slide show by selecting only the...

Page 172: ...d back in 2D conventional image A black screen is displayed for a few seconds when switching back and forth playback of 3D pictures and 2D pictures When you select a 3D picture thumbnail it may take a...

Page 173: ...t choose to format Computers that can be used The camera can be connected to any computer capable of recognizing a mass storage device Windows support Windows 7 Windows Vista Windows XP Mac support OS...

Page 174: ...HD motion pictures when the files or folders related to the motion pictures are deleted modified or moved using Windows Explorer or similar so make sure to acquire the AVCHD motion pictures using the...

Page 175: ...not be imported correctly when copied as files or folder We recommend using the available software for importing files Refer to P173 for details A new folder is created when pictures are taken in the...

Page 176: ...not be displayed If the icon is not displayed check that Access is not displayed on the monitor of the camera before removing the hardware Connection in the PTP Mode Set USB Mode to PictBridge PTP Da...

Page 177: ...ture quality 1 Connect the camera with the recording equipment with the supplied AV cable 2 Start the playback of the camera 3 Start the recording on the recording equipment When ending the recording...

Page 178: ...t PictBridge PTP and then MENU SET Notes Use a battery with sufficient capacity If the remaining battery power becomes low while the camera and the printer are connected the status indicator flashes a...

Page 179: ...one time Press 3 4 2 1 to select the pictures and then DISP When DISP is pressed again the setting is canceled After the pictures have been selected press MENU SET Select All Prints all the stored pi...

Page 180: ...ed If the printer does not support date printing the date cannot be printed on the picture Depending on the printer the date print settings of the printer may take precedence so check if this is the c...

Page 181: ...aper Size Item Description of settings Settings on the printer are prioritized L 3 5qk5q 89mmk127mm 2L 5qk7q 127mmk178mm POSTCARD 100mmk148mm 16 9 101 6mmk180 6mm A4 210mmk297mm A3 297mmk420mm 10k15cm...

Page 182: ...mera is receiving an error message from the printer when the indication lights up in orange during printing After finishing printing make sure there are no problems with the printer If the number of p...

Page 183: ...6 14 AF Assist Lamp P137 Focus P30 15 Motion Deblur P35 16 Histogram P57 17 Spot Metering target mark P133 18 AF frame P30 19 Self timer Mode P80 20 Number of recordable pictures P22 Available recordi...

Page 184: ...departure date P53 Location P53 Name P109 Age P109 Shutter speed aperture combination P58 30 Date Stamp P140 31 Elapsed Recording Time P38 32 Internal memory P20 Card P20 displayed only during recordi...

Page 185: ...of days that have passed since the departure date P53 Recorded date and time World Time P52 16 Motion picture recording time P44 Number of pictures in a picture series group P148 17 Auto Retouch P145...

Page 186: ...ters or high voltage lines If you record near radio transmitters or high voltage lines the recorded pictures and or sound may be adversely affected Always use the supplied cords and cables If you use...

Page 187: ...oved battery in a plastic bag and store or carry away from metallic objects clips etc If you drop the battery accidentally check to see if its body and the terminals are damaged Inserting a damaged ba...

Page 188: ...astigmatism are advised to correct their vision by wearing glasses etc Stop viewing if you can clearly see a double image while viewing 3D contents There are differences in the way that different peop...

Page 189: ...ely stable temperature Recommended temperature 15oC to 25oC 59oF to 77oF Recommended humidity 40 RH to 60 RH Always remove the battery and the card from the camera If the battery is left inserted in t...

Page 190: ...space on built in memory Not enough memory on the card There is no space left in the internal memory or the card When you copy pictures from the internal memory to the card batch copy the pictures ar...

Page 191: ...Try another card An error has occurred accessing the card Insert the card again Insert a different card Read Error Write Error Please check the card It has not been possible to read or write data Rem...

Page 192: ...rently retrieving information icon may be displayed in the playback screen for long period of time when there are many image files and deletion or Playback menu cannot be used during this time If you...

Page 193: ...ot be able to record for a short while after turning the camera on when using a large capacity card The picture can become whitish if there is dirt e g fingerprints on the lens If the lens is dirty tu...

Page 194: ...ity is set to AUTO when the camera is shipped Therefore when taking pictures indoors etc noise will appear Decrease the ISO sensitivity P82 Increase the setting for Noise Reduction in Photo Style or l...

Page 195: ...puter or other equipment the data writing speed is lower In such cases we recommend that you make a backup of the data and then format P65 the card in this camera The subject is rendered slightly dist...

Page 196: ...as fluorescent lights LED lights etc and is not a malfunction Check LCD Mode setting P55 Perform LCD Display Viewfinder P55 Does the picture appear in the viewfinder Press EVF LCD button to switch to...

Page 197: ...set to or Is there a picture in the internal memory or the card The pictures in the internal memory appear when a card is not inserted The picture data on the card appears when a card is inserted Is...

Page 198: ...FF P138 Is it a picture that has been recorded with other equipment In such cases these pictures may be displayed with a deteriorated picture quality The camera automatically adjusts the aperture duri...

Page 199: ...cted properly with the HDMI mini cable available as accessory see P7 P167 Confirm that the HDMI mini cable is firmly fitted Press on the camera Is the HDTV Link on the camera set to ON P63 Depending o...

Page 200: ...er with a cropping or borderless printing function cancel this function before printing For details refer to the operating instructions for the printer When you order photo studios to print pictures a...

Page 201: ...ramatically However the picture is not affected Press MENU SET select the Setup menu icon and then select the icon to set the desired language P65 In dark places the AF Assist Lamp lights red to make...

Page 202: ...p temporarily This is not a malfunction When you perform an operation after taking a certain action the pictures may be recorded in folders with different numbers from the ones used prior to the opera...

Page 203: ...t form on the Leica Camera AG homepage Leica Camera AG Information Service Software Support Postfach 1180 D 35599 Solms Phone 49 0 6442 208 111 108 Fax 49 0 6442 208 490 info leica camera com software...

Page 204: ...either registered trademarks or trademarks of Microsoft Corporation in the United States and or other countries This camera uses DynaFont from DynaComware Corporation DynaFont is a registered trademar...

Page 205: ...amera at My products by entering its serial number Do so by following the respective instructions c Then select software download You will be requested to enter the TAN code which you will find on a s...

Page 206: ...Leica Camera AG Oskar Barnack Stra e 11 D 35606 SOLMS DEUTSCHLAND Telefon 49 0 6442 208 0 Telefax 49 0 6442 208 333 www leica camera com...

Reviews: