A.
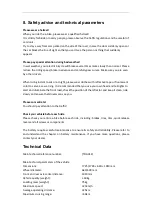
Adjusting the height of the saddle: Generally, when the user sits on the saddle, the pedal
is stepped on the lowermost end, and the height of the saddle when the knee can be easily
and naturally bent is the best height. The user or beginner must adjust the saddle to the
position where the toes of the feet can land when riding.
B.
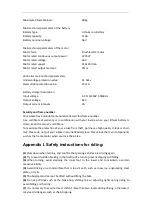
When using the pin type saddle clamp: Use a wrench to loosen the pin nut of the clamp
saddle tube counterclockwise to adjust the height of the saddle. After adjusting the height,
lock it clockwise.
C.
When using the quick release saddle clamp: adjust the saddle height by pulling the quick
release handle (the arrow direction is locked), adjust the height and lock it clockwise. If the
quick release handle is locked and you cannot reach the normal closed position, you can
adjust the adjustment nut on the opposite side of the quick release handle until the quick
release handle can be locked to the position parallel and adjacent to the front and rear fork
legs.
D.
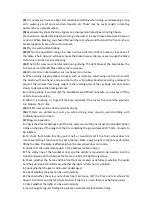
When using the screw-type saddle clamp: Rotate the knob counterclockwise to loosen the
height adjustment of the saddle tube. After adjusting the height, lock it clockwise.
E.
When using the hexagon socket pin type saddle clamp: Use a 5mm hex wrench to twist
the pin counterclockwise to adjust the saddle height. After adjusting the height, lock it
clockwise. (Note: due to the left end of the pin Adjustment will damage the saddle clamp
and related components, so it must be adjusted from the right end of the pin)
F.
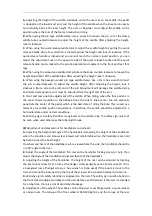
Front and rear position adjustment of the saddle: When riding, when the foot pedal is in
the most stressed position in the oblique front, the rider's knee center line can vertically
penetrate the center of the pedal, which is the best state of riding the bike. This is used as a
reference for saddle position adjustment. In addition, the saddle should be adjusted to a
horizontal state under normal conditions.
G.
Warning sign: A safety identifier is engraved on the saddle tube. The safety sign must not
be seen when used otherwise the tube might break.
(2)
Adjustment and precautions for handlebars and wheels:
A.
Adjusting the height and angle of the handlebars: Generally, the height of the handlebars
when the shoulders and elbows feel relaxed and comfortable when the handlebars are held
by both hands is the best height.
Crossbars and risers of the handlebars: when viewed from the side, the handlebar should be
in a 90° angle to the riser.
B.
Adjust the angle of the handlebar: first loosen the handlebar locking screw (or nut), then
adjust the angle of the handlebar, adjust and then lock the handlebar.
C.
Adjusting the height of the handlebar: The height of the riser can be adjusted by rotating
the riser boom screw for 2/3 turns. (The hanger screw generally uses a 13mm wrench. If it is
a hexagonal row of hanger screws, a hex wrench is to be used) If the boom is stuck in the
riser and cannot be loosened, tap the top of the screw with a wooden hammer to loosen it.
D.
Warning sign: A safety identifier is engraved on the riser. The safety sign must be buried in
the front fork standpipe and locked in the riser before use. Otherwise, if the riser is extended
for a long time, there is a risk of accidental breakage.
E.
Adjustment of the wheel: The wheels can be adjusted or exchanged with a quick release
or normal nuts. The torque at the front wheel is 180-220 kgf.cm and the torque at the rear

