THROUGH DOVETAILS
24
Chapter 8
D4R Pro User Guide
8-25
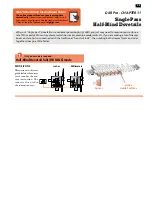
Clamp a test pin board against the left hand side stop,
outside face
o
away from the jig, with the top end flush under
the guides.
8-26
Place the side edge of one of the finished tail boards horizontally
flush under the guidefingers and mark a thin pencil line part way
across the pin board.
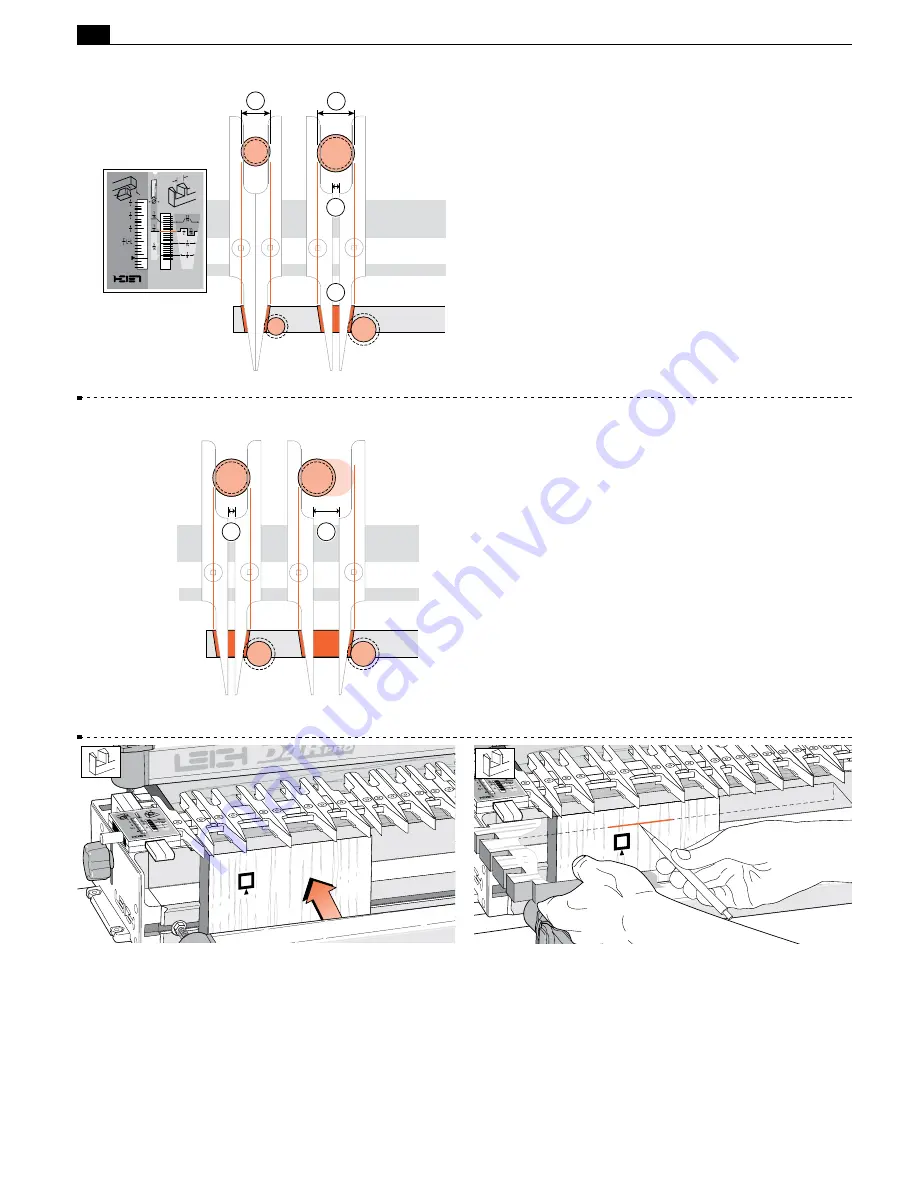
8-23 Why are the
1
⁄
2
" and
11
⁄
16
"[12,7&17,5mm] pin widths
on the same scale line?
1
⁄
2
" through dovetails are routed using a
7
⁄
16
" guidebush
➀
11
⁄
16
" through dovetails are routed with a
5
⁄
8
" guidebush
➁
.
That's a
3
⁄
16
" difference in size between the two bits …and between
the two guidebushes.
The
5
⁄
8
" diameter guidebush for
11
⁄
16
" joints requires that the guide
fingers be opened up by
3
⁄
16
"
➂
.
This automatically makes the pins
3
⁄
16
" wider
➃
but on the same
scale setting.
3
4
2
1
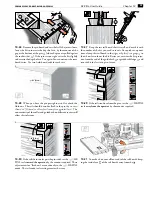
8-24 Do the guide fingers have to be opened up precisely
3
⁄
16
"[4,75mm] for larger combinations?
No, just so long as they are opened up by at least
3
⁄
16
"(4,75mm)
➀
to allow the larger guidebush to enter the tail guides. Anything more
than this minimum is fine
➁
; both the pin and matching pin socket
widths will be automatically increased by exactly the same amount,
whatever the spacing. Varying the pin width does not affect the joint
fit or the scale setting. In fact, the pin width can be varied with all
bit combinations, not just the larger bits
1
2
Summary of Contents for D4R Pro
Page 14: ...JIG ASSEMBLY MOUNTING AND USING THE CLAMPS 6 Chapter 1 D4R Pro User Guide ...
Page 24: ...WOOD PREPARATION 16 Chapter 6 D4R Pro User Guide ...
Page 86: ...BIT SELECTION 78 Appendix II D4R Pro User Guide ...
Page 90: ...JIG PARTS 82 Appendix III D4R Pro User Guide ...
Page 92: ...PRINTED IN CANADA Joining Tradition with Today Printed in Canada ...


