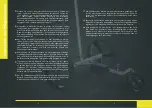
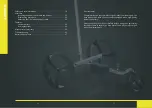
background image

Structure

Assembling  Golftrolley  Taurus/  Quintum/

Spirit


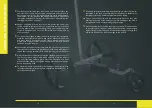
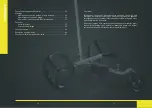
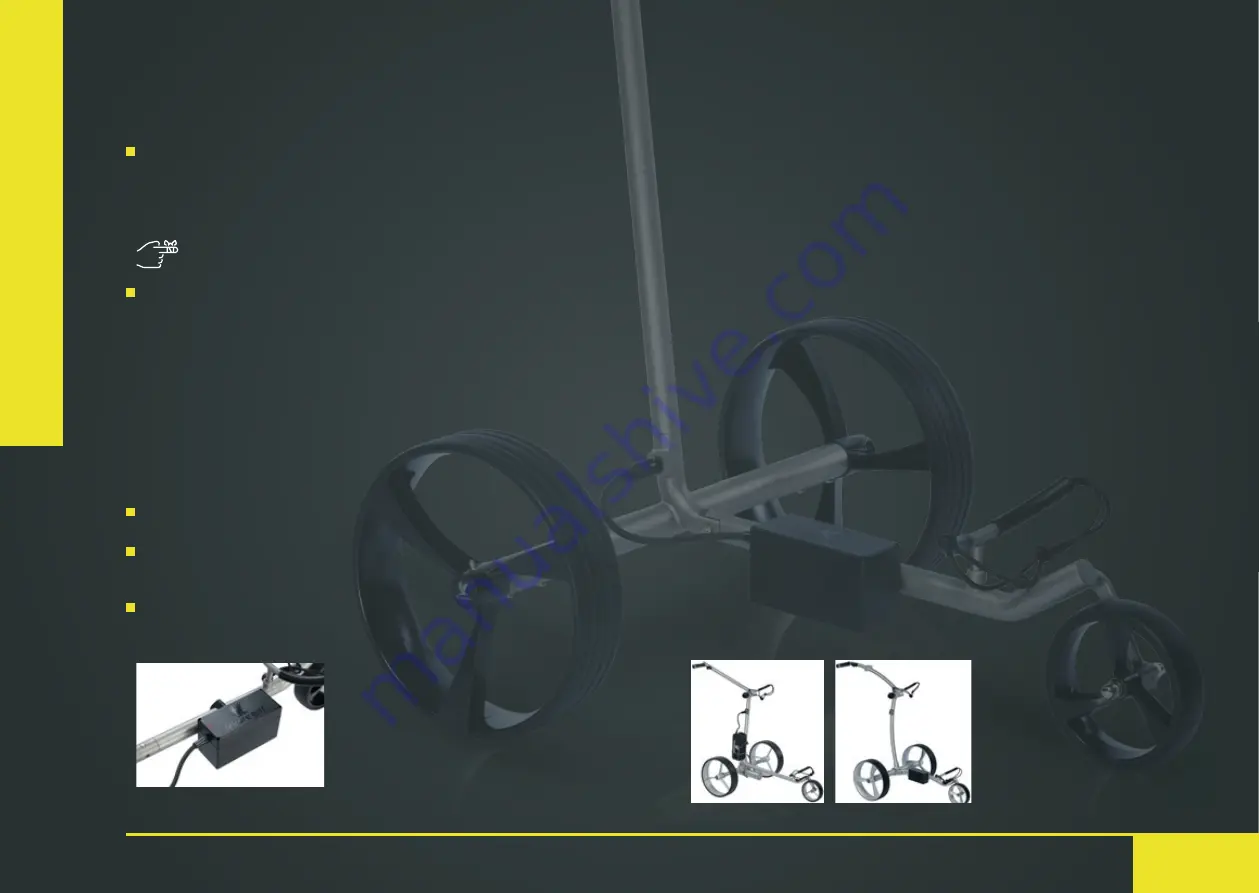
1. Take the axle in your hand and connect it to the front part. Slide the 

front part up to the pin in the opening of the lateral axle. 

Press the stainless steel pin into the frame and push the front part 

completely into the lateral axle. Turn the two parts together so that 

the pin can engage into the hole.

Caution, risk of pinching!


Hold the axle to the left or right of the central spar.


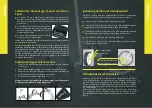
2. Take the rear wheels and install them on the lateral axle as described 

below.

Danger:


Pay attention to the running direction of the rear wheels The 

wheels are markedwith LE and RE on the inner site from the hub.
- Press the pin on the rim.


- Slide the wheels onto the first groove on the axle. This is the freewheel 

position (for manual pushing). 
- Push the wheel to the final position on the axle and engage. This is 

the position for driving.

Important:


If the wheel is not in the drive position, there is no 

propulsion of the device.


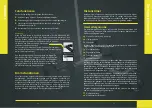
3. Now connect the vertical bar with the lateral axle. Proceed in the 

same way as above. 

 4. With the side knob, you can adjust the handle height and ‘adjust’ the 

upper bag holder individually to your bag size. Then tighten the lateral 

fixing screw.


5. The battery is transported in the bag with the extension cable or 

optionally attached to the frame with the battery basket.

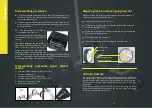
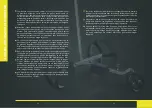
Assembling Golftrolley Figus/ Falcon/ Ikarus

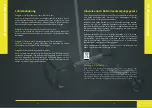
The golf trolley frame comes with a separate front wheel. Please loosen the 

screw on the front part and slide the front wheel with the suspension over 

the pin. You can only install the suspension in one direction. Then use the 

hex key which has been supplied to tighten the screw again.

For the assembly of the rear wheels, please take a rear wheel in one hand 

and push down the pin. Hold the trolley axle horizontally with the other hand. 

Push the rear wheel onto the axle until it stops and release the pin again. 

Move the rear wheel slightly until the pin is locked in its final position. To 

loosen it, carry out the steps in the opposite order.

The rear wheels are generally removable and can be left permanently on the 

device or attached prior to use.

Pay attention to the direction of the profile. The profile must point in the 

same direction as the front wheel. To activate the free-wheel function, move 

the rear wheel outward from the locking position. The four driver heads are 

then visible. The Ikarus have the same wheels as Taurus/ Quintum/ Spirit.

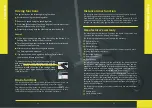
Set the vertical bar horizontally. Adjust the handlebar for your height and 

tighten the locking screw. The golf trolley is designed so that the battery can 

fit in your golf bag. Alternatively, we offer a battery holder for the vertical bar. 

Please contact us. Insert the plug into the socket on the device. The trolley is 

now switched on and ready for use

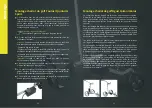
The battery can take place for the Falcon into the battery holder. The Figus 

have a battery basket as option or the extension cable to storage the battery 

into the Cartbag

The Ikarus has the same battery holder as Taurus/ Quintum/ Spirit.

20

21

Summary of Contents for GOLFTROLLEY

Page 1: ...Elektro GOLFTROLLEY Bedienungsanleitung leisure golf leisure golf DE EN FR...

Page 2: ...te lesen Sie die Bedienungsanleitung vor dem ersten Gebrauch sorgf ltig durch Dann werden Sie viel Freude mit Ihrem Elektro Golftrolley der Marke leisure golf haben Sicherherheits und Pflegehinweise 4...

Page 3: ...inger ist das Risiko einer Verletzung Dies gilt f r Sie selbst besonders aber auch f r andere Personen Auch wenn der Umgang kinderleicht ist Ihr Caddy ist ein Sportger t und kein Kinderspielzeug Daher...

Page 4: ...en seitlich Aufbau Golftrolley Figus Falcon Ikarus Ikarus Slim Line Der Rahmen des Golfrolleys wird mit separatem Vorderrad geliefert Bitte l sen Sie die Schraube am Vorderteil und schieben Sie das Vo...

Page 5: ...f k nnen Sie die Hinterr der abnehmen 5 Bei Bedarf k nnen Sie den Akku entfernen Hinweis Stellen Sie grunds tzlich vor Demontage oder Zerlegen die Griffstange senkrecht nach unten Kippgefahr Justierun...

Page 6: ...gen dem Verschlei und sind von der Garantie und der Gew hrleistung ausgeschlossen Gummibereifung Klettb nder Batteriehalter Garantieerkl rung Fahrfunktionen Der Golfrolley verf gt ber folgende Fahrfun...

Page 7: ...ieentsorgungsgesetz Da wir Batterien und Akkus bzw solche Ger te verkaufen die Batterien und Akkus enthalten sind wir nach dem Batteriegesetz BattG verpflichtet Sie auf Folgendes hinzuweisen Batterien...

Page 8: ...Electric GOLFTROLLEY User Manual leisure golf leisure golf DE EN FR 14 15...

Page 9: ...e using your golf trolley for the first time to ensure you have a lot of fun with your electric golf trolley from leisure golf Safety and care instructions 18 Structure Installing the wheels handlebar...

Page 10: ...anger of tipping over on fast turns The better you know your caddie the lower the risk of injury This applies to you but especially for other people Even if the handling is easy your caddie is a piece...

Page 11: ...a separate front wheel Please loosen the screw on the front part and slide the front wheel with the suspension over the pin You can only install the suspension in one direction Then use the hex key w...

Page 12: ...ecessary to readjust the barrel 1 Loosen the cap nut one or two turns 2 If the device is pulling to the left unscrew the front grub screw and screw in the rear grub screw 3 If the device is pulling to...

Page 13: ...e speed using the speed regulator Start Stop Reverse gear function using the front stainless steel button A Reverse only for Spirit Distance timer using with the side stainless steel button B Control...

Page 14: ...ies and or devices that contain batteries and rechargeable batteries we are obliged under the Battery Act BattG to point out the following Batteries rechargeable and otherwise must not be disposed of...

Page 15: ...Chariot de golf ELECTRIQUE Notice d utilisation leisure golf leisure golf DE EN FR 28 29...

Page 16: ...avec attention avant la premi re utilisation Vous aurez ainsi beaucoup de plaisir utiliser votre chariot de golf lectrique de la marque leisure golf Conseils d utilisation et d entretien 32 Montage M...

Page 17: ...s rapides Mieux vous connaitrez votre chariot moins vous aurez de risque de vous blesser Cela vaut aussi bien pour vous m me que pour d autres personnes M me si son utilisation est tr s simple votre c...

Page 18: ...est transport e dans le sac de golf ou ventuellement fix au cadre dans le support de batterie MontagechariotdegolfFigus Falcon Ikarus Le ch ssis du chariot de golf est livr avec une roue avant s par e...

Page 19: ...stement roue avant stabilit directionnelle Chaque chariot est param tr l usine avec stabilit directionnelle Il est pourtant possible que vous deviez r ajuster la direction 1 Faites tourner l crou borg...

Page 20: ...xclues de la garantie et de la protection de garantie Pneumatiques Porte batterie velcro D claration de garantie 4 2 Fonctions de pilotage Ce chariot de golf dispose des fonctions de pilotage suivante...

Page 21: ...vendeurs de batteries et de piles ainsi que d appareils contenant des batteries et des piles nous sommes dans l obligation de vous informer des indications suivantes conform ment la loi allemande sur...

Page 22: ...Leisure and Sports GmbH Langer Acker 3 30900 Wedemark service leisure sports de www leisure sports de...

Reviews:

Related manuals for GOLFTROLLEY