background image


Pag. 7 

ENGLISH 


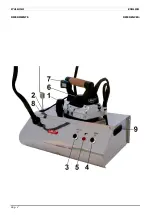
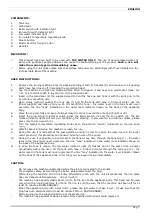
COMPONENTS: 
 

1.


Tank cap 

2.


Wand seat 

3.


Boiler switch with indicator light 

4.


Iron switch with indicator light 

5.


Low water indicator light  

6.


Iron plate’s temperature regulating knob  

7.


Steam button 

8.


Elastic band for fixing the iron 

9.


Handles 


IMPORTANT: 


This product has been built to be used with

  TAP  WATER  ONLY. 

The use of demineralised water or 

water with perfumes and/or additives can cause the malfunctioning of the product.

  Such  a  use  will 

make the warranty period immediately cease. 


Before using the unit please make sure that voltage and power are accordingly with those indicated on the 
technical data label of the machine.  


USER INSTRUCTIONS: 

 
1.


Remove the ironing machine from its packing holding it with its handles (9) and make sure all packing 
parts have been taken off (including the protection bags).  

2.


Lay the machine on a flat and steady surface fitted to support it and next to a wall socket (max. mt. 
1,5). It is recommended to lay the iron on the supplied pad. 

3.


Insert in the wand seat (2) the supplied wand to hold the hose up and hook it with the spring up to the 
iron-boiler connecting wire.  

4.


Open  slowly  (without  pulling)  the  tank  cap  (1)  and  fill  the  tank  with  max.  0,8  litre of  water,  use  the 
funnel  supplied  and  make  sure  you  do  not  overfill  the  tank  –  the  water  level  in  the  tank  must  never 
overcome  the  line  “max”  indicated  on  the  water  level  indicator  drawn  on  the  back  of  the  appliance 
body. 

5.


Close the cap carefully and keep it always closed in order to avoid the entering of dust or dirt. 

6.


Insert  the  plug  into  an  electrical  outlet,  press  the  boiler  switch  (3)  and  the  iron  switch  (4);  the  two 
relative indicator lights will come on confirming the starting - if you want to iron without steam, please 
press only the iron switch (4). 

7.


Turn  the  plate’s  temperature  regulating  knob  (8)  to  the  position  “cotton”  (indicated  on  the  iron  knob 
“°°°”). 

8.


Wait for about 6 minutes, the machine is ready for use.  

9.


During the use it is normal that the pump starts working in order to restore the water level in the boiler 
under pressure; this procedure can cause a buzzing noise of the pump.   

10.


During the use it is possible to pour water in the tank at any time through the tank cap (1) - the water 
level in the tank must never overcome the line “max” indicated on the water level indicator drawn on 
the back of the appliance body. 

11.


In  case  the  tank  is  empty,  the  low  water  indicator  light  (5)  flashes  and  at  the  same  time  a  buzzer 
acoustically warns the user: fill the tank with max.  0,8 liters of water through the  tank cap (1) - the 
water level in the tank must never overcome the line “max” indicated on the water level indicator drawn 
on the back of the appliance body. After that you can begin ironing immediately.  


CAUTION: 


-


Do not leave the machine unattended while the plug is connected to the socket. 

-


For complete safety, before filling the boiler, please disconnect the plug. 

-


While  using  the  machine  and  30  minutes  afterwards  (even  with  the  unit  disconnected)  the  iron  plate 
has very dangerous temperature – do not touch it. 

-


The machine has a special elastic band (10) to fix the iron to the appliance body. This band can be used 
only when the ironing machine is off and the iron is cold (be sure that the machine has been off for at 
least 30 minutes. BURN DANGER) 

-


Clean the appliance body with a wet cloth - please use just water to make it wet - (make sure that the 
plug has been disconnected at least 60 minutes before: BURN DANGER)


-


While ironing use the supplied pad to rest the steam iron.


-


The machine has a special heating element. Only qualified technician should replace it.


Summary of Contents for PS1R

Page 1: ...PS1R FERRO DA STIRO A RICARICA CONTINUA STEAM IRONING MACHINE WITH AUTO REFILL ЭЛЕКТРОПАРОВОЙ УТЮГ С ПАРОГЕНЕРАТОРОМ С СИСТЕМОЙ ПОСТОЯННОГО ПОПОЛНЕНИЯ ВОДОЙ ...

Page 2: ...Pag 2 ITALIANO ENGLISH RIFERIMENTI REFERENCES ...

Page 3: ...relative spie di riferimento si illumineranno a conferma dell avvenuta accensione Per stirare senza vapore accendere solo l interruttore ferro 4 7 Posizionare la manopola di regolazione della temperatura della piastra del ferro da stiro 6 sulla posizione cotone indicato sulla manopola 8 Attendere circa 6 minuti a questo punto il PS1R è pronto per l utilizzo 9 Durante il funzionamento è normale che...

Page 4: ...profumi o sostanze simili Dal ferro da stiro non esce vapore E possibile che la spia di riferimento dell interruttore del ferro 4 sia spenta Accendere l interruttore del ferro 4 la spia di riferimento si illuminerà a conferma dell avvenuta accensione attendere almeno 6 minuti in modo che la piastra del ferro da stiro si scaldi E possibile che la spia di riferimento dell interruttore della caldaia ...

Page 5: ...personale non autorizzato e o dall utilizzo di ricambi non originali la mancata osservanza delle istruzioni per l uso e o la manutenzione riportate nel libretto in dotazione al prodotto La garanzia non si estende mai temporalmente oltre quanto indicato non prevede l obbligo di risarcimento danni di qualsiasi natura eventualmente subiti da persone e o cose non prevede l obbligo di sostituzione del ...

Page 6: ...to da società persone giuridiche o attività professionali di fatto la garanzia è di massimo 12 mesi Condizioni generali Servizio di Assistenza diretta Gemme Italian Producers srl riservato ai consumatori http www lelit com condizioni_assistenza pdf Centro assistenza nazionale LELIT Italia Ritiro e consegna a domicilio su tutto il territorio italiano Recapiti di riferimento care lelit com telefono ...

Page 7: ...ng if you want to iron without steam please press only the iron switch 4 7 Turn the plate s temperature regulating knob 8 to the position cotton indicated on the iron knob 8 Wait for about 6 minutes the machine is ready for use 9 During the use it is normal that the pump starts working in order to restore the water level in the boiler under pressure this procedure can cause a buzzing noise of the ...

Page 8: ...ative indicator light comes on wait for 5 minutes so that the boiler produces steam The water might be finished the low water indicator light flashes and the buzzer is on Fill it to the required level following the instructions carefully especially following the points 4 and 5 of the present manual The ironing board gets wet The ironing board cover might not be able to absorb completely the steam ...

Page 9: ...ь не попали в бойлер 6 Подключите вилку шнура питания к электросети включите кнопку бойлера 3 и кнопку утюга 4 световая индикация двух кнопок подтверждает включение электроприбора Для глажения без пара включите только кнопку утюга 4 7 Установите регулятор температуры подошвы утюга 8 в позицию cotone графическое изображение на регуляторе утюга 8 Подождите около 6 минут парогенератор готов к использ...

Page 10: ...ь выключатель утюга 4 световой индикатор утюга загорится ждите примерно 5 мин чтобы подошва утюга нагрелась Световой индикатор бойлера 3 отключен Нажать выключатель бойлера 3 световой индикатор бойлера загорится ждите примерно 5 минут чтобы вода в бойлере нагрелась и начнет вырабатываться пар Возможно закончилась вода горит индикатор контрольной лампочки при низком уровне воды и звучит сигнал Запо...

Page 11: ...nergy and resources As a reminder of the need to dispose of household appliances separately the products is marked with a crossed out wheeled dustbin EC DECLARATION OF CONFORMITY Gemme Italian Producers srl declares under its own responsibility that the product PS1R to which this declaration relates is in accordance with the provisions of the specific directives CEI EN 60335 1 CEI EN 60335 2 3 It ...

Page 12: ...Pag 12 Gemme Italian Producers srl Via del Lavoro 45 I 25045 Castegnato BS Italy Tel 39 030 2141199 Fax 39 030 2147637 www lelit com lelit lelit com P Iva 03426920173 ...

Reviews: