background image

EN

PERIODS OF INACTIVITY

Proceed as follows to prepare the machine for extended periods of inactivity:

• 

Remove the battery from the machine, referring to the section “Battery: removal” and recharge 

it fully, referring to the section “Battery: preparation  / installation  / recharging”. The battery 

should also be recharged regularly when the machine is not in use, so as to keep it constantly 

at the maximum charge level.

• 

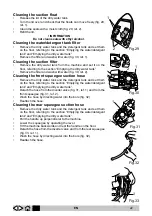
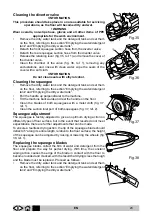
Clean the squeegee blades with a moist cloth, referring to the section “Cleaning the squeegees”.

• 

Open up and clean the chamber of the diverter valve, referring to the section “Cleaning the 

diverter valve”.

• 

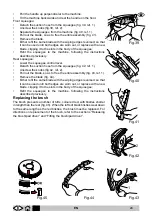
Detach and clean the suction hoses of the squeegees, referring to the section “Cleaning the 

front squeegee suction hose” and “Cleaning the rear squeegee suction hose”.

• 

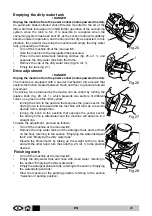
Make certain the tanks have been emptied completely and are perfectly clean, referring to the 

section “Emptying the dirty water tank” and “Emptying the water/detergent tank”.

• 

Stow the machine in the parking position, referring to the section “Selection of parking position”.

MAINTENANCE INSTRUCTIONS

! DANGER

Never perform any maintenance operations on the machine without first unplugging it from 

the mains socket (mains powered models) or removing the battery pack (battery powered 

models).

! DANGER

In the case of mains powered models, the operator must be able to verify from any position 

occupied that the machine remains unplugged from the mains socket while maintenance is 

being carried out.

! WARNING

Before proceeding with any maintenance operation on the machine, always be sure to empty 

the detergent tank and the dirty water tank, referring to the relative sections “Emptying the 

water/detergent tank” and “Emptying the dirty water tank”.

! INFORMATION

Maintenance operations involving the electrical system, and in any event all servicing or 

repair operations not explicitly described in this manual, must be entrusted to a specialist 

technician approved by IP Cleaning or carried out at an IP Cleaning service centre, in 

accordance with current safety regulations.

! INFORMATION

Ensure the machine undergoes regular maintenance, so that it will always deliver optimum 

performance. 

! INFORMATION

Do not clean seals with ethyl alcohol.

This chapter describes how maintenance is carried out.

Maintenance - General rules

When cleaning the machine, observe the following precautions.

• 

Avoid the use of high pressure washers. Water could penetrate the electrical compartment or 

the motors, leading to damage or the risk of short circuit.

• 

Do not use steam, as the heat generated could cause plastic parts to lose their shape.

• 

Do  not  use  solvents  or  hydrocarbon  based  products. These  can  damage  the  cowling  and 

rubber components.

21

Summary of Contents for 63951

Page 1: ...igungstechnik www lema at Art Nr 63951 Spannung 36V Schrubb Breite 280mm Arbeitsbreite 370mm Tank Frischwasser 5l Tank Schmutzwasser 5l Fl chenleistung 900m2 h Laufzeit 50min Gewicht 20kg inkl Batt Di...

Page 2: ...Fitting the brush pad driver 14 Brush pad driver release 14 Battery preparation installation recharging 14 Battery removal 15 Battery disposal 15 PRACTICAL GUIDE FOR THE OPERATOR 16 Preparing the mac...

Page 3: ...mental capabilities or lack of experience and knowledge Use of the machine as a toy is prohibited make certain this does not happen Children should be supervised to ensure they do not play with the ma...

Page 4: ...the power cable When using the mains powered version never use the power cable as a handle and ensure it is not pinched by a closed door or pulled over sharp edges or around corners When using the mai...

Page 5: ...ne mains powered model must be earthed In the event of a malfunction or failure the earth connection provides the path of least resistance for electrical current reducing the risk of electric shock Ma...

Page 6: ...age to property Keep hair loose garments fingers and all other parts of the body well clear of slots and moving parts Avoid any contact with moving parts of the machine brushes and pad drivers Take pa...

Page 7: ...er consumption indicated on the voltage frequency and power consumption indicated on the data plate are compatible with those of the mains electricity data plate are compatible with those of the mains...

Page 8: ...XTRA LOW VOLTAGE SELV THIS MEANS IN PRACTICE THAT THE APPLIANCE IS POWERED BY A BATTERY OR A SELV TRANSFORMER EARTH SYMBOL IDENTIFIES ANY TERMINAL INTENDED FOR CONNECTION TO AN EXTERNAL EARTH CONDUCTO...

Page 9: ...ower W 160 HP 0 21 Overall power of the machine in operation PM W 248 HP 0 33 Maximum speed km h 3 5 mph 2 17 Solution tank l 5 galls 1 32 Dirty water tank l 5 galls 1 32 Rear wheel diameter mm 200 in...

Page 10: ...5 2 72 ahv m sec2 2 5 Measurement uncertainty K m sec2 Vibration level body IEC 60335 2 72 HBV m sec2 Measurement uncertainty K m sec2 Maximum water and detergent temperature C 40 F 104 Degree of prot...

Page 11: ...ch could cause death or serious injury to personnel WARNING Indicates the need for attention in order to avoid a series of consequences which could cause injury to personnel or damage to the machine o...

Page 12: ...artial vacuum in the dirty water tank Squeegees mounted beneath the tank are designed to collect the film of dirty water with the machine moving in both forward and reverse directions Parts of the mac...

Page 13: ...aration of conformity certificate of warranty battery charger manual bumper wheel front squeegee brush battery charger Lift the machine out of the box by the handle fig 2 ref 1 and set it down on the...

Page 14: ...ine up into the vertical position fig 4 Wipe dry the front squeegee rear squeegee and brush with a cloth Lifting and transporting the machine DANGER Risk of injury if handle is not properly locked in...

Page 15: ...ne position the brush cowling directly over the brush and proceed to lower the machine fig 12 Jog the brush control lever fig 11 ref 2 repeatedly this will enable the brush to engage automatically wit...

Page 16: ...rly it must not be dismantled and should be kept well clear of children Whilst the battery will normally come fully charged and ready for use it is good policy nonetheless to run a recharge cycle befo...

Page 17: ...he floor and dirt to be removed Follow the safety regulations on the use of detergents given in the section Risk of injury DANGER Before starting work put on overalls non slip shoes gloves and all oth...

Page 18: ...ction the brush does not start rotating until the Brush control lever fig 15 ref 2 is operated INFORMATION Pressing the brush control button also has the effect of automatically enabling the suction a...

Page 19: ...ly Proceed to recharge the battery referring to the section Battery preparation installation recharging In cases where floors are soiled with particularly stubborn dirt scrubbing and drying operations...

Page 20: ...ed The tank can be filled in two different ways Tank installed on the machine Turn off the machine at the main switch Remove the cap of the detergent tank fig 21 ref 1 Fill the tank Tank removed from...

Page 21: ...nt The driving force produced by the device can be varied by turning the relative knob fig 28 ref 1 which presents two sectors of different colour one green and the other yellow turning the knob to th...

Page 22: ...y powered models DANGER In the case of mains powered models the operator must be able to verify from any position occupied that the machine remains unplugged from the mains socket while maintenance is...

Page 23: ...he front squeegee suction hose Remove the dirty water tank and the detergent tank and set them on the floor referring to the section Emptying the water detergent tank and Emptying the dirty water tank...

Page 24: ...e up perpendicular to the machine Tilt the machine backwards and rest the handle on the floor Clean the blades of both squeegees with a moist cloth fig 37 ref 1 Clean the suction inlet port of both sq...

Page 25: ...the suction hose from the squeegee fig 42 ref 1 Unscrew the knobs fig 42 ref 2 Pull out the blade so as to free the entire assembly fig 43 ref 1 Remove the blade fig 44 Either refit the same blade wi...

Page 26: ...C Connect plug to mains socket B C Main switch not activated B C Press main switch Brush not rotating B C Brush control button not depressed B C Press brush control button B C Brush control lever not...

Page 27: ...sists contact customer service Red Led alight on brush control button 2 fast blinks Detergent pump overcurrent short circuit Switch off all functions of the machine Restart the machine If the problem...

Page 28: ...eistungszeit kommt k nnen Sie Ihre Rechte wahrnehmen F llen Sie diese Gewinnkarte aus und vergewissern Sie sich dass Ihr H ndler und das Kaufdatum eingetragen sind nur so kann Ihr Garantieanspruch gel...

Reviews: