background image

VOL. 20

by Lee Hoe Electrical & Trading Sdn. Bhd.

Installation Manual

HOW TO INSTALL

CEILING FAN

LEMAX Ceiling Fan

Model: L760

Summary of Contents for L760

Page 1: ...VOL 20 by Lee Hoe Electrical Trading Sdn Bhd Installation Manual HOW TO INSTALL CEILING FAN LEMAX Ceiling Fan Model L760 ...

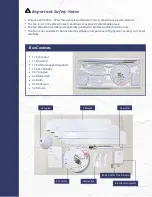
Page 2: ...lified or professional technicians only The fan is not suitable to be operated by children and persons with physical sensory or mental disability 1 x Fan motor 1 x Downrod 1 x Electronic speed regulator 1 x Set of blades 2 x Canopies 3 x Blade clips 2 x Bolts 2 x Cotter pin 3 x Screws Canopies Important Safety Notes Box Contents Fan motor Blade clips Electronic regulator Downrod 3 Blades Bolts Cot...

Page 3: ...port the fan torque and weight During unboxing handle the blades with care Avoid bending as it will cause the fan to wobble The recommended height between the blades and ground should be 2 5 metres to 3 metres Before you begin Fan Diagram Safety wire Top canopy Cotter pin Nut 1 2 3 4 Spring washer Flat washer Bottom canopy Fan motor 5 6 7 8 Downrod Bolts Screws Fan blades 9 10 11 12 ...

Page 4: ...ntil the top of the downrod Connect and attach the downrod shaft onto the fan motor Connect the blue and brown wires into the motor terminal Please refer to the wiring and circuit diagram Connect the wires to the power supply as shown in the diagram Brown wire to the terminal block Live blue wire to the terminal block Neutral and yellow or green wire to the terminal block Earth STEP 1 STEP 2 STEP ...

Page 5: ...motor for blade installation Keep the screws safely aside Attach the blade clips onto each sides of the fan motor Slot the clips firmly until you hear the sound click Then tighten the screw in the middle of the clip Important Set the blades with the back plate facing upwards Tighten all blades with the screws set aside earlier in Step 8 STEP 6 STEP 7 STEP 8 IMPORTANT Handle the blades with caution...

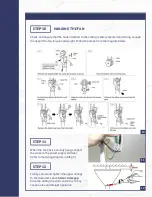
Page 6: ... the fan torque and weight Follow the steps from the diagram below When the fan set is securely hung connect the wires to the power supply terminal refer to the wiring diagram in Step 5 Finally screw and tighten the upper canopy to the downrod Leave 5mm 10mm gap from the ceiling to avoid contact as it may cause noise and disrupt operation 11 12 ...

Page 7: ...2 points of the screw on the back plate of the regulator Drill 2 holes on the wall Screw the back plate regulator firmly onto the wall Connect the live wire from power supply to the terminal on the back plate Close the regulator cover onto the back plate and tighten screw at the bottom STEP 13 STEP 14 STEP 15 15 14 15 16 17 13 STEP 16 STEP 17 Installing the electronic regulator ...

Page 8: ...avoid bending Ensure the fan motor is dry at all times Make sure the blades are clean to ensure ventilation effectiveness Do not use harsh chemicals such as detergent acid benzine or alcohol to clean the fan It is recommend to avoid from operating the fan for more than 8 hours consecutively to allow the fan motor to cool down Maintenance by Lee Hoe Electrical Trading Sdn Bhd ...

Reviews: