background image

9

5  ATTACHING AND DETACHING THE IMPLEMENT

5.1  Attaching to the tractor


Set tractor hydraulics to "Position
control".


Attach tractor lower links to the drawbar
(1) and secure.


Fit top link so that it raises towards the
implement when in working position.
Secure top link (3) by means of spring
clip (4).


Make electric supply connections for
lighting equipment, if public roads are
used.

5.2  Detaching from the tractor


Park the implement always on firm and
level ground; re-attachment will then be
easier.


Set tractor hydraulics to "Position
control".


Lower the implement and disconnect
top link.


Remove lower links from the drawbar (1).


Detach electric supply-couplings if provided.

  Read and adhere to the General Safety Instructions as well as to

the Instructions ’Mounted implements’! See section 1!

Summary of Contents for 9/260

Page 1: ... 9 400 S 9 260 Ü 9 300 Ü and 9 400 SÜ Safety is our concern Art Nr 175 1217 GB 4 03 01 LEMKEN GmbH Co KG Weseler Straße 5 D 46519 Alpen Postfach 11 60 D 46515 Alpen Telefon 0 28 02 81 0 Telefax 0 28 02 81 220 eMail lemken lemken com Internet http www lemken com ...

Page 2: ......

Page 3: ...s instruction book Any changes and modifications carried out not being mentioned expressly in this instruction book may only be carried out with a written agreement of the manufacturer Ordering spare parts When ordering spare parts please state type and serial No of the implement This information will be found on the identification plate Put down this data on the following table so that it is alwa...

Page 4: ...d to The LEMKEN Terradisc may only be operated maintained and repaired by such persons who have been made acquainted with it and who have been advised about the dangers The applicable accident prevention advice as well as the generally accepted safety technical working medical and road traffic rules should be adhered to CONTENTS DEFINED USE 2 CONTENTS 2 1 LIST OF VARIANTS 4 2 SAFETY INSTRUCTIONS 5...

Page 5: ...13 7 4 Depth adjustment of the discs 13 7 5 Rollers 14 7 6 Packer roller scrapers 15 8 SHEARBOLTS 16 9 TERRADISC 9 Ü WITH AUTOMATIC OVERLOAD SAFETY DEVICE 17 10 OPTIONS 18 10 1 Outer discs 18 10 2 Push linkage device 19 10 3 Straw harrow STR 80 20 11 MAINTENANCE 21 12 TRANSPORT ON PUBLIC ROADS 22 12 1 Warning boards with lighting equipment 22 12 2 Transport width 22 12 3 Push linkage 22 12 4 Axle ...

Page 6: ...device with overload safety device Push linkage device Kat II Tail wheels 10 0 80 12 pneumatic Depth wheels 10 0 80 12 pneumatic Shares S12P with wing shares S12P with hardfaced wing shares S12PK with wing shares S12PK with hardfaced wing shares Lower link connections L2 Z2 L2 Z3 L3 Z2 L3 Z3 L2 Z2 F L2 Z3 F L3 Z2 F L3 Z3 F Top link connections Kat II Kat III Harrows Straw harrow Tines with shear b...

Page 7: ...ing on the implement during operation or during transport is not permissible Attach implements as advised and only to the stipulated positions Special care should be taken when the implement is coupled to or uncoupled from the tractor When coupling or uncoupling the implement bring the supporting stands into the corresponding position standing safety Fit weights only to the fixing points provided ...

Page 8: ...ocked to prevent lowering Tyres When working on the tyres make sure that the implement has been placed on the ground safely and that it is secured by chocks against unintentional rolling Fitting tyres requires knowledge and special tools Repairwork on tyres may only be conducted by trained staff and with suitable tools Check air pressure regularly and adhere to the advised air pressure Maintenance...

Page 9: ... stickers are fitted which draw attention to these 3 2 Meaning of the stickers Familiarise with the meaning of the stickers The following descriptions inform about them in detail WARNING Read and adhere to this Instruction book and these General Health and Safety precautions before putting the implement to work WARNING Keep well clear of the working and swinging area of the implement WARNING Pinch...

Page 10: ...ways when in working position 4 4 Tractor hydraulics During work the tractor hydraulics must be set to floating position or to mixed control 4 5 Front weights Fit sufficient front weights in accordance with the recommendations of tractor manufacturer 4 6 Terradisc 9 400 S The TERRADISC 9 400 S is wider than 3 m It is not allowed to transport it on public roads if fitted to the tractor 4 7 Front mo...

Page 11: ...lip 4 Make electric supply connections for lighting equipment if public roads are used 5 2 Detaching from the tractor Park the implement always on firm and level ground re attachment will then be easier Set tractor hydraulics to Position control Lower the implement and disconnect top link Remove lower links from the drawbar 1 Detach electric supply couplings if provided Read and adhere to the Gene...

Page 12: ...be experienced the drawbar must be fitted in the lower position In case the penetration is insufficient the pressure load on the roller or rollers is insufficient or the tractor lift capacity is insufficient the drawbar must be fitted in the upper position 6 3 Change of the Drawbar Position If required change the drawbar position as follows Loosen bolts S of carriers P reverse carriers by 180 fit ...

Page 13: ...lt device the tine position and thus the share position will be altered by repositioning the shearbolt 7 Hole A flat position especially for heavy sticky soils easier to pull Hole B steep position especially for dry and hard conditions improved penetration With the TERRADISC Ü with cranked tine carrier VZ however the share position will be altered by slackening and by turning 180 the eccentric bol...

Page 14: ...bove the carrier 13 are for obtaining enough clearance between the ground and the tube bar roller with the cultivator raised If with raised cultivator the tube bar roller 14 is still touching the ground or is too close to the ground then with fully lowered cultivator the pins 12 must be placed in a lower hole above the carrier 13 The length of the top link should be adjusted so that the frame 15 i...

Page 15: ...nsufficiently An optimum depth adjustment is achieved when the following tube bar roller 14 is filled with soil throughout the total working width If the roller area behind the discs is filled with more soil than in the area between the discs the discs are working too shallow Conversely the discs are working too deep if the roller area between the discs is filled with more soil than the area behin...

Page 16: ...If the roller is sinking too deep into the soil in light and sandy soils and or will not roll and the top link cannot be set still more steeply i e higher at the implement or lower at the tractor then the pressure of the roller can be reduced by setting the tractor hydraulics to Draft control or Mixed control This is also recommendable if the tractor shows too much slippage For such soils also a r...

Page 17: ...roller the scrapers must be adjusted Dried soil on the roller creates high wear and also damages the scrapers Z1 Therefore always remove soil before continuing work The scrapers must be adjusted as follows The synthetic scrapers K must contact the roller with a little pressure The scrapers A must be adjusted as close as possible to the roller but must not touch it The standard scrapers S must alwa...

Page 18: ...ly Only shearbolts according to the schedule below should be used Otherwise there is a serious risk of damage to frame tine or disc carrier or a premature failure may be experienced Tine Disc carrier 301 7342 301 3240 TERRADISC 9 M 12x65 B 15 8 8 M 10x45 B 10 8 8 301 4600 301 3240 TERRADISC 9 Ü M 20x70 B 28 8 8 M 10x45 B 10 8 8 301 3391 301 3240 TERRADISC 9 Ü with double cutting shear bolt device ...

Page 19: ...nce the obstacle has been passed The cultivator is additionally protected by means of shearbolts 7 As special equipment also hollow discs 25 with automatic overload safety device are available Read and adhere to the General Safety Instruc tions See section 1 Coil springs are under load If a tripped tine will not swing back into its working position the bolts may be tightened too much Slacken the b...

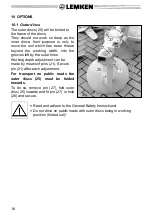
Page 20: ...into the grooves left by the outer tines Working depth adjustment can be made by means of pins 21 Secure pin 21 after each adjustment For transport on public roads the outer discs 25 must be folded inwards To do so remove pin 27 fold outer disc 25 inwards and fit pin 27 in hole 26 and secure Read and adhere to the General Safety Instructions Do not drive on public roads with outer discs being in w...

Page 21: ...he tractor must be set to floating position The working depth adjustment will be done by means of the pin adjustment SV of the tail wheels For the use in the rear in combination with the parallel linkage with hollow discs and roller or rollers the front headstock can remain at the disc cultivator when the supports S are connected to the bore C of the front headstock FB The tail wheels SR of the pu...

Page 22: ... prevents a swinging back of the straw harrow in lifted position For work the straw harrow must be adjusted so that the straw will be distributed very well but not pile up It must be ensured that the tines Z of the straw harrow do not touch the following roller The steeper the harrow tines Z are positioned the better is the crumbling The less steep the harrow tines Z are positioned the less is the...

Page 23: ...iendly grease in order to prevent getting rusty Tighten all bolts and nuts first after 10 working hours and then every 20 working hours Worn shares wings guideboards and so on must be replaced in time so that the carrying parts will not be damaged or worn Use genuine Lemken spare parts only Important Do not clean this implement with a Pressure Washer during the first 6 weeks After this time a mini...

Page 24: ...3 m and therefore may not be transported on public roads If the Terradisc 9 300 is equipped with wing shares FL37 FL37D or wider wing shares it also may not be transported on public roads The regulations and laws concerned must be abided by 12 3 Push linkage If the Terradisc is used front mounted the visibility is influenced This must be considered during transport as well as the regulations and l...

Page 25: ...DISC does not exceed 70 dB A during work 15 WEIGHTS up to KW HP Working Width Weight kg Distance of centre of gravity ca cm TERRADISC 9 260 88 120 260 854 143 TERRADISC 9 300 110 150 300 928 143 TERRADISC 9 400 S 133 180 400 1328 145 TERRADISC 9 260 Ü 88 120 260 1066 168 TERRADISC 9 300 Ü 110 150 300 1174 168 TERRADISC 9 400 S Ü 133 180 400 1653 170 16 PRODUCT REGISTRATION GUARANTEE We would like ...

Page 26: ...ication of the safety and health requirements stated in the EEC Directions the following standards and or technical specifications were consulted EN 292 1 11 91 EN 292 2 11 91 ________________________________________________________________________________________________________________________________________________________________________________________________________________________________...

Reviews: