background image

3


Table of contents 

Checking the model number ....................................................................................... 2


Table of contents ........................................................................................................ 3


What’s in the box? ...................................................................................................... 6


Explanation of the symbols ......................................................................................... 7


Important information before using the device ............................................................ 7


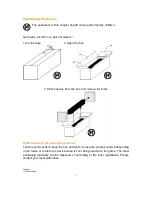
Unpacking the device ................................................................................................. 8


What to do with the packaging material.............................................................................. 8


Mounting the base ...................................................................................................... 9


Exploring the device ................................................................................................. 10


Exploring the remote control ..................................................................................... 12


Where to install ......................................................................................................... 13


Mounting the FM wire antenna ................................................................................. 14


Connecting the device to a power supply ................................................................. 15


Stopping the device in an emergency ...............................................................................15


Connecting the device to the mains ..................................................................................16


General information about the energy saving mode ................................................. 17


Basic control ............................................................................................................. 17


General operation .............................................................................................................17


Turning the power on or off on the device .................................................................................... 17


Turning the device on from standby mode ................................................................................... 17


Putting the device in standby mode .............................................................................................. 17


Adjusting the speaker volume ....................................................................................................... 17


Muting the speakers ...................................................................................................................... 17


Selecting the input source ............................................................................................................ 17


Bluetooth® mode ..............................................................................................................17


Connecting with a Bluetooth® device ........................................................................................... 17


Playing an audio file ...................................................................................................................... 18


Pausing playback .......................................................................................................................... 18


Skipping to the next track ............................................................................................................. 18


Searching forward ......................................................................................................................... 18


Skipping to the previous track ....................................................................................................... 18


Searching backward ..................................................................................................................... 18


Stop playback ............................................................................................................................... 18


AUX Mode ........................................................................................................................18

 

Summary of Contents for BTT-2

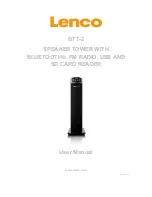
Page 1: ...BTT 2 SPEAKER TOWER WITH BLUETOOTH FM RADIO USB AND SD CARD READER User Manual www lenco com 20130103 v1 0 ...

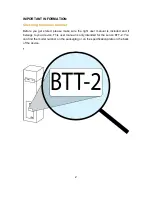
Page 2: ...e you get stared please make sure the right user manual is included and it belongs to your device This user manual is only intended for the Lenco BTT 2 You can find the model number on the packaging or on the specification plate on the back of the device f ...

Page 3: ...ng the device in an emergency 15 Connecting the device to the mains 16 General information about the energy saving mode 17 Basic control 17 General operation 17 Turning the power on or off on the device 17 Turning the device on from standby mode 17 Putting the device in standby mode 17 Adjusting the speaker volume 17 Muting the speakers 17 Selecting the input source 17 Bluetooth mode 17 Connecting...

Page 4: ...Playing the content on the storage media in random order 21 Repeating the content on the storage media 21 USB Mode 22 Pausing playback 22 Skipping to the next track 22 Searching forward 22 Skipping to the previous track 22 Searching forward 23 Stopping playback 23 Playing the content on the storage media in random order 23 Repeating the content on the storage media 23 Advanced 23 Display informati...

Page 5: ...h memory 30 SD Card 30 AUX in 30 Fail situation 30 Mono 30 Stereo 30 Troubleshooting 31 Specifications 32 Safety Precautions 33 Notice statements and information 35 Declaration of Conformity 35 Service and support 36 Do not distribute copyrighted material 37 Trademarks 37 Disclaimer 38 ...

Page 6: ... manual is designed to help you with the features of this device Please keep this manual for future reference This user manual was written during the development of the product based on the factory settings If the product would need improvement priority is given to the product and therefore in these cases the quick start guide user manual illustrations in the user manual and or packaging may diffe...

Page 7: ...rtant information before using the device Use the device only as described in the user manual Read the safety precautions carefully before use The safety precautions can be found in the back of the user manual If certain functions or instructions are unclear always contact our helpdesk or the dealer where the device was bought Information about our helpdesk can be found in the back of the manual T...

Page 8: ...ice from the box and remove the foam What to do with the packaging material Lenco recommends to keep the box and foam in case the product needs transporting in the future or to store the device when it s not being used for a long time The other packaging materials can be disposed of according to the local regulations Please contact your local authorities Legend not included ...

Page 9: ... children Get ready Phillips screwdriver Put the device on a flat stable surface that is slightly elevated for instance on a table so that the base can easily be mounted Place the base against the bottom of the device and secure it with the 4 included screws Legend not included ...

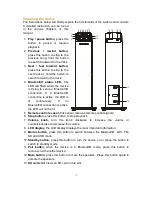
Page 10: ...ntinuously If no Bluetooth connection is active the LED will not be lit 5 Remote control sensor this sensor receives remote control signals 6 Stop button press this button to stop playback 7 Volume knob turn this knob clockwise to increase the volume or counterclockwise to decrease the volume 8 LCD display the LCD display displays the most important information 9 Modus button press this button to ...

Page 11: ...loss of data 15 AUX INPUT connect a device that is equipped with an AUX output or headphones output to this input 16 Wire antenna the antenna receives the FM radio signals 17 Power on off switch set the switch in the OFF position to switch off the device Set the switch in the ON position to put the device in standby mode 18 AC connection connect the power cord to this connection ...

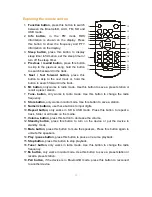
Page 12: ...o change the radio frequency 8 Store button only works in radio mode Use this button to save a station 9 Numeric buttons use these buttons to input digits 10 Repeat button only works in SD USB mode Press this button to repeat a track folder or all tracks on the media 11 Volume button press this button to decrease the volume 12 Standby button press this button to turn on the device or put the devic...

Page 13: ... and low tones 23 Volume button press this button to increase the volume Where to install Never place the device in direct sunlight Place it on a sturdy platform of which the surface should be flat and steady so the product can t fall or hit by any objects Make sure the product is placed in such a manner that nothing can fall on top of it as pressure will damage or break the product Prevent insert...

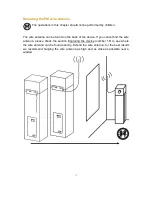
Page 14: ...na can be found on the back of the device If you cannot find the wire antenna please check the section Exploring the device number 16 to see where the wire antenna can be found exactly Extend the wire antenna for the best results we recommend hanging the wire antenna as high and as close as possible near a window ...

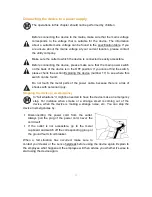
Page 15: ... number 17 to see where this switch can be found Do not touch the metal parts of the power cable because there is a risk of shocks with personal injury Stopping the device in an emergency In fail situations it might be needed to have the device make an emergency stop For instance when smoke or a strange smell is coming out of the device when the device is making a strange noise etc You can stop th...

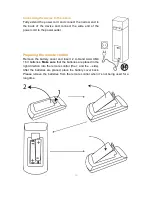
Page 16: ...e power outlet Preparing the remote control Remove the battery cover and insert 2 A brand AAA UM4 1 5V batteries Make sure that the batteries are placed in the right direction into the remote control the and the side After the batteries are placed place the battery cover back Please remove the batteries from the remote control when it s not being used for a long time ...

Page 17: ... device in standby mode When the device is turned on press the standby button on the device or the remote control to put the device in the standby mode Adjusting the speaker volume Turn the volume knob to adjust the speaker volume Turn counterclockwise to decrease the speaker volume or turn clockwise to increase the speaker volume When using the remote control press the VOL button to decrease the ...

Page 18: ...g playback press the play pause button on the device or the remote control to pause playback press the button again to resume playback Skipping to the next track During playback of an audio file press the next button on the device or the remote control to skip to the next track Searching forward During the playback of an audio file hold the next button on the device or the remote control The devic...

Page 19: ...evice or the tune on the remote control 2 Lower the frequency with steps of 0 05 MHz by pressing the previous button on the device or the tune on the remote control Automatic tuning The display shows the current frequency When the device finds a station with sufficient signal strength the device will automatically stop searching You can automatically search for a station in 2 ways 1 Search for sta...

Page 20: ...ency You can save up to 20 preset stations in the memory of this device Tune to the frequency that you would like to save and follow the steps below to save the frequency 1 Press the store button on the remote control the preset number appears on the display 2 The preset number can be increased by pressing M on the remote control and decreased by pressing M on the remote control 3 Press the store ...

Page 21: ...or the remote control to skip to the previous track Searching backward During the playback of an audio file hold the previous button on the device or the remote control The device will search backward in the track until the button is released Stopping playback Press the stop button on the device or the remote control to stop playback Playing the content on the storage media in random order Press t...

Page 22: ...device is read the device will automatically start playing the files on the card Pausing playback During playback press the play pause knop on the device or the remote control to pause playback press the button once more to resume playback Skipping to the next track During playback of an audio file press the next button on the device or the remote control to skip to the next track Searching forwar...

Page 23: ...n the display when all tracks in the current folder are repeated This function can only be used when the tracks are stored into 1 or multiple folders REP ALL if this is shown on the display all tracks on the storage media will be repeated REP OFF when this is shown on the display the repeat function is disabled and all tracks will be played normally Advanced Display information Press the info butt...

Page 24: ...s Now TREB appears on the display Treble are the high tones Press the vol button on the remote control to enhance the treble tones Press the vol button on the remote control to reduce the high tones Press the TONE button on the remote control to confirm the treble settings Resetting the device When the device is not responding or is not responding correctly reset the device by putting the power sw...

Page 25: ...xploring the device number 17 to see where this switch can be found Do not touch the metal parts of the power cable because there is a risk of shocks with personal injury Get ready Phillips screwdriver 1 Disconnect the equipment that is connected to the AUX input and remove any USB devices and SD cards 2 Turn the main power switch on the back of the device in the off position 3 Remove the plug fro...

Page 26: ...26 4 Disconnect the wire antenna ...

Page 27: ... Put the device on a flat stable surface that is slightly elevated for instance on a table so that the base can easily be removed Loosen the 4 screws and don t forget to hold the base so it can t fall down ...

Page 28: ...sturdy tape and the packaging material as saved according to the unpacking instructions 1 Insert the foam and lower the device into the box 2 Close the box shut 3 Tape the box shut The device is now ready to be stored or transported Try to limit the number of shocks as much as possible during transport Legend not included ...

Page 29: ... between devices Open standard an open norm or standard that is publicly available LED The word led was originally an acronym for light emitting diode A led is an electronic component a semiconductor that emits light when electric power is sent through in the forward direction Sensor Machines use sensors to observe the surroundings or gather information to control processes LCD A liquid crystal di...

Page 30: ...device does not respond or operate as intended For instance when buttons do not respond or smoke starts coming out of the device Mono Mono means one and in sound engineering the term is used to indicate that all sound is distributed and output through a single channel Stereo Stereo generally refers to two channel sound recording and or output a recording that contains a simultaneous signal for two...

Page 31: ... a time limit for settings and selections Repeat the steps Radio stations cannot be received or can barely be heard because of hiss Fully extend the wire antenna Re position the wire antenna Increase the distance between the device and other equipment Bluetooth music stutters Place the Bluetooth device closer to the radio The remote control does not work Check the input source Keep the remote cont...

Page 32: ...z 108MHz Dimensions WxDxH Speaker Tower incl base 90 x 29 x 29 cm Remote Control 11 x 5 x2 cm Weight Main device incl base 7 5 KG Remote Control 45 Gram Display Color Information Display Light Blue Remote Control Operating Range 5M max Angle of 30 Battery 2x AAA 1 5V Connections USB slot USB 2 0 5V 500mA Tot 32GB FAT16 32 999 files 99 folders External Audio Input Line in RCA cinch SD Memory Card U...

Page 33: ...d by the manufacturer This device must be used in combination with a power supply as specified in the specification table If you are not sure of the type of power supply used in your home consult your power company Do not use loose or damaged cords and or plugs This device has a Class II construction Devices with a Class II construction can be connected to an unearthed power outlet The power outle...

Page 34: ...of water on top of the device The display is made of plastic and might break when it s damaged Beware of sharp plastic splinters when the screen breaks to avoid injury Should the unit become wet immediately remove the plug from the power outlet and let the appliance fry for 72 hours before trying to use it again Remove the batteries from the device and or remote control if they will not be used fo...

Page 35: ...ect waste treatment of the product and battery please dispose them in accordance to any applicable local laws of requirement for disposal of electrical equipment or batteries By doing so you will help to conserve natural resources and improve standards of environmental protection in treatment and disposal of electrical waste Waste Electrical and Electronic Equipment Directive This product contains...

Page 36: ...rial number can be found on the back of the device Please write down the serial number below Model BTT 2 Serial number _________________________________ Lenco offers service and warranty in accordance to European law which means that in case of repairs both during and after the warranty period you should contact your local dealer Important note It is not possible to send products that need repairs...

Page 37: ...ation of copyright laws The manufacturer is not liable for any legal issues caused by illegal use of copyrighted material by the user Trademarks Lenco and the Lenco logo are trademarks of STL Group BV Pair Play is a trademark of STL Group BV logo is a trademark of STL Group BV Bluetooth and the Bluetooth logo are trademarks of Bluetooth SIG Inc ...

Page 38: ...INESS LEGALITY OR COMPLETENESS OF ANY CONTENT OR SERVICE MADE AVAILABLE THROUGH THIS DEVICE UNDER NO CIRCUMSTANCES INCLUDING NEGLIGENCE SHALL LENCO BE LIABLE NEITHER IN CONTRACT NOR TORT FOR ANY DIRECT INDIRECT INCIDENTAL SPECIAL OR CONSEQUENTIAL DAMAGES ATTORNEY FEES EXPENSES OR ANY OTHER DAMAGES ARISING OUT OF OR IN CONNECTION WITH ANY INFORMATION CONTAINED IN OR AS A RESULT OF THE USE OF ANY CO...

Page 39: ... B V is not responsible for any printing errors in this manual Products of other manufacturers are only mentioned for information This does not mean that these products are recommended by STL Group B V STL Group B V accepts no liability for the reliability or compatibility of these products ...

Reviews: