background image

Multimedia Operation


19


1. Photo


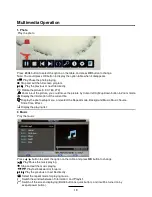
Play the photo 


Press 

button to select the option on the table, and press 

OK 

button to change. 

Note: You could press OK button to display the option table when it disappears. 

Play/Pause the photo playing. 

Stop and exit the full screen program. 

Play the previous or next file directly. 

Ratate the picture(0, 90, 180, 270). 

Zoom in/out the picture, you could move the picture by Cursor left/right/up/down button in Zoom mode. 

Display the information of the current file. 

Display the photo setup menu, and select the Repeat mode, Background Music, Music Source, 
Slide Time, Effect. 

Display the playing list. 


2. Music


Play the music 


Press 

button to select the option on the table, and press 

OK 

button to change. 

Play/Pause the music playing. 

Stop and exit the music playing. 

Play fast backword or forword.  

Play the previous or next file directly. 

ALL


Select the repeat mode for playing music. 
Switch the window between “Information” and “Playlist”. 
Switch off the screen displaying (BLUE button as quick button), and it will be turned on by 
exepet power button). 

Summary of Contents for DVL-1955

Page 1: ...61cm 24 FULL HD LED TV with DVB T C S2 CI Slot Model No LED 2419 BLACK Please read and follow these instructions before using your unit www lenco com ...

Page 2: ......

Page 3: ...ed dangerous voltage within the products enclosure that may be of sufficient magnitude to constitute a risk of electric shock to the persons The exclamation point within an equilateral triangle is intend to alert the user to the presence of important operating and maintenance servicing instructions in the literature accompanying the appliance ...
Page 4: ...s such as Bathrooms steamy kitchens or near swimming pools 3XOO WKH SOXJ RXW LPPHGLDWHOy and seek professional help if the mains plug or cable is damaged liquid is spilt onto the set or if it is accidentally exposed to water or moisture anything accidentally penetrates the ventilation slots the set does not work normally Do NOT remove the safety covers There are no user serviceable parts inside Yo...

Page 5: ... Batteries for Remote Control Converter cable for AV and YPbPr video Note The configuration of the components may look different from the following illustration Technical Specification TV System Screen Size Resolution Aerial input Audio output power Power Consumption PAL BG DK I SECAM BG DK L L 23 6 inch diagonal 1920x1080 2x3W 12V 3A 36W Remote Control Type Control distance Control angle Batterie...

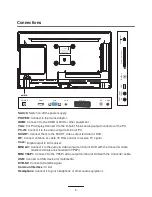
Page 6: ...4 Product Introduction Introduction Front View POWER to turn on and off Blue off Null INPUT MENU CH Press to scan through channels VOL POWER ...

Page 7: ...utput terminal of PC SCART Connect them to the SCART video output terminal of DVD RF Connect antenna or cable 75 Ohm coaxial to receive TV signal Coax Digital output to AV receiver MINI AV Connect it to the audio video output terminal of DVD with the Converter cable Audio terminals are shared with YPbPr MINI YPbPr Connect it to the YPbPr video output terminal of DVD with the Converter cable USB Co...

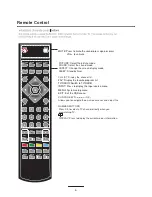
Page 8: ...he channel list FAV Display the favorite program list TV RADIO Switch to TV RADIO INPUT Press to display the input source menu MENU System setup menu EXIT Exit the OSD menu CURSOR KEYS OK Allows you to navigate the on screen menus and adjust the MEN U EXIT NUMBERBUTTONS 1 2 3 4 5 6 7 8 DISPLAY Press 0 9 to select a TV channel directly when you are watching TV DISPLAY Press to display the current m...

Page 9: ... Next chapter REC REC LIST VOL CH TV TXT CANCEL REVEAL NICAM A2 INDEX HOLD SIZE SUBPAGE TV TXT Turn off on the Teletext display CANCEL Cancel the Teletext display REVEAL Reveal any hidden text NICAM A2 TV Nicam A2 select INDEX Go to index HOLD Hold or carry on the current subpage SIZE Press to see top half of page double size Press again to see the bottom half of page double size Press again for n...

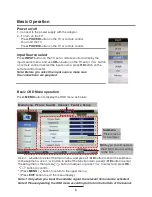
Page 10: ...pared Basic OSD Menu operation Press MENU button to display the OSD menu as below Main menu Picture Sound Channel Feature Setup Submenu Picture menu for example Hint you should operate the OSD menu according to the hint Use v button to select the main menu and press OK button to enter the submenu In the submenu use v button to select the function item press OK button to enter the setup menu then p...

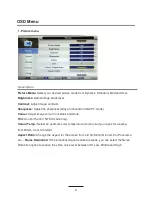
Page 11: ...mode Colour Adjust image colour from black and white Tint Control the tint NTSC mode only Colour Temp Select an optimum color temperature mode to suit your eyes for viewing from Warm Cool Standard Aspect Ratio Change the aspect for the screen from 4 3 16 9 Zoom1 Zoom2 or Panorama etc Noise Reduction If the broadcast signal received is weak you can select the Noise Reduction option to reduce the vi...

Page 12: ... of the lower pitched sounds Treble Adjust the level of the higherpitched sounds Balance Adjust the audio output between left and right speakers Surround Turn on off the surround sound function Auto Volume Level AVL The volumes of all sources will be maintained when the function s on SPDIF Select the spdif mode for the TV from off PCM and Auto ...

Page 13: ... function Press GREEN button to sign lock or cancel unlock the channel And you have to enter the password to view the program Skip Press YELLOW button to skip the channel or cancel the setting and the program will not be programed by CH button Move Press BLUE button to sign the channel press button to move and press OK button to move the position Favorite Management Add or remove favourite channel...

Page 14: ...button to stop auto tunning and return to preview menu DTV Manual Search Enter the DTV Manual Search menu Press button to select the Channel item and press button to select the channel then press button to select the Start item and press button to manual search DVB T DVB C ATV Manual Search Enter the ATV Manual Search menu Current Channel Select the current channel for manual searching Search Pres...

Page 15: ...ellite OK Select Auto Search as follow Operations in satellite Auto Search menu are shown in the following table Option Value Mode Default Network Search Full Search Satellite 65 satellite for searching 3 user edit satellite Service Type All Services Free Service Channel Type All TV Only ...

Page 16: ...ff LNB1 LNB2 LNB3 LNB4 Burst A Burst B Motor None DisEqC1 2 DisEqC1 3 Satellite System Press button to select the TV Conection and set it on Satellite OK Press button to select the Satellite System show as follow Operations in Satellite List Menu are shown in the following table Key Stroke Action KEY_UP use cursor to up KEY_DOWN use cursor to down KEY_LEFT switch operation to satellite system para...

Page 17: ...u will be asked for a password As default it is 0000 Lock Enable Turn on off the Lock functions Note When it is be turned on the functions of Parental Guidance and Change Pin code below will be locked and the functions Lock in Channel Management Auto Search DTV Manual Search ATV manual Search in Channel menu will also be locked Parental Guidance Select the Parental Guidance mode or turn off the fu...

Page 18: ...t Import all Hotel Settings from the USB device Previous Page Select Previous Page items press the ok button to return to the previous page Language Lets you adjust the different language options available Clock Allows you to set the clock as default the information is taken automatically from the digital signal Sleep Timer Lets you set the sleep timer so the television automatically switches off ...

Page 19: ...uency until the image size is maximized for the screen Blue Screen Changes the background when there is no input between clear and a blue background Only available in some sources Home Mode Press to select from the following home modes Home Dynamic Reset TV Setting This clears all the TV settings for the television Software Upgrade From time to time we may release new firmware to improve the runni...

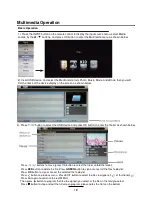
Page 20: ... press OK button to enter the file list as shown below Press buttons to move press OK button to select the file or unfold the folder Press RED button to delete the file Press GREEN button to sign or cancel all the files to playlist Press OK button to sign or cancel the selected file to playlist Press button to previous menu Press EXIT button to select the file view type list or thurnbnail Press Ex...

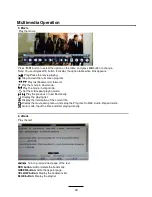
Page 21: ...ton in Zoom mode Display the information of the current file Display the photo setup menu and select the Repeat mode Background Music Music Source Slide Time Effect Display the playing list 2 Music Play the music Press button to select the option on the table and press OK button to change Play Pause the music playing Stop and exit the music playing Play fast backword or forword Play the previous o...

Page 22: ...slow mode Play the movie in step mode AB Set the A B repeat playing mode Play the previous or next file directly Display the playing list Display the information of the current file Display the movie setup menu and setup the Program Subtitle Audio Repeat mode Goto mode Input the time and start playing directly 4 eBook Play the text Turn to previous next page of the text RED button Add or delete th...

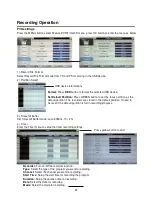
Page 23: ...partition The recorders are stored in the default partition It need to be reset if the default partition is full in recording progress 3 Timeshift Buffer Set Timeshift Buffer mode auto 30Mins 1hr 2hr 4 Timer Enter the Timer menu to setup the timer recording settings Recorder Turn on off the recorder function Type Select the type of the program you want to recording Channel Select the channel you w...

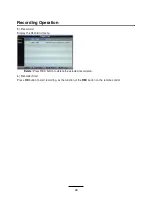
Page 24: ...eration 5 Record List Display the Record list menu Delete Press RED button to delete the selected record plan 6 Recorder Start Press OK button to start recording as the function of the REC button on the remote control ...

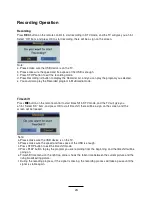
Page 25: ...ift Press button on the remote control to start timeshift in DTV mode and the TV will give you a hint Select OK item and press OK to start timeshift there will be a sign on the screen and the screen will be freezed Note a Please make sure the USB device is on the TV b Please make sure the speed and free space of the USB is enough c Press STOP button to exit the timeshift mode d Press PLAY button t...

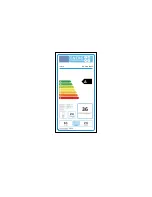
Page 26: ...LENCO LED 2419 BLACK A 36 24 61 24 2011 ...

Page 27: ...can be found on the back of the device Please write down the serial number below Model LED 2419 BLACK Serial number Lenco offers service and warranty in accordance to European law which means that in case of repairs both during and after the warranty period you should contact your local dealer Important note It is not possible to send products that need repairs to Lenco directly Important note If ...

Page 28: ...ent or batteries In so doing you will help to conserve natural resources and improve standards of environmental protection in treatment and disposal of electrical waste Waste Electrical and Electronic Equipment Directive Products with the CE marking comply with the EMC Directive 2004 108 EC and the Low Voltage Directive 2006 95 EC issued by the Commission of the European Community The declaration ...

Reviews: