background image


L-82 

INSTRUCTION MANUAL 


For information and support, www.lenco.eu 

All manuals and user guides at all-guides.com

all-guides.com

Summary of Contents for L-82

Page 1: ...1 L 82 INSTRUCTION MANUAL For information and support www lenco eu All manuals and user guides at all guides com a l l g u i d e s c o m ...

Page 2: ...2 CONTENTS Assembly 3 Description 4 5 Mains Connection 6 Amplifier Connection 6 Specification 6 All manuals and user guides at all guides com ...

Page 3: ...D Clip the E ring on the shaft and place the rubber mat onto the turntable platter Caution 1 Make sure that the drive belt is not twisted or distorted 2 Avoid oil Oil splashes will make the belt slippery Auto Return Reset Always do the reset for Auto Return once you move this product The mechanism of Auto Return will rotate irregularly when moving and it will cause the malfunction of Auto Return T...

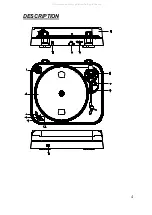
Page 4: ...4 DESCRIPTION All manuals and user guides at all guides com ...
Page 5: ...d Connect this cord to an AC outlet of the proper voltage 12 Power Switch For turning the power on or off through this switch Please press this button to re start your device when operation was interrupted 13 USB Port Input Plug in a USB Pen Drive for recording the music from a record The design is only for USB Flash Drive To prevent the power supply is not sufficient and overheated of the circuit...

Page 6: ...record spindle Choose the desired playing speed 33 rpm button unlocked 45 rpm button locked Release the pick up arm clip Place the cartridge vertically over the first track of the record the turntable starts turning When the record is over the pick up arm returns to its rest the turntable stops turning Take care that the pick up lift stick is in forward turned lift down close pick up arm lock to s...

Page 7: ...ch as vases shall be placed on the apparatus 4 The apparatus shall not be exposed to dripping or splashing 5 The mains plug is used as the disconnect device the disconnect devices shall remain readily operable 6 No replaceable parts inside repair work should be carried out by manufacturer or authorized agent All manuals and user guides at all guides com ...
Page 8: ...L 82 BEDIENUNGSANLEITUNG Zur Information und Unterstützung www lenco eu All manuals and user guides at all guides com ...

Page 9: ...INHALT Zusammenbau 3 Beschreibung 4 5 Netzanschluss 6 Anschluss eines Verstärkers 6 Technische Daten 6 All manuals and user guides at all guides com ...
Page 10: ... den E Ring auf der Welle und setzen Sie die Gummimatte zurück auf den Plattenteller Warnung 1 Stellen Sie sicher dass der Antriebsriemen nicht verdreht oder verzogen wird 2 Vermeiden Sie Öl Ölspritzer führen dazu dass der Riemen nicht mehr richtig greift Reset der Auto Return Funktion Führen Sie immer einen Reset der Auto Return Funktion durch wenn Sie das Gerät an einen anderen Ort bewegt haben ...

Page 11: ...lattenteller vor Staubeinwirkung zu schützen Der Staubschutz kann während der Benutzung geöffnet oder vollkommen entfernt werden sollte aber bei Nicht Benutzung geschlossen bleiben 10 Cinch Line Out Kabel Verbinden Sie den Cinch Line Out Anschluss mit einem Mischpult oder Verstärker Ihres Audiosystems 11 Netzkabel Schließen Sie dieses Kabel an eine Steckdose mit geeigneter Spannung an 12 Ein Aus S...

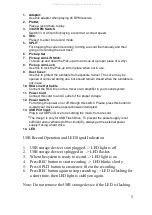
Page 12: ...hme LED leuchtet 4 REC Taste zum Starten der Aufnahme betätigen LED blinkt langsam 5 Betätigen Sie die SPLIT Taste um eine neue Datei während der Aufnahme zu erstellen 6 Betätigen Sie die REC Taste erneut um die Aufnahme zu stoppen LED blinkt kurz auf und bleibt dann an Hinweis Entfernen Sie Ihr USB Speichermedium nicht wenn die LED blinkt All manuals and user guides at all guides com ...
Page 13: ...nd am Tonarmhalter befestigt wird Technische Daten Stromversorgung 230 V 50 Hz Stromverbrauch 10 W Gleichlaufschwankungen 0 25 Verzerrung 3 4 Rauschabstand 50 dB Audio Ausgangspannung 500 mV 200 mV USB 5 V 500 mA Sollten Sie dieses Produkt zu einem späteren Zeitpunkt entsorgen müssen beachten Sie bitte Elektro und Elektronik Altgeräte dürfen nicht mit dem Hausmüll entsorgt werden Bitte wiederverwe...

Page 14: ...1 L 82 MANUEL D INSTRUCTION Pour information support technique www lenco eu All manuals and user guides at all guides com ...

Page 15: ...2 TABLE DES MATIÈRES Montage 3 Description 4 6 Connections principales 7 Connections des amplificateurs 7 Spécification 7 All manuals and user guides at all guides com ...

Page 16: ... tapis de caoutchouc sur le plateau tourne disque Précaution 1 Assurez vous que la courroie ne soit pas entortillée ou tordue 2 Évitez l huile Les taches d huiles rendent la courroie glissante Réinitialisation du retour automatique Réinitialisez systématiquement le retour automatique dès que vous bougez ce produit Le mécanisme de retour automatique tournera irrégulièrement après un déplacement et ...

Page 17: ...4 DESCRIPTION All manuals and user guides at all guides com ...

Page 18: ...ester fermé lorsque le tourne disque est inutilisé 10 10 10 10 Câble sortie RCA Connectez la sortie RCA sur un mélangeur ou un amplificateur de votre système de sonorisation 11 11 11 11 Câble d alimentation Connectez ce câble à une prise de courant du voltage approprié 12 12 12 12 Interrupteur Allumez ou éteignez votre appareil grâce à ce bouton Appuyez sur ce bouton pour redémarrer votre appareil...

Page 19: ...r d enregistrement 6 Appuyez à nouveau sur la touche REC pour stopper l enregistrement la DEL clignote un court instant puis la lumière de la DEL se stabilise à nouveau Note N enlevez pas le dispositif de stockage USB lorsque la DEL clignote All manuals and user guides at all guides com ...

Page 20: ...sque Choisissez la vitesse de lecture désirée 33 tours bouton déverrouillé 45 tours bouton verrouillé Relâchez la tige levier du bras de lecture Placez le bras de lecture verticalement au dessus de la première piste du disque le tourne disque se met à tourner Lorsque le disque est fini le bras de lecture retourne en position de repos le tourne disque cesse de tourner Veillez à ce que la tige levie...

Page 21: ...niques 1 N obstruez pas les ouvertures d aération 2 Aucune source de flamme nue telle qu une bougie allumée ne doit être posée sur l unité 3 Ne posez aucun objet rempli de liquide tel qu un vase sur l appareil 4 N exposez pas l unité aux égouttements et éclaboussures 5 Utilisez la fiche du cordon pour mettre l unité hors tension celle ci doit être rapidement accessible 6 L unité ne contient aucun ...

Page 22: ...1 L 82 Manual de instrucciones Para obtener información y apoyo www lenco eu All manuals and user guides at all guides com ...

Page 23: ...2 ÍNDICE Montaje 3 Descripción 4 6 Conexión del suministro 7 Conexión del amplificador 7 Especificaciones 7 All manuals and user guides at all guides com ...

Page 24: ... sobre el eje y ponga la almohadilla de caucho sobre el plato del giradiscos Precaución 1 Asegúrese de que la correa no esté torcida ni distorsionada 2 Evite el aceite Las salpicaduras de aceite harán que la correa esté resbalosa Restauración del autorretorno Siempre realice la restauración del autorretorno cuando mueva este producto El mecanismo del autorretorno girará irregularmente cuando lo mu...

Page 25: ...4 DESCRIPCIÓN All manuals and user guides at all guides com ...

Page 26: ...use 10 Cable de salida de línea RCA Conecte el cable RCA a un mezclador o un amplificador de su sistema de sonido 11 Cable de alimentación Conecte este cable a una toma AC para el voltaje adecuado 12 Interruptor Power Para encender y apagar el aparato Pulse este botón para reiniciar su dispositivo cuando la operación se interrumpa 13 Entrada USB Conecte un lápiz USB para grabar música de un disco ...

Page 27: ...tón REC de nuevo para detener la grabación La LED parpadeará algunos momentos después se mantendrá encendida Nota No quite el almacenamiento USB si el LED está parpadeando All manuals and user guides at all guides com ...

Page 28: ... en el eje de discos Elija la velocidad de reproducción deseada 33 rpm botón desbloqueado 45 rpm botón bloqueado Libere el clip del brazo Coloque el cartucho verticalmente sobre la primera pista del disco el giradiscos empezará a girar Cuando se acabe el disco el brazo de la aguja volverá a su apoyo el giradiscos se detendrá Asegúrese de que la saliente del brazo esté hacia adelante girado bajar c...

Page 29: ...ónicos 1 No cubra la ventilación 2 Ninguna fuente de llamas descubiertas como velas encendidas deben colocarse sobre el aparato 3 Ningún objeto con líquido como un jarrón debe colocarse encima del aparato 4 El aparato no debe exponerse a goteos ni salpicaduras 5 La clavija de alimentación se usa como mecanismo de desconexión El mecanismo de desconexión debe permanecer fácilmente utilizable 6 No ha...

Page 30: ...1 L 82 HANDLEIDING Voor informatie en ondersteuning www lenco eu All manuals and user guides at all guides com ...

Page 31: ...2 INHOUDSOPGAVE Montage 3 Omschrijving 4 6 Aansluiten op lichtnet 6 Aansluiten op versterker 6 Specificaties 7 All manuals and user guides at all guides com a l l g u i d e s c o m ...

Page 32: ... draaiplateau Let op 1 Zorg ervoor dat de aandrijfriem niet is gedraaid of vervormd 2 Vermijd olie Oliespatten maken de aandrijfriem glad De automatische terugkeerfunctie resetten Voer altijd de reset voor de automatische terugkeerfunctie uit als u het product verplaatst Het mechanisme van de automatische terugkeerfunctie zal onregelmatig draaien wanneer u het apparaat verplaatst en dit zal een st...

Page 33: ...4 OMSCHRIJVING All manuals and user guides at all guides com ...

Page 34: ...in gebruik is 10 RCA Line Out kabel Sluit de RCA line out aan op een mixer of versterker in uw geluidssysteem 11 Netsnoer Sluit dit snoer aan op een stopcontact met de juiste spanning 12 Aan uit knop Gebruik deze knop voor het in uitschakelen van de draaitafel Druk op deze knop om uw apparaat opnieuw te starten als de operatie werd onderbroken 13 USB poort Plaats een USB stick voor het opnemen van...

Page 35: ...an het L kanaal Plaats een plaat naar keuze op de draaitafel Als het een 45 toerenplaat is vergeet niet om de adapter 1 op de platenspil te plaatsen Kies de gewenste afspeelsnelheid 33 toeren knop is ontgrendeld 45 toeren knop is vergrendeld Ontgrendel de sluiting van de pick up arm Plaats de houder verticaal boven het eerste nummer van de plaat het draaiplateau begint te draaien Als de plaat is a...

Page 36: ...orwerpen gevuld met vloeistof zoals vazen op het apparaat 4 Het apparaat mag niet worden blootgesteld aan druppend of spattend water 5 De stekker wordt gebruikt om het apparaat los te koppelen van het lichtnet en moet eenvoudig bereikbaar blijven 6 Er zitten geen door de gebruiker te vervangen onderdelen in het apparaat reparaties moeten worden uitgevoerd door de fabrikant of een erkende vertegenw...

Reviews: