background image

- 1 -


Model LS-480 / LS-500(V2)


User Manual – 

Turntable with built-in amplifier, Bluetooth and speakers


Gebruikershandleiding – 

Platenspeler met ingebouwde versterker, 


Bluetooth en luidsprekers


Bedienungsanleitung – 

Plattenspieler mit integriertem Verstärker, Bluetooth und 

Lautsprechern


Mode d’emploi – 

Platine tourne-disque avec amplificateur intégré, Bluetooth et haut-

parleurs


Manual de usuario – 

Tocadiscos con amplificador incorporado, Bluetooth y altavoces


Manuale Utente – 

Giradischi con amplificatore, Bluetooth e altoparlanti integrati


Руководство пользователя – 

Виниловый проигрыватель со встроенным 

усилителем, Bluetooth и внешними динамиками


Summary of Contents for LS-480

Page 1: ...en luidsprekers Bedienungsanleitung Plattenspieler mit integriertem Verst rker Bluetooth und Lautsprechern Mode d emploi Platine tourne disque avec amplificateur int gr Bluetooth et haut parleurs Man...

Page 2: ...2 Index English 3 Nederlands 13 Deutsch 24 Fran ais 36 Espa ol 47 Italiano 59 70 Version 1 0...

Page 3: ...u notice smoke an excessive build up of heat or any other unexpected phenomena you should disconnect the plug from the main power socket immediately 11 This device must operate on a power source as sp...

Page 4: ...ontaining coin cell batteries Warning Do not ingest battery Chemical Burn Hazard or equivalent working The remote control supplied with This product contains a coin button cell battery If the battery...

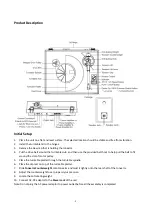
Page 5: ...hoot to help pull the belt to fit around the slot of motor pulley 5 Place the turntable platter through the turntable spindle 6 Place the slip mat on top of the turntable platter 7 Slide Tonearm Count...

Page 6: ...onearm should return to the balanced position if it is moved up or down This adjustment must be done carefully Once the tonearm is correctly balanced return it to its rest Hold the Counterweight witho...

Page 7: ...to the left of support The anti skating force must be adjusted corresponding to the down force as follows Down force Groove in the stub 2 2 5g 1 st from bearing rings 2 5 3g 3 3 5g 3 5 4g 2 nd 3 rd 4...

Page 8: ...t has a bluetooth reception function you can not transmit any bluetooth sound with it this means that you can receive wirelessly a bluetooth sound signal from an external source like a smartphone Turn...

Page 9: ...tylus will be tracking the grooves in parallel perfectly To achieve this place the included paper cartridge alignment protractor over the turntable spindle carefully lift the tone arm and place the ti...

Page 10: ...1 Do not touch the stylus tip with your fingers Avoid bumping the stylus on the turntable mat or a record s edge 2 Clean the stylus frequently with a soft brush with a back to front motion only 3 Clea...

Page 11: ...hole unit will switch to standby mode automatically if no music has been playing for about 20 minutes To restart the unit hold press the ON OFF MODE Button If your unit switches off regularly this is...

Page 12: ...ipment or batteries In so doing you will help to conserve natural resources and improve standards of environmental protection in treatment and disposal of electrical waste Waste Electrical and Electro...

Page 13: ...staan voordat u het inschakelt het apparaat dient droog te zijn voordat deze stroom ontvangt 10 Alhoewel dit apparaat met grote zorg gefabriceerd en verschillende keren ge nspecteerd is voordat het d...

Page 14: ...rmende aardverbinding Apparaten met een Klasse 2 structuur vereisen geen aardverbinding Houd altijd de stekker vast wanneer u deze uit het stopcontact trekt Trek nooit aan de voedingskabel Dit kan tot...

Page 15: ...latenspeler Dust Cover Stofkap Lid Hinge Dekselscharnier Anti skating Weight Antiskating gewicht Tonearm Counterweight Tegengewicht toonarm Anti skating Stub Antiskating mechanisme Tonearm Lift Hefmec...

Page 16: ...jn 2 Installeer de kap van de platenspeler op de scharnieren 3 Verwijder de tie wrap die de toonarm vasthoudt 4 Leg de aandrijfriem rond de naaf van de platenspeler en gebruik vervolgens de meegelever...

Page 17: ...ceert De toonarm dient terug te keren naar de gebalanceerde positie als deze omhoog of omlaag wordt bewogen Deze afstelling moet voorzichtig worden uitgevoerd Nadat de toonarm eenmaal correct is gebal...

Page 18: ...5 g 1e vanaf lagerringen 2 5 3 g 3 3 5 g 3 5 4 g 2e 3e 4e Een stereosysteem aansluiten RCA aansluitingen De RCA aansluitingen van dit apparaat worden gedeeld als zowel de telefoonuitgang aansluitinge...

Page 19: ...u draadloos een Bluetooth geluidssignaal kunt ontvangen van een externe bron zoals een smartphone De platenspeler bedienen 1 Houd de AAN UIT MODUS knop 3 seconden ingedrukt om het apparaat in te schak...

Page 20: ...is uitgelijnd op de behuizing zodat de naald perfect in parallel in de groeven past Plaats de meegeleverde papieren gradenboog hiertoe over de as van de platenspeler til de toonarm voorzichtig op en...

Page 21: ...0 84 No load Power consumption 0 080W Gebruik uitsluitend de lichtnetdapter die in de gebruiksaanwijzing wordt vermeld Onderhoud platenspeler 1 Raak de naaldpunt niet met uw vingers aan Stoot niet met...

Page 22: ...op de voorversterker is verkeerd ingesteld Geluiden van de plaat te snel of te langzaam Verkeerde snelheid geselecteerd voor de plaat Er klinkt een luid gezoem uit de phono ingang De kabel is niet cor...

Page 23: ...de accu batterij niet mag worden verwijderd als algemeen huishoudelijk afval in Europa Zorg voor een juiste afvalverwerking door het product en de accu batterij in overeenstemming met alle van toepass...

Page 24: ...s Ger ts Wassertropfen oder Kondensationen bilden und zu Fehlfunktionen des Ger ts f hren Schalten Sie in diesem Fall das Ger t f r 1 2 Stunden aus bevor Sie es erneut einschalten Das Ger t sollte vol...

Page 25: ...sse 1 sind an eine Netzsteckdose mit Schutzleiter anzuschlie en Ger te der Schutzklasse 2 ben tigen keinen Schutzleiteranschluss Halten Sie den Netzstecker in der Hand wenn Sie ihn aus der Netzsteckdo...

Page 26: ...Hub Plattentellerdrehscheibe Turntable Platter Plattenteller Dust Cover Staubschutzabdeckung Lid Hinge Abdeckhaubenscharnier Anti skating Weight Antiskating Gewicht Tonearm Counterweight Tonarm Gegen...

Page 27: ...Der gew hlte Aufstellort sollte stabil und schwingungsfrei sein 2 Befestigen Sie den Plattenspielerdeckel an den Scharnieren 3 Entfernen Sie den Kabelbinder der den Tonarm sichert 4 Legen Sie den Antr...

Page 28: ...ller Drehen Sie das Gegengewicht vorsichtig bis der Tonarm ausbalanciert ist Der Tonarm sollte in die balancierte Position zur ckkehren wenn er nach oben oder unten bewegt wird Diese Einstellung muss...

Page 29: ...stellstift des Anti Skating Gewichts in die 3 Einkerbung die richtige Anti Skating Kraft f r werksmontierte Tonabnehmer 2 Ziehen Sie leicht am Anti Skating Gewicht damit die Schlaufe der Angelschnur i...

Page 30: ...sivlautsprecher angeschlossen zu werden Wenn Sie dennoch Passivlautsprecher anschlie en dann ist der Lautst rkepegel sehr gering Lautsprecheranschluss Die Lautsprecher Federklemmen stellen ein endvers...

Page 31: ...ng gedr ckt um das Ger t auszuschalten Austausch des Tonabnehmers 1 Legen Sie vor dem Austausch den Nadelschutz wieder auf die Nadel um eine Besch digung der Nadel w hrend des Austauschvorgangs zu ver...

Page 32: ...ung Lautsprecher B x H x T 162 x 248 x 158 mm Gewicht 3 76 kg Tonnadel AT 3600L Frequenzgang 20 Hz 20 kHz Kanalabgleich 2 5 dB Kanaltrennung 18 dB Ausgangsspannung 2 5 mV Empfohlener Lastwiderstand 47...

Page 33: ...cken Sie die MODE taste um den Plattenspielermodus auszuw hlen der durch Leuchten der LED in Rot angezeigt wird Sie m ssen die PLAY STOP Taste einmal dr cken damit die Wiedergabe beginnt Der Antriebs...

Page 34: ...ofessionelle Zwecke eingesetzt wird erl schen alle Garantieverpflichtungen seitens des Herstellers Haftungsausschluss Aktualisierungen der Firmware und oder Hardware Komponenten werden regelm ig durch...

Page 35: ...runds tzlichen Anforderungen der EU Richtlinie entspricht Die Konformit tserkl rung kann unter folgendem Link abgerufen werden techdoc commaxxgroup com Service Besuchen Sie bitte f r weitere Informati...

Page 36: ...a condensation peuvent se former l int rieur de l appareil et affecter son fonctionnement Laissez l appareil hors tension pendant 1 ou 2 heures avant de le mettre en marche l appareil doit tre sec ava...

Page 37: ...ch s une prise de courant disposant d une connexion protectrice la terre Les appareils la norme de construction de classe 2 ne n cessitent pas de connexion la terre Tirez toujours sur la fiche pour d...

Page 38: ...Hinge Charni re du couvercle Anti skating Weight Poids antipatinage Tonearm Counterweight Contrepoids du bras de lecture Anti skating Stub Doigt annel de l antipatinage Tonearm Lift Bras de lecture To...

Page 39: ...L emplacement choisi doit tre ferme et ne subir aucune vibration 2 Installez le couvercle de la platine tourne disque sur les charni res 3 Retirez l attache autobloquante qui retient le bras de lectur...

Page 40: ...bras de lecture soit quilibr Le bras de lecture doit retourner la position d quilibre s il est d plac vers le haut ou le bas Ce r glage doit tre effectu avec pr caution Une fois que le bras de lecture...

Page 41: ...bout 2 2 5 g 1re partir des bagues de roulement 2 5 3 g 3 3 5 g 3 5 4 g 2e 3e 4e Connexion du syst me st r o Prises RCA Les prises RCA de cet appareil sont partag es par les prises de sortie phono et...

Page 42: ...atine tourne disque cela signifie que vous pouvez recevoir sans fil un signal sonore Bluetooth partir d une source externe par ex un smartphone Utilisation du tourne disque 1 Maintenez le bouton MARCH...

Page 43: ...ign avec pr cision sur la t te afin que l aiguille puisse suivre parfaitement les rainures en parall le Pour cela placez le rapporteur d alignement de porte pointe de lecture en papier fourni sur l ax...

Page 44: ...iciency 87 58 Efficiency at low load 10 84 No load Power consumption 0 080W Utilisez uniquement l alimentation lectrique indiqu e dans le mode d emploi Entretien de la platine tourne disque 1 Ne touch...

Page 45: ...disque est connect e une mauvaise entr e de l amplificateur Aiguille ou porte aiguille endommag La courroie d entra nement est trop tendue ou sale Roulement non lubrifi sale ou endommag Poussi re sur...

Page 46: ...e Aucun droit l gal ne peut tre obtenu depuis les informations contenues dans ce manuel Mise au rebut de l appareil usag Ce symbole indique que le produit lectrique concern ainsi que les piles ne doiv...

Page 47: ...mo cuidado y comprobado varias veces antes de salir de f brica todav a es posible que se puedan producir problemas al igual que con todos los aparatos el ctricos Si observa la aparici n de humo una ac...

Page 48: ...mpre el enchufe cuando los extraiga de la toma de corriente No tire del cable de alimentaci n Esto puede provocar un cortocircuito No utilice un cable de alimentaci n o enchufe deteriorado o una toma...

Page 49: ...agra de la tapa Anti skating Weight Peso antideslizamiento Tonearm Counterweight Contrapeso del brazo de lectura Anti skating Stub Pitillo antideslizamiento Tonearm Lift Elevador del brazo de lectura...

Page 50: ...el tocadiscos en las bisagras 3 Quite la tira que sujeta el brazo de lectura 4 Coloque la correa de transmisi n alrededor del eje del tocadiscos y a continuaci n con el accesorio de la correa provisto...

Page 51: ...to Gire con cuidado el contrapeso hasta que el brazo se equilibre El brazo debe volver a la posici n equilibrada si se mueve hacia arriba o hacia abajo Este ajuste debe hacerse con cuidado Una vez que...

Page 52: ...ura la fuerza antideslizamiento correcta para el cartucho equipado de f brica 2 Tire levemente del peso antideslizamiento para que la tira del estrobo de sujeci n pueda moverse hacia la tornamesa 3 Le...

Page 53: ...muy bajo Conexi n de altavoz Los terminales de altavoz con abrazadera de resorte emiten se ales amplificadas de nivel de altavoz como salida y se deben conectar con los altavoces pasivos Funcionamien...

Page 54: ...r que se da e la aguja durante el proceso de sustituci n 2 Retire con cuidado los cables del cartucho original 3 Afloje los dos tornillos de la cubierta que aseguran el cartucho y retire el cartucho o...

Page 55: ...Tensi n de salida 2 5 mV Resistencia de carga recomendada 47 k Conexi n del amplificador Entrada MM Presi n de seguimiento recomendada 3 0 0 5 g Peso 5 g Nota El dise o y las especificaciones podr an...

Page 56: ...si n del tocadiscos o se ha salido El tocadiscos gira pero no hay sonido o el sonido no es lo suficientemente alto El protector de la aguja todav a est puesto El brazo de lectura se levanta con la pal...

Page 57: ...especificaciones e im genes incluidas en este documento pueden diferir ligeramente respecto a su situaci n particular Todos los elementos descritos en esta gu a tienen un objetivo de mera ilustraci n...

Page 58: ...58 Servicio Para obtener m s informaci n y soporte del departamento t cnico por favor visite la p gina web www lenco com Commaxx B V Wiebachstraat 37 6466 NG Kerkrade Pa ses Bajos...

Page 59: ...altra apparecchiatura elettrica Se si nota fumo eccessivo accumulo di calore o altri fenomeni imprevisti scollegare immediatamente la spina dalla presa di alimentazione principale 11 Questo dispositi...

Page 60: ...ne potrebbe provocare incendi o scariche elettriche 28 Se il prodotto contiene o viene consegnato con un telecomando contenente batterie a pulsante a bottone Avvertenza Non ingerire la batteria perico...

Page 61: ...i skating Tonearm Counterweight Contrappeso braccio Anti skating Stub Mozzo anti skating Tonearm Lift Sollevamento braccio Tonearm Lift Lever Leva di sollevamento del braccio Tonearm Clip Clip braccio...

Page 62: ...erchio del giradischi sui cardini 3 Rimuovere la fascetta che tiene il braccio 4 Mettere la cinghia di trasmissione attorno al mozzo del giradischi quindi utilizzare il gancio della cinghia fornito pe...

Page 63: ...so finch il braccio non bilanciato Il braccio dovrebbe tornare alla posizione bilanciata se viene spostato su o gi Questa regolazione deve essere eseguita con attenzione Una volta che il braccio corre...

Page 64: ...i skating deve essere regolata in base alla forza verso il basso come segue Forza verso il basso Scanalatura nel mozzo 2 2 5 g 1 dagli anelli dei cuscinetti 2 5 3 g 3 3 5 g 3 5 4 g 2 3a 4 Collegamento...

Page 65: ...al dispositivo all unit Nota Bluetooth versione 5 0 Questo prodotto ha una funzione di ricezione bluetooth non puoi trasmettere alcun suono bluetooth con esso questo significa che puoi ricevere in mod...

Page 66: ...egolare la posizione della testina per assicurarsi che sia allineata con precisione sul portatestina in modo che la puntina segua perfettamente le scanalature in parallelo Per ottenere ci posizionare...

Page 67: ...ta 2 4A Potenza in uscita 36W Efficienza media attiva 87 58 Efficienza a basso carico 10 84 Nessun carico Consumo energetico 0 080W Utilizzare solo l alimentazione indicata nel presente manuale Manute...

Page 68: ...lante al giradischi Suono distorto o assente da uno o da entrambi i canali Il giradischi collegato all ingresso sbagliato dell amplificatore La puntina o il cantilever sono danneggiati La cinghia trop...

Page 69: ...strativo e non si applicano necessariamente alla specifica situazione Nessun diritto legale o contrattuale pu derivare dalle descrizioni contenute nel presente libretto di istruzioni Smaltimento a fin...

Page 70: ...70 1 5 2 2 3 0 35 C 4 5 6 7 8 9 1 2 10 11 12 13 14 15 16 USB USB USB 17 18...

Page 71: ...71 19 20 21 22 23 24 25 26 27 class 1 class 2 28 2 29...

Page 72: ...72...

Page 73: ...73 1 2 3 4 5 6 7 8 9 10 11 12 13 14 15 16 17 18 PLAY STOP 19 Bluetooth 20 21 RCA line out 22 RCA line out 23 phono line 24 25 R 26 R 27 L 28 L 29 30...

Page 74: ...74 1 2 3 4 5 6 7 8 9 10 3 0 6 0...

Page 75: ...75 0 05 3 0 0 5 1 2 3...

Page 76: ...76 2 2 5 g 1 2 5 3 g 3 3 5 g 3 5 4 g 2 3 4 RCA RCA Phono Line Phono Line Line Phono Line LINE RCA PHONO Phono Line PHONO RCA LINE RCA Bluetooth 1 3 2 Bluetooth Bluetooth Lenco LS 480 Lenco LS 500...

Page 77: ...77 3 4 Bluetooth 5 0 LS 480 LS 500 15 Bluetooth Bluetooth Bluetooth 1 3 2 3 45 4 5 6 7 PLAY STOP 8 9 10 11 PLAY STOP 12 3 1 2 3 4 5 L L R R...

Page 78: ...36 2x 30 RMS 33 1 3 45 RPM 1 0 0 15 72 0 6 0 8 6 218 5 0 73 X X 418 X 123 X 346 420 X 410 X 420 5 77 8 10 X 2 4 30 X 2 X X 162 X 248 X 158 3 76 AT 3600L 20 20 2 5 18 2 5mV 47k MM input 3 0 0 5 5 Brigh...

Page 79: ...79 Co Ltd SW1502400 IM S036A1502400M 100 240 50 60 DC 15 2 4A 36 87 58 10 84 0 080 1 2 3 4 MODE PLAY STOP Phono Line PHONO RCA Line...

Page 80: ...80 MM MC 20 1 5 Lenco...

Page 81: ...35 E 37 6466 Commaxx B V Wiebachstraat 37 6466 NG Kerkrade The Netherlands techdoc lenco com 1 6361 HB EAC 004 2011 020 2011 123458 30 503 7 495 787 5900 37 6466 903 907 9 788 www lenco ru o AAAABDDM...

Page 82: ...82 A B C D E F G H I J K L 1 2021 2461A05C0 C 0 2020 2461A05A1123456 A 1 2021 1 e mail ______________________ _____________________ www lenco ru...

Reviews: