background image


3


NAMES OF CONTROLS 

1. 

CD COMPARTMENT 

2. 

CD DOOR OPEN/CLOSE 

3. 

LCD DISPLAY 

4. 

CD PLAY/PAUSE BUTTON 

5. 

REMOTE SENSOR 

6. 

USB INDICATOR 

7. 

POWER ON/OFF BUTTON 

8. 

STANDBY INDICATOR 

9. 

MEMORY UP / ALBUM + BUTTON 

10. 

C-ADJ./MEMORY BUTTON 

11. 

FIND/ST/ESP BUTTON 

12. 

PHONE JACK 

13. 

SPEAKERS (L&R) 

14. 

EQUALIZER BUTTON 

15. 

CD REPEAT BUTTON 

16. 

CD RANDOM BUTTON 

17. 

CD STOP BUTTON 

18. 

USB PORT 

19. 

SD/MMC CARD SLOT 

20. 

VOLUME UP/DOWN CONTROL 

21. 

CD  SKIP  BACK/FORWARD  &  RADIO 

TUNING UP/DOWN CONTROL 

22. 

BAND SELECTOR 

23. 

FUNCTION BUTTON 

24. 

FM ANTENNA WIRE 

25. 

AUX INPUT JACK 

26. 

SPEAKER CONNECTORS 

27. 

AC POWER PLUG  

REMOTE CONTROL 

1. 

FUNCTION BUTTON 

2. 

MEMORY DOWN/ALBUM - BUTTON 

3. 

VOLUME DOWN BUTTON 

4. 

MUTE BUTTON 

5. 

CD SKIP BACK/TUNING DOWN 

BUTTON 

6. 

BATTERY COMPARTMENT 

7. 

CD STOP BUTTON 

8. 

CD SKIP FORWARD/TUNING UP 

BUTTON 

9. 

CD PLAY/PAUSE BUTTON 

10. 

VOLUME UP BUTTON 

11. 

MEMORY UP/ALBUM + BUTTON 

12. 

C-ADJ./MEMORY BUTTON


13. 

POWER/STANDBY BUTTON 


POWER SOURCE 

This unit is designed to be operated on AC. 
Plug the power cord into standard household AC wall outlet.   
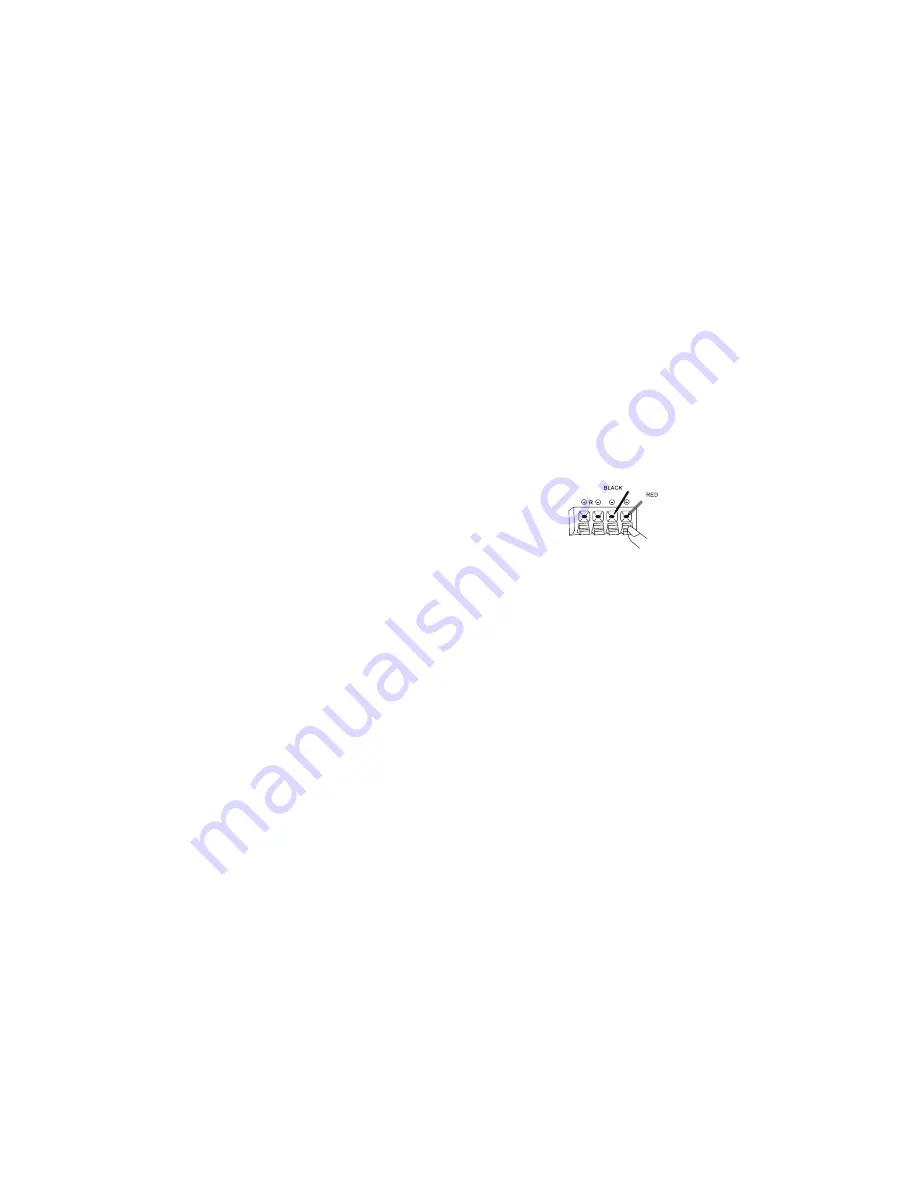
SPEAKER CONNECTION 

Connect  each  speaker  to  the  corresponding  speaker  terminals  on  the  back 
panel  of  the  main  unit.  Make  sure  that  the  left  speaker  is  connected  to  the 
left  pair  of  speaker  terminals  and  the  right  speaker  to  the  right  pair  of 
speaker  terminals.  Also  make  sure  that  the  speaker  wires  are  correctly 
connected: that the red wires are connected to the red terminals and the black 
wires to the black terminals.  

BASIC FUNCTION 

Switching on the unit  

Note: Before switching on the unit, please make sure that all connections have been made. 
Press the POWER ON/OFF button, the LCD display will be illuminated and shows "HELLO". Press the 
FUNCTION button to select a playing mode.  

Summary of Contents for MC-140

Page 1: ...INSTRUCTION MANUAL MICRO MUSIC CENTRE WITH CD PLAYER PLL RADIO AND USB SD MMC INTERFACE MC 140 ...

Page 2: ...t to constant vibration 4 Humid or moist places Operate turning controls and switches as instructed in the manual Before turning on the power for the first time make sure that the power cord is properly installed Store your tapes or CD in a cool area to avoid damage from heat CAUTION TO REDUCE THE RISK OF AN ELECTRIC SHOCK NOT REMOVE THE COVER OR BACK NO USER SERVICEABLE PARTS INSIDE REFER SERVICI...

Page 3: ...2 LOCATION OF CONTROLS ...

Page 4: ...8 CD SKIP FORWARD TUNING UP BUTTON 9 CD PLAY PAUSE BUTTON 10 VOLUME UP BUTTON 11 MEMORY UP ALBUM BUTTON 12 C ADJ MEMORY BUTTON 13 POWER STANDBY BUTTON POWER SOURCE This unit is designed to be operated on AC Plug the power cord into standard household AC wall outlet SPEAKER CONNECTION Connect each speaker to the corresponding speaker terminals on the back panel of the main unit Make sure that the l...

Page 5: ...de the display will show TUNER 2 Press the BAND switch to select the desired wave band AM MW FM ST 3 Tune to desired station by pressing the CD SKIP BACK FORWARD RADIO TUNING UP DOWN CONTROL the display will show the band frequency Example FM 97 10 MHz 4 Adjust the VOLUME CONTROL to the to desired volume level 5 Extend the ANTENNA WIRE to its full length if you are listening to FM broadcasting Gen...

Page 6: ...ake sure the disc is stopped before open the CD compartment To ensure a good system performance you need to wait until the disc tray completely reads the disc before proceeding If no disc loaded into the compartment or the disc is unreadable the display will show NO DISC PLAYING A DISC 1 Press PLAY PAUSE button to start the playback The playback starts at track 1 To interrupt the playback press th...

Page 7: ... off on the display To repeat all the Tracks 1 Press REPEAT button twice in playing mode REPEAT ALL shows in the display all tracks on the disc will be played over and over again until you press the STOP button 2 To cancel the repeat playback press and keep pressing button REPEAT until REPEAT ALL goes off on the display To repeat album MP3 1 Press the REPEAT button three times in the playing mode ...

Page 8: ... playing mode 2 Connect the SD MMC card to the SD MMC CARD INPUT slot The LCD will display the total number of tracks stored inside the card and STOP Example 019 STOP 3 Press the PLAY PAUSE button to start playing Press the PLAY PAUSE button once again to temporarily stop The elapsed time will flash 4 Press the STOP button to stop playing The display will show the total number of tracks and STOP 5...

Page 9: ...y so that the and polarities match the polarity diagrams inside the battery compartment About half a year of normal operation can be expected when using the general batteries When the batteries are exhausted the remote control can no longer operate the system Replace both batteries with new ones When the commander is not to be used for a long time remove the batteries to avoid damage caused by bat...

Page 10: ...ng Range AM 530 1600 KHz FM 87 5 108 MHz COMPACT DISC SECTION Optical Pickup 3 Beam Laser Frequency Response 100Hz 16KHz AUDIO SECTION Power output Maximum 2 Watts x 2 Headphone Impedance 32 Ohms ACCESSORIES Instruction Booklet 1 Remote Handset 1 Specifications are subject to change for continuous improvement we reserve the rights to modification without prior notice ESD Remark I1 In case of malfu...

Reviews: