1. If you want to fall asleep to music, press and hold SLEEP button.
2. You may adjust the radio or CD player's sleep function to play
from 90, 80, 70 up to 10 minutes of music before shutting
itself off automatically.
TO SET SLEEP FUNCTION
GB 6
CD display
PROGRAM PLAYBACK
FOR NORMAL COMPACT DISC PLAYBACK
Programmed playback enables tracks on a disc to be played in the desired order.
Up to 60 tracks can be programmed.
1.
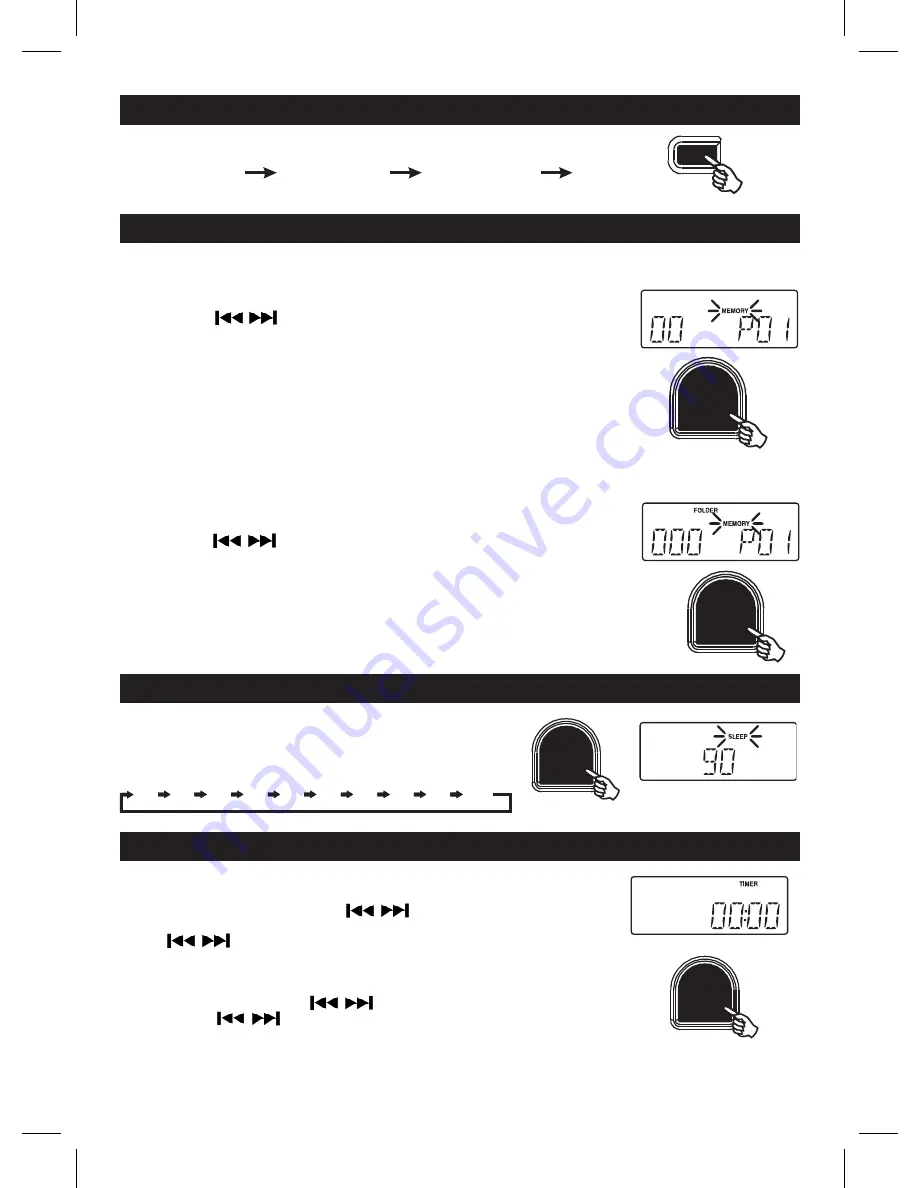
Press the “ MEMORY “ button.
2.
Press the skip buttons to select the desired track number.
3.
Press “ MEMORY “ button again to memorize the track.
4.
Repeat steps 2 and 3 until all desired tracks are programmed.
5.
Press the “ PLAY/PAUSE “ button to start. “ MEMORY “ is shown on the CD display.
6.
Press “ STOP “ button to stop programmed playback.
7.
Press “ MEMORY “ and “ PLAY/PAUSE “ buttons to resume
programmed playback.
8.
Press "STOP/BAND" button to clear the programmed memory.
FOR MP3/WMAPLAYBACK
Programmed playback enables folders/albums or tracks on a disc to be played in the desired
order. Up to 60 folders/albums or tracks can be programmed.
1.
Press the “ MEMORY “ button.
2.
Press the M-UP/
FOLDER UP button to select the desired folder.
3.
Press “ MEMORY “ button again to memorize the folder.
4.
Press the skip buttons to select the desired track number.
5.
Press “ MEMORY “ button again to memorize the track.
6.
Repeat steps 2 and 5 until all desired tracks are programmed.
7.
Press the “ PLAY/PAUSE “ button to start. “ MEMORY “ is shown on the CD display.
8.
Press “ STOP “ button to stop programmed playback.
9.
Press “ MEMORY “ and “ PLAY/PAUSE “ buttons to resume programmed playback.
10. Press "STOP/BAND" button to clear the programmed memory.
Note :
Programming can only be made when the player is in stop mode.
CD display
MP3/WMA display
90 80 70 60 50 40 30 20 10 90
ID 3 DISPLAY
-
Song name,Singer name and album name can be displayed cyclically
by pressing ID3 button during playing MP3.
-
Title-song name Artist-singer name Album-Album name
-
Press ID3 again to cancel ID3 display.
TIMER SETTING
1. Press the STANDBY button to put the machine in the standby mode.
2. Press and hold the "TIMER/SLEEP" button, "ON TIME" will display, "TIMER"
and the hour digits flash. Press the skip buttons to set the hour.
Press the "TIMER/SLEEP" button to confirm, the minutes digits flash, press
the skip buttons to set the minutes. Press the "TIMER/SLEEP"
button to confirm and "OFF TIME" will display. Follow same procedure of setting
"ON TIME" to set the "OFF TIME".
3. After setting the "OFF TIME", you can also select the FUNCTION (CD, TUNER,
AUX) for TIMER by pressing . Press the "TIMER/SLEEP" to confirm.
4. Then, press skip buttons to select the volume of the sound,
press the "TIMER/SLEEP" to confirm.
ID3
MEMORY/CLOCK ADJ.
MEMORY/CLOCK ADJ.
TIMER/SLEEP
TIMER/SLEEP