background image


18.


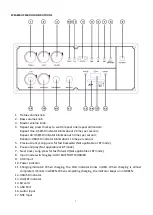
Wired guitar volume control 

19.


Wired microphone echo and volume control (double function) 


Prior to first use 

To avoid damage to the rechargeable battery, it is only half-charged upon delivery. Charge the battery 
fully before using for the first time. Only use the supplied mains cord for charging. 
Charging the battery 
1.


Make sure that the On/Off switch AC POWER is set to OFF. 

2.


Connect the mains cord to the AC connection socket. 

3.


Insert the mains plug into an easily accessible wall socket. 

4.


Set the On/Off switch AC POWER to ON. (The battery can only be charged when the device is 
switched on.) 
The charging indicator light CHG flashes orange at brief intervals. When the battery is empty, it 
normally takes around 3 hours to fully charge it. Once the rechargeable battery is fully charged, the 
charging indicator light will light up green. 
The playing time is at least 4-5 hours and varies depending on volume, surrounding temperature, 
connected devices, etc. 


You can used the sound system while it is charging. However, this will increase the charging 
time. 


To preserve the rechargeable battery’s full capacity for as long as possible, you should fully 
recharge the battery at least once a month, even if you do not use it. 


Charge the battery in an environment b10 and +40ºC. 


The battery will best hold its charge at room temperature. The lower the surrounding 
temperature, the shorter the playback time. 


Mode 

USB/SD Indicator 

AUX IN/BT Indicator 

USB 

ORANGE 

OFF 

SD 

GREEN 

OFF 

AUX IN 

OFF 

ORANGE 

Bluetooth 

OFF 

BLUE 

 
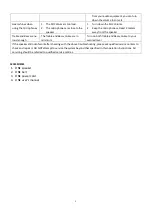
TROUBLESHOOTING 

Troubles 

Possible Reasons 

Trouble Shootings 

Power Indicator OFF 
and NO sound coming 
out 

1. AC Power Button is still OFF 
2.Battery run out of power 

1.


Turn the AC Power Button to ON. 

2.


Connect the power cord to AC 220V/50Hz 
outlet to test if speaker still working and to 
re-charge the battery. 

Power Indicator ON But 
NO sound coming out 

1. Wrongly connect the RCA or 3.5mm 
Audio input. 
2. Master Volume is in minimum. 

1.


Turn OFF the speaker and check all audio 
cable connections. 

2.


Turn on the master volume to your wanted 
level. 

Sound coming out with 
NOISES 

Improper audio-cable connections or 
cross talk 

1.


Turn OFF the speaker and check all audio 
cable connections to see if they are 
correctly connected. 

2.


If all cables are well connected, that might 
be caused by some external cross talks 

Summary of Contents for PA-46

Page 1: ...1 PA 46 Portable Sound System with Bluetooth USER S MANUAL www lenco com ...

Page 2: ... any other unexpected phenomena you should disconnect the plug from the main power socket immediately 14 This device must be well ventilated at all time 15 This device must operate on a power source as specified on the specification label If you are not sure of the type of power supply used in your home consult your dealer or local power company 16 The socket outlet must be installed near the equi...

Page 3: ... Do not use or store this product in a place where it is subject to direct sunlight heat excessive dust or vibration 45 Do not clean this product with water or other liquids 46 Do not block or cover the slots and holes in the product 47 Do not push foreign objects into the slots or holes in the product 48 Do not allow children access to plastic bags 49 Please check that the voltage on the type pla...

Page 4: ...nd contact qualified service centres to check the speaker before continuing usage 8 When you are not using the speaker please power off the speaker and unplug the power cord from the power supply 9 When using a power socket or coupler as a power ON OFF device please ensure that this device can be easily accessed and operated BATTERY CAUTION 1 Make sure to charge the lead acid battery for a minimum...

Page 5: ...uency Response 20Hz 20KHz Distortion 0 15 fo lKHz Po l W Power Supply Re chargeable Lead acid Battery 2600mAh AC power supply AC 230V 50 60Hz SPEAKER CONNECTIONS 1 Insert your USB disk or SD card to the corresponding ports in the control panel referring to Diagram 1 2 Connect your audio equipments TV DVD MP3 Iphone Ipad to the signal AUDIO INPUT ports 3 5mm RCA referring to Diagram 1 3 Connect the...

Page 6: ...to link to the speaker The Indicator will stop blinking and light up in BLUE color when you are successfully linked After the linking you can start to play music from your device When Bluetooth is paired and connected you can press the play pause button to disconnect the current connection and re pairing once POWER SUPPLY SELECTION Back Panel 1 Power Jack Insert the power cord to this jack and con...

Page 7: ...ond 5 Previous track Long press for fast backward Not applicable at BT mode 6 Pause and play Not applicable at BT mode 7 Next track Long press for fast forward Not applicable at BT mode 8 Input mode switching key AUX BLUETOOTH USB SD 9 AUX input 10 Power indicator 11 Charging indicator When charging the CHG indicator blinks in RED When charging is almost completed it blinks in GREEN When completin...

Page 8: ...To preserve the rechargeable battery s full capacity for as long as possible you should fully recharge the battery at least once a month even if you do not use it Charge the battery in an environment between 10 and 40ºC The battery will best hold its charge at room temperature The lower the surrounding temperature the shorter the playback time Mode USB SD Indicator AUX IN BT Indicator USB ORANGE O...

Page 9: ...ss are no loud enough The Treble and Bass volume are in minimum Turn on both Treble and Bass volume to your wanted level If the speaker still out of work after checking with the above troubleshooting please ask qualified service centers to check and repair it DO NOT attempt to service the system beyond that specified in this operation instructions All servicing should be referred to qualified serv...

Page 10: ...the instruction specifications and pictures in this documentation may differ slightly from your particular situation All items described in this guide for illustration purposes only and may not apply to particular situation No legal right or entitlements may be obtained from the description made in this manual Disposal of the Old Device This symbol indicates that the relevant electrical product or...

Reviews: