24
NOTE: DIAGRAMS & ILLUSTRATIONS ARE NOT TO SCALE.
Proof of Fire Switch
(Recommended Frequency of 1 year or after every 100 bags of fuel used*)
This switch needs to be removed and cleaned after every 100 bags of
fuel burned.
Cleaning Procedure:
1.
UNPLUG STOVE!
2. Locate the switch on the combustion blower (see
Figure 52
).
3. Using a flat-head screwdriver, remove the 2 screws which secures
the switch to the blower housing.
4. Using a dry cloth, wipe off any flyash build-up on the sensor portion
of the switch.
5. Reinstall switch. Ensure wires are properly connected to the switch
and the connectors are not making contact with the blower housing.
Close side panel.
Note: Failure to clean the proof of fire switch when needed may re-
sult in nuisance shut-downs. When heavy ash, creosote or soot are
built up on the proof of fire switch, it may require cleaning with a
medium abrasive pad or sheet. These heavy build ups insulate the
heat sensing area of the switch and keep the switch from functioning
as intended.
Front Door Removal
CAUTION: Do not open the front door when the stove is hot.
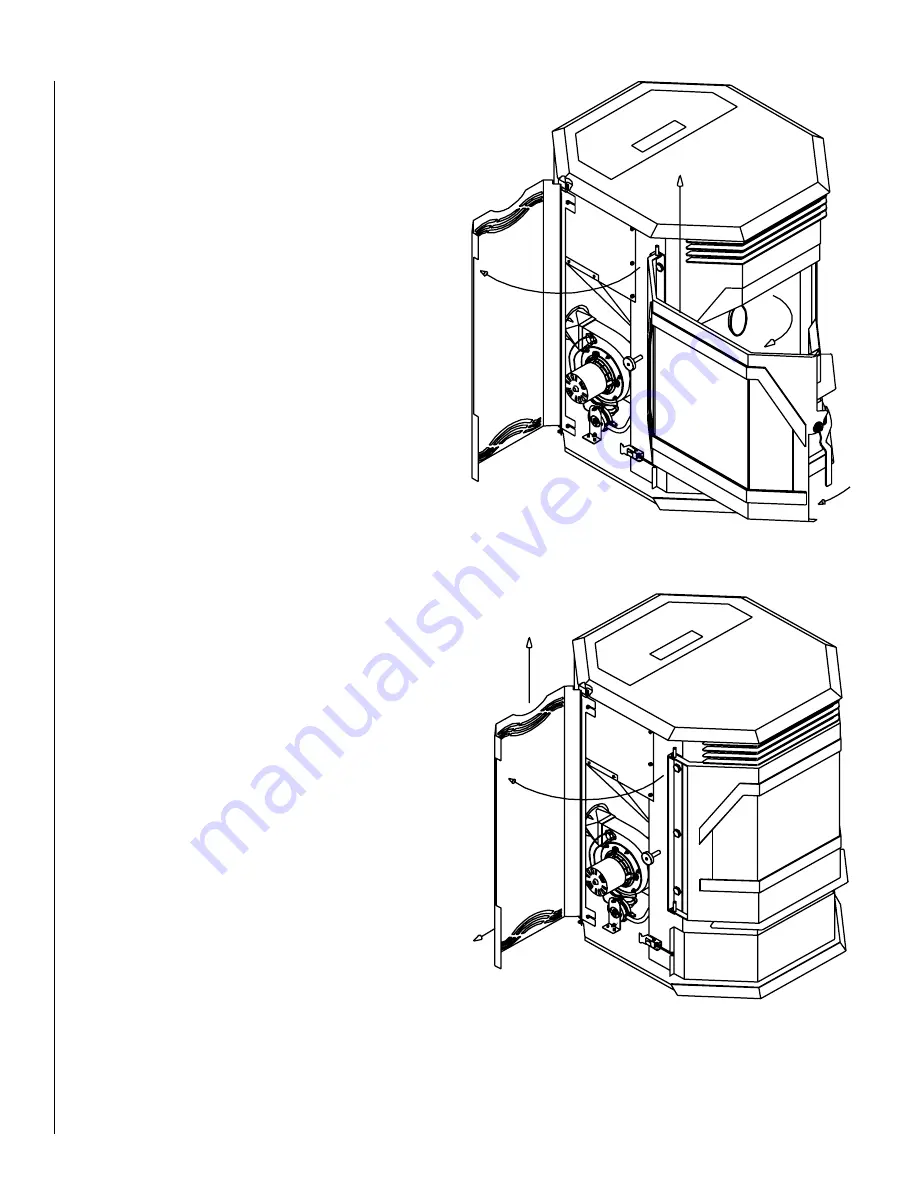
To remove the door, swing the left and right side doors A open. Pull the
front door handle B to the front and swing the front door open. Lift the
front door up and off the hinges as shown in C in
Figure 49
. To reinstall
the door repeat the steps in reverse order.
Side Door Removal
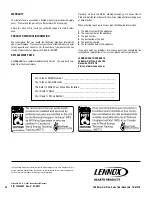
To remove the door,
1 Swing the door open,
2 Lift the door up and
3. Pull the bottom of the door out and down - pulling the top hinge pin
out of the retaining hole in the top hinge bracket.
To reinstall the door, slide the pin on the top of the door up and into the
hole in the upper hinge bracket. Slide the pin on the bottom of the door
into the hole in the pedestal base and rotate the door closed.
Back Removal and Lower Cover Plate
To remove the back:
1. Remove the left and right side panels (see the previous page).
2. If the stove is connected to the vent pipe, loosen the four 5/32” al-
len head screws (see A in
Figure 51
) securing the lower cover plate
beneath the flue outlet, lift the plate slightly and pull the plate off.
3. Loosen the two screws B and C shown in
Figure 52
and the cor-
responding two screws on the other side of the stove. The back can
now be pulled to the rear and off of the stove.
To reinstall the back, follow the steps just listed - but in the reverse order.
*Burning fuel with a high ash content or an improperly adjusted damper
may require more frequent cleaning and stove maintenance.
B
C
A
3
1
2
Figure 49
Figure 50
Front Door
Side
Door


