background image

Page 51

13 - Disconnect the 2‐pin plug from the combustion air in­

ducer. Remove screws which secure combustion air
inducer to collector box. Remove combustion air in­
ducer assembly. Remove ground wire.

14 - Mark and disconnect all combustion air pressure tub­

ing from cold end header collector box.

15 - Mark and remove wires from pressure switch. Re­

move pressure switch. Keep tubing attached to pres­
sure switch.

16 - Remove electrical junction box from the side of the fur­

nace.

17 - Remove blower access panel.

18 - Mark and disconnect any remaining wiring to heating

compartment components. Disengage strain relief
bushing and pull wiring and bushing through the hole
in the blower deck.

19 - Remove the primary limit from the vestibule panel.

20 - Remove top cap screws to allow top cap to be tilted up­

ward to allow clearance for removing heat exchanger.

21 - Remove two screws from the front cabinet flange at

the blower deck. Spread cabinet sides slightly to allow
clearance for removal of heat exchanger.

22 - Remove screws along vestibule sides and bottom

which secure vestibule panel and heat exchanger as­
sembly to cabinet. Remove two screws from blower
rails which secure bottom heat exchanger flange. Re­
move heat exchanger from furnace cabinet.

23 - Back wash heat exchanger with soapy water solution

or steam.

 If steam is used it must be below 275°F

(135°C) .

24 - Thoroughly rinse and drain the heat exchanger. Soap

solutions can be corrosive. Take care to rinse entire
assembly.

25 - Reinstall heat exchanger into cabinet making sure that

the rear baffle of the heat exchanger assembly is
nested under the support located at the rear of the
cabinet. Remove the indoor blower to view this area
through the blower opening.

26 - Re‐secure the supporting screws along the vestibule

sides.

27 - Reinstall blower assembly and reinstall two screws

through rails.

28 - Reinstall cabinet screws on front flange at blower

deck.

29 - Reinstall screws securing top cap.

30 - Reinstall the primary limit on the vestibule panel.

31 - Route heating component wiring through hole in blow­

er deck and reinsert strain relief bushing.

32 - Reinstall pressure switch and reconnect pressure

switch wiring.

33 - Carefully connect combustion air pressure switch hos­

ing from pressure switch to proper stubs on cold end
header collector box.

34 - Reinstall 1/2” NPT (if removed) in the cold end header

box. Reconnect drain tubing to collector box.

35 - Reinstall condensate trap pipe. Reconnect conden­

sate drain line to the condensate trap.

36 - Reinstall electrical junction box.
37- Reinstall the combustion air inducer and flexible no

hub connector. Reconnect the 2-pin plug to the wire
harness.

39 - Reconnect drain tubes between flue collar and cold

end header box.

40 - Secure burner assembly to vestibule panel using four

existing screws. 

Burners are self aligning to center

of clam shells.

41 - Reconnect gas supply line to gas valve.
42 - Reconnect flame roll-out switch wires.
43 - Reconnect sensor wire and reconnect 2-pin plug from

ignitor.

44 - Reconnect wires to gas valve.
45 - Replace the blower compartment access panel.
46 - Refer to instruction on verifying gas and electrical con­

nections when re-establishing supplies.

47 - Follow lighting instructions to light and operate fur­

nace for 5 minutes to ensure that heat exchanger is
clean and dry and that furnace is operating properly.

48 - Replace heating compartment access panel.

Cleaning the Burner Assembly

 1 - Turn off gas and electrical power to the furnace. Re­

move heating compartment access panel.

 2 - Disconnect the gas supply line from the gas valve.
 3 - Disconnect and label wires from gas valve.
 4 - Disconnect ignitor wiring at 2 circuit plug.
 5  - Disconnect and label wires from rollout switch.
 6 - Disconnect and label flame sensor wire.
 7  - Disconnect and label ground wire from burner/man­

ifold assembly.

 8 - Remove four screws that secures burner/manifold as­

sembly to vestibule. Remove the assembly and make
note not to allow ignitor plate to dislodge from the as­
sembly.

 9 - Gently clean the face of the burners using the soft

brush attachment on a vacuum cleaner. Visually in­
spect the inside of the burners and crossovers for any
blockage caused by foreign matter. Remove any
blockage

10 - Reinstall the burner/manifold assembly using the ex­

isting four screws. 

Burners are self aligning to cen­

ter of clam shells.

11 - Reconnect ground wire.
12 - Reconnect flame sensor wire.
13 - Reconnect rollout switch wires.
14 - Reconnect ignitor wires.
15 - Reconnect gas valve wires.
16 - Reconnect gas supply line to gas valve.
17 - Refer to instructions on verifying gas and electrical

connections when re-establishing supplies.

18 - Follow instructions to place furnace in operation. Run

furnace 5 minutes to ensure burners are clean and op­
erating correctly.

19 - Replace heating compartment access panel.
Summary of Contents for ML195UH 045XP24B

Page 1: ...es a detailed description on how this is done All specifications are subject to change Procedures out lined in this manual are presented as a recommendation only and do not supersede or replace local...

Page 2: ...res and according to FTC labeling regulations Isolated combustion system rating for non weatherized furnaces SPECIFICATIONS Gas Heating Performance Model No ML195UH 045XP24B ML195UH 045XP36B ML195UH 0...

Page 3: ...entric US 2 in 71M80 69M29 3 in 60L46 60L46 Canada 2 in 44W92 44W92 3 in 44W93 44W93 Flush Mount 2 2 1 2 or 3 in 51W11 51W11 51W11 Wall Close Couple US 2 in 22G44 3 in 44J40 44J40 44J40 Wall Close Cou...

Page 4: ...350 740 295 585 240 505 220 0 80 790 325 670 275 510 225 455 205 0 90 735 310 575 255 460 220 390 195 ML195UH070XP36B PERFORMANCE Less Filter External Static Pressure in w g Air Volume Watts at Variou...

Page 5: ...5 1590 840 1505 710 1280 590 0 90 1730 1150 1570 790 1470 660 1250 540 1630 1135 1490 685 1460 685 1235 565 ML195UH135XP60D PERFORMANCE Less Filter External Static Pressure in w g Air Volume Watts at...

Page 6: ...SSEMBLY CONTROL BOX includes integrated control transformer and interlock switch COMBUSTION AIR INDUCER BLOWER ACCESS DOOR BURNER ACCESS PANEL COMBUSTION AIR PRESSURE SWITCH PRIMARY LIMIT GAS VALVE BL...

Page 7: ...gnition control system consists of an integrated con trol figure 4 ignitor figure 10 and flame sensor figure 10 The integrated control and ignitor work in combination to ensure furnace ignition and ig...

Page 8: ...line voltage conditions Fan Control The fan on time of 30 seconds is not adjustable The fan off delay amount of time that the blower operates after the heat demand has been satisfied may be adjusted...

Page 9: ...flame 5 times during single heating demand SLOW FLASH OFF Flame sensed without gas valve energized ON SLOW FLASH Rollout switch open OR 12 pin connector improperly attached ON ON OFF ON OFF ON Circuit...

Page 10: ...second trial for ignition If ignition is not proved during the trial for ignition the integrated control will try four more times with an inter purge and warm up time between trials of 30 seconds Aft...

Page 11: ...g Speed 120VAC Blower Heating Speed 120VAC Dead terminals to park alternate spd taps Continuous blower Neutral terminals 120VAC PUSH BUTTON LED TWIN TWIN Twinning Terminal 24VAC DEMAND CAI GAS VALVE 1...

Page 12: ...NO JUMPER FIGURE 8 60 90 120 180 60 90 120 180 60 90 120 180 60 90 120 180 60 Second off Time 90 Second off Time 120 Second off Time 180 Second off Time Twinning 2 ML195UH Furnaces Integrated control...

Page 13: ...For Cool Call For Fan Call For 1st Stage Heat Call For 2nd StageHeat R Y G W1 W2 Y W C Y W R R G C G TWIN TWIN TWIN 2 TWIN 1 ISOLATION RELAY Call For Cool Call For Fan Call For Heat R Y G W SINGLE ST...

Page 14: ...and slowly remove from the vestibule panel Install replacement limit with same care 3 Burners Figure 11 All units use inshot burners Burners are factory set and do not require adjustment Burners can b...

Page 15: ...Make sure that the furnace is wired correctly and is properly grounded A microamp DC meter is needed to check the flame signal on the integrated control Flame microamp signal is an electrical current...

Page 16: ...l to Ohms To Flame Terminal Multi Meter To Control Sensor Terminal Flame Sensor Wire Flame Sensor Terminal Intergrated Control Remove sensor wire from integrated control and connect alligator clip to...

Page 17: ...then the problem is with the wiring between the jack plug and the control If reading is not correct the issue is the ignitor Test 3 Check ignitor for correct voltage Insert meter probes into terminals...

Page 18: ...across the combustion air inducer orifice to insure proper flow through the heat exchanger The switch is a SPST N O prove switch electrically con nected to the integrated control The purpose of the sw...

Page 19: ...ential should be greater than those listed in table 10 5 Remove thermostat demand and allow to cycle off 6 Remove manometer and tee s Reinstall combus tion air sensing hoses to the pressure switch Mea...

Page 20: ...ce air out of the house When fire places exhaust fans or clothes dryers are used at the same time as the furnace much more air is required to en sure proper combustion and to prevent a downdraft Insuf...

Page 21: ...PACE ALL AIR FROM OUTSIDE Inlet Air from Crawl Space and Outlet Air to Ventilated Attic NOTE The inlet and outlet air openings shall each have a free area of at least one square inch per 4 000 Btu 645...

Page 22: ...ng and fitting ma terials CAUTION Solvent cements for plastic pipe are flammable liq uids and should be kept away from all sources of ignition Do not use excessive amounts of solvent cement when makin...

Page 23: ...Any vent pipe or elbows external to the structure must be included in total vent length calculations See vent length tables Kits must be properly installed according to kit instructions 1Requires fiel...

Page 24: ...ed 2 In areas where piping penetrates joists or interior walls hole must be large enough to allow clearance on all sides of pipe through center of hole using a hanger 3 When furnace is installed in a...

Page 25: ...hese applications NOTE The exhaust collar on all models is sized to accom modate 2 Schedule 40 vent pipe In horizontal applica tions any transition to exhaust pipe larger than 2 must be made in vertic...

Page 26: ...104 4 66 51 29 n a 100 100 78 43 123 122 103 103 99 5 61 46 24 95 95 73 38 118 117 98 98 94 6 56 41 19 90 90 68 33 113 112 93 93 89 7 51 36 14 85 85 63 28 108 107 88 88 84 8 46 31 n a 80 80 58 23 103...

Page 27: ...75 59 24 91 91 84 84 75 8 38 23 n a 70 70 54 19 86 86 79 79 70 9 33 18 65 65 49 14 81 81 74 74 65 10 28 13 60 60 44 n a 76 76 69 69 60 Concentric Termination Elevation 4501 10 000 ft Number Of 90 Elb...

Page 28: ...19 n a 85 85 63 28 103 102 83 83 79 5 51 36 14 80 80 58 23 108 97 78 78 74 6 46 31 9 75 75 53 18 93 92 73 73 89 7 41 26 4 70 70 48 13 88 87 68 68 64 8 36 21 n a 65 65 43 8 83 82 63 63 59 9 31 16 60 60...

Page 29: ...gth of 2 PVC pipe possible NOTE Exhaust pipe and intake pipe must be the same diameter or FIGURE 28 TRANSITION SIDE VIEW 2 2 2 2 or TYPICAL EXHAUST PIPE CONNECTIONS IN HORIZONTAL DIRECT OR NON DIRECT...

Page 30: ...use the shortest length of 2 PVC pipe possible NOTE Intake and exhaust pipe must be the same diameter or FIGURE 30 TYPICAL AIR INTAKE PIPE CONNECTIONS IN HORIZONTAL DIRECT VENT APPLICATIONS RIGHT HAN...

Page 31: ...YPICAL AIR INTAKE PIPE CONNECTIONS HORIZONTAL NON DIRECT VENT APPLICATIONS Horizontal Right Hand Air Discharge Application Shown INTAKE DEBRIS SCREEN Provided OR NOTE Debris screen may be positioned s...

Page 32: ...ions combustion air is taken from outdoors and the flue gases are discharged to the out doors The ML195UH is then classified as a direct vent Category IV gas furnace In both Non Direct Vent and Direct...

Page 33: ...32 28 40 35 0 to 20 18 to 29 2 in 10 9 20 18 30 28 24 24 N A N A 2 1 2 in 8 N A 14 N A 20 N A 32 N A N A N A 3 in 4 3 10 8 16 14 26 23 30 26 1Refer to 99 Minimum Design Temperature table provided in t...

Page 34: ...y inlet Clearance above paved sidewalk or paved driveway located on public property Clearance under veranda porch deck or balcony 12 Equal to or greater than soffit depth 3 feet 9m 12 3 feet 9m within...

Page 35: ...ve paved sidewalk or paved driveway located on public property Clearance under veranda porch deck or balcony 12 7 feet 2 1m 3 feet 9m within a height 15 feet 4 5m above the meter regulator assembly 3...

Page 36: ...ith the flush mount termination must use the 1 1 2 accelerator supplied with the kit NOTE Care must be taken to avoid recirculation of ex haust back into intake pipe 5 On field supplied terminations f...

Page 37: ...CER MAY BE REQUIRED TO ADAPT LARGER VENT PIPE SIZE TO TERMINATION EXHAUST VENT 1 1 2 38mm accelerator provided on 71M80 44W92 kits for EL296UHV045P24B 070P24B 070P36B EXHAUST VENT FIGURE 44 EXHAUST VE...

Page 38: ...227 mm Min 12 305 mm Min 16 405 mm Max 6 152 mm Max 6 152 mm Min 24 610 mm Max 9 227 mm Min 12 305 mm Min 20 508 mm Max 6 152 mm Max Intake Elbow WALL SUPPORT B A D E B D E A ALTERNATE TERMINATIONS TE...

Page 39: ...ack is required insert piping inside chimney until the pipe open end is above top of chimney and terminate as illus trated In any exterior portion of chimney the exhaust vent must be insulated FIGURE...

Page 40: ...56 In horizontal furnace applications the field provided vent must be a mini mum 4 to a maximum 5 length above the condensate drain outlet connection Any length above 5 may re sult in a flooded heat...

Page 41: ...n FurnaceCondensate DrainConnection From Evaporator Coil Optional Condensate Trap With Optional Overflow Switch FIGURE 54 ML195UH with Evaporatoir Coil Using a Separate Drain Unit shown in horizontal...

Page 42: ...ndensate drain outlet must be vented to relieve pressure in or der for the furnace pressure switch to operate properly FIGURE 56 ML195UH with Evaporator Coil Using a Common Drain Unit shown in horizon...

Page 43: ...Condensate Drain Connection In Unit Vent To Drain Condensate Drain Connection In Unit Optional Condensate Drain Connection OptionalDrainPipingFromTrap DrainTrapAssembly Furnished DrainTrap Assembly w...

Page 44: ...y for 3 4 inch Drain Pipe 90 Street Elbow 1 2 inch PVC Not Furnished Condensate Drain Connection In Unit Adapter 1 2 inch slip X 1 2 inch mpt Not Furnished Condensate Drain Connection In Unit Vent To...

Page 45: ...int the trap should be primed with suffi cient water to ensure proper condensate drain opera tion WARNING If you do not follow these instructions exactly a fire or explosion may result causing propert...

Page 46: ...TER CLOCKING CHART ML195 Unit Seconds for One Revolution Natural LP 1 cu ft Dial 2 cu ft Dial 1 cu ft Dial 2 cu ft DIAL 045 80 160 200 400 070 55 110 136 272 090 41 82 102 204 110 33 66 82 164 135 27...

Page 47: ...19 or table 21 for manifold pressuers at varying altitudes Table 22 lists conversion kit and pressure switch require ments at varying altitudes The combustion air pressure switch is factory set and r...

Page 48: ...oor Blower Energized Less than 2 10 AN2 GREEN AN1 RED CHECK VOLTAGE BETWEEN LINE NEU TRAL AND LOW VOLTAGE C TERMINAL FIGURE 61 FIGURE 62 AN2 GREEN AN1 RED CHECK VOLTAGE BETWEEN LINE HOT AND LINE NEUTR...

Page 49: ...uct Static _____ Total Duct Static ________ dry coil Duct Static or Supply Air Return Air FIGURE 64 D Blower Speed Taps Blower speed tap changes are made on the integrated con trol See figure 4 The he...

Page 50: ...ections 2 Check for the correct voltage at the furnace furnace operating Correct voltage is 120VAC 10 3 Check amp draw on the blower motor with blower ac cess panel in place Motor Nameplate__________A...

Page 51: ...or box 34 Reinstall 1 2 NPT if removed in the cold end header box Reconnect drain tubing to collector box 35 Reinstall condensate trap pipe Reconnect conden sate drain line to the condensate trap 36 R...

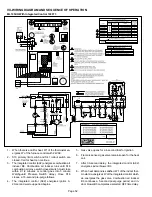
Page 52: ...2 minutes or control goes into 5 minute Watchguard Pressure Switch delay Once S18 closes a 15 second pre purge follows 4 The integrated control A92 energizes ignitor A 20 second warm up period begins...

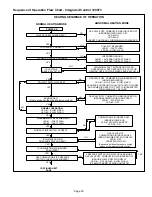
Page 53: ...MUM OF 1 SECOND GAS VALVE OFF COMBUSTION AIR INDUCER ON INDOOR BLOWER ON HEATING SPEED LED 1 SLOW FLASH LED 2 OFF GAS VALVE OFF COMBUSTION AIR INDUCER OFF INDOOR BLOWER OFF WITH DELAY LED 1 OFF LED 2...

Page 54: ...PLETE YES 4 SECONDS YES HAS CONTROL RESET IGNITION SEQUENCE FOUR TIMES FLAME SIGNAL 1 5 MICROAMPS OR GREATER YES YES YES ROLLOUT SWITCH CLOSED GAS VALVE POWER OFF COMBUSTION AIR INDUCER POWER ON INDOO...

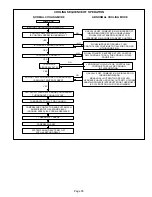
Page 55: ...SH RATE REMAINS UNCHANGED THROUGHOUT COOLING CYCLE THERMOSTAT CALLS FOR COOLING COMPRESSOR CONTACTOR AND SYSTEM FAN ENERGIZED WITH 2 SECOND DELAY COOLING SPEED EAC TERM ENERGIZED COMPRESSOR OFF THERMO...

Page 56: ...ED THERMOSTAT CALLS FOR HEAT W THERMOSTAT CALLS FOR COOLING THERMOSTAT OPENS SYSTEM FAN SWITCHED TO COOL SPEED EAC TERM REMAINS ON THERMOSTAT OPENS MANUAL FAN SELECTION MADE AT THERMOSTAT CONTROL G EN...

Page 57: ...oes into 5 minute Watchguard Pressure Switch delay Once S18 closes a 15 second pre purge follows 4 The integrated control A92 energizes ignitor A 20 second warm up period begins 5 Gas valve opens for...

Page 58: ...DOOR BLOWER ON HEATING SPEED LED 1 FLASH GAS VALVE OFF COMBUSTION AIR INDUCER OFF INDOOR BLOWER OFF WITH DELAY LED 2 FLASHES Sequence holds until pressure switch opens or thermostat resets control NO...

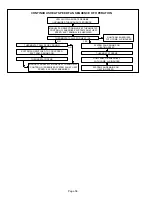
Page 59: ...HEAT DEMAND WATCHGUARD MODE GAS VALVE OFF COMBUSTION AIR INDUCER OFF INDOOR BLOWER OFF WITH DELAY LED 7 FLASHES WATCHGUARD FAILURE CODE IS 60 MINUTE RESET PERIOD COMPLETE NO 4 SECONDS YES HAS CONTROL...

Page 60: ...AC TERM OFF WITH 60 SECOND DELAY NO NO IS VOLTAGE ABOVE 90 VOLTS LED ON STEADY CONTROL WILL CONTINUE TO CALL FOR COOLING IN THIS CONDITION YES NO IS THERE A PROPER GROUND YES NO LED ON STEADY CONTROL...

Reviews: