Page 13
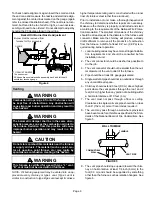
1 − Connect the inlet pipe to the pump inlet. Start the burner.
2 − Arrange the primary burner control for continuous op-
eration during purging. See figure 14.
3 − Turn the bleed valve one turn counterclockwise to
open.
4 − Bleed the unit until all air bubbles disappear.
NOTE − Hurried bleeding will prevent the unit from op-
erating properly.
5 − Tighten the bleed valve securely.
Two−Pipe Systems
If the installation requires a two−pipe operation, install the
bypass plug included in the bag which is attached to the
pump. To convert the pump, install the bypass plug accord-
ing to the provided pump instructions. Notice in the two-
pipe system the return pipe must terminate in the tank 3"
(76 mm) to 4" (102 mm) above the supply inlet. Ensure the
return pipe terminates at the correct measurement or air
may escape into the system. This could result in loss of
prime.
NOTE− If using an outside tank in cold climates a number
one fuel or an oil treatment is strongly recommended.
1 − Remove 1/4" plug from return port.
2 − Insert bypass plug and tighten it. See figure NO TAG.
3 − Attach the return and inlet pipes. Start the burner. Air
bleeding is automatic.
NOTE − If a faster bleed is necessary, open the bleed
valve.
4 − The return pipe must terminate 3" to 4" above the sup-
ply pipe inlet. See figure NO TAG.
NOTE − If the return pipe does not terminate where it
should, air may enter the system, and prime may be
lost.
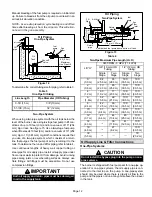
An oil filter is required for all models.
Install filter inside
the building between the tank shut-off valve and the burner.
Locate filter close to burner for easy maintenance. Table 5
lists the filters for the O23 furnace.
Table 5
Installation Clearances inches (mm)
Oil Filters
Cat.
Number
10 micron filter (no mounting bracket)
81P89
10 micron filter (mounting bracket)
53P92
10 micron replacement cartridge for filter, 45 gph
53P93
Filter restriction indicator gauge
53P90
Consult burner manufacturer’s instructions packaged with
unit for further details concerning oil supply pipe connec-
tions.
Leak Check
After oil piping is completed, carefully check all piping con-
nections (factory and field) for oil leaks.
Oil Pipe Heater (Optional)
A heater for the oil pipe is available for applications that are
located in cold climates. The heater warms the oil pipe to
assist the initial start−up.
Electrical Wiring
All wiring must conform to the National Electric Code
(NEC), or Canadian Electric Code (CEC) and any local
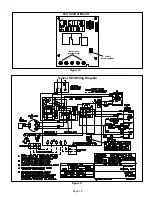
codes. Refer to figure 16 for the terminal designations on
the fan control board.
1− Refer to the appliance rating plate for proper fuse size.
2− Install the room thermostat and make wire connections
to the fan control board. Avoid installing thermostat on
an outside wall or where it can be affected by radiant
heat. Set the adjustable heat anticipator on thermostat
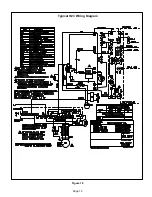
according to the wiring diagram sticker provided on
unit.
3− Install a separate fused disconnect switch near unit so
power can be shut off for servicing.
4− Complete line voltage wiring from disconnect switch
near unit to make-up box.
NOTE − An equipment ground screw is provided. Refer
to unit wiring diagram and figure 16 for O23 series
units. Ground unit using a suitable ground wire.
5− Any accessory rated up to 1 amp can be connected to
the accessory terminal. The accessory terminal is en-
ergized when the blower is operating.
IMPORTANT
When an accessory is being used in a continuous fan
application which does not include the S68 ON/OFF
switch, the accessory must be wired between L1 and
N on the fan control board to ensure proper voltage.


