

I
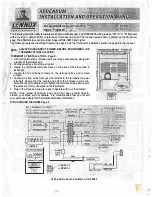
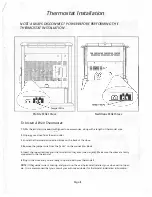
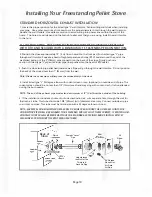
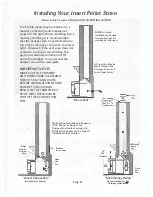
Thermostat Installation
NOTE: ALWAYS DISCONNECT POWER BEFORE PERFORMING THE
THERMOSTAT INSTALLATION.
�is:=:=Jc:::::=l��c=:)�c::=,c::::::::)
i=,
��c==:,:r-=:=)c==)c::::=,'=<==:,c=;i
c=::,
��(==:=Jir=.)C'=c,��l'==:,c::::::z)
'=>
�c::=.ii�c=.i���c==,c=::z:=::)
c:==,
(=:l'C=>�'=�c=:=:tl:=>
�l=,)(===:::s,c::=::')�(==:::)<=.o
(:==t,c:::::=,c====ic==:>c=c,c::=:=:i�
11'=1)c=,.c=,��c:::=:ii=>
'=-'lc=:::=>��--=::t:lc=::::=:l�
c==i, c::z:., c::=:o � c:=::::c, � c:::z=.,
'=l>i:c=><=O<=i=:>oc:z:z=)c:==,�
�a:==:)��cz=,�r.sc::::,
c=:t, cx=.,c=::::, <=C:IC.:X::,��
�c:::c=:,c=::,��6=:;I�
�c=c::::=,<==:)�<=:c:,�r===:::,
�c::::::::s::=:.<==:>c=.ic:c::c,c:::.c:D�
t===,c::I:,c=:=::::,,c'i2C:::)�c::::s:=ic::::z:o
t=:ii=o<==:>����t:::=:==.>cm=::>
t===::>
c=::, c:::=)c:::=,o:::=,.,=,ci:=>�c==,cm=>
(=.,o
c=--:;:
c:::::::) �c:=::::i � �c=:::) el:::)
t===,
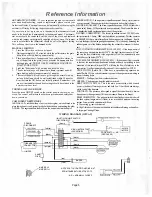
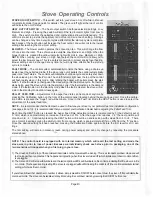
Jumper Wire
Profile Pellet Stove
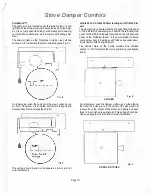
To Install A Wall Thermostat:
,
,
�������25�
=
=
'!::=::::::I
= =
=== �
=
===
c:=) c::::::::>c::::::i c:::::::J c:::, c=:::>c::::::i c:::, c:=,
Traditions Pellet Stove
1. A 24� thermostat is inclu�cj_ with'.iyour stove accessories, along with a length of thermostat wire.
'-.......1
2. Unplug your stove from the wall outlet.
3. Locate the thermostat connection block on the back of the stove.
4. Remove the jumper wire from the ']acks" on the connection block.
5. Insert the two wires from your thermostat into the jacks (one per jack). Make sure the wires are firmly
connected to the thermostat.
6. Plug in the stove and you are ready to operate with your thermostat!
NOTE:
If the jumper wire is missing, and you do not have a thermostat installed, your stove will not oper
ate. It is recommended that you consult your authorized dealer for thermostat installation information.
Page 8


