background image

Hub 500 User Guide and Hardware 
Maintenance Manual

Machine Types: 

10V5 and 10V6

Summary of Contents for 10V5

Page 1: ...Hub 500 User Guide and Hardware Maintenance Manual Machine Types 10V5 and 10V6 ...

Page 2: ...rmation Guide and Appendix A Notices on page 59 First Edition February 2018 Copyright Lenovo 2018 LIMITED AND RESTRICTED RIGHTS NOTICE If data or software is delivered pursuant to a General Services Administration GSA contract use reproduction or disclosure is subject to restrictions set forth in Contract No GS 35F 05925 ...

Page 3: ...g the internal microphones 18 Removing the system cover 20 Replacing the video capture card 23 Replacing the Skype board 24 Replacing the Wi Fi card 26 Replacing the system fan 30 Replacing the heat sink 31 Replacing the coin cell battery 33 Replacing the microprocessor 35 Replacing the system board 39 Replacing a memory module 41 Replacing the M 2 solid state drive 43 Replacing the LED board 45 R...

Page 4: ...ii Hub 500 User Guide and Hardware Maintenance Manual ...

Page 5: ... Your meeting console model might look slightly different from the illustration CAUTION Move the meeting console by holding the base instead of the hinge or the LCD panel Figure 1 Moving the meeting console Figure 2 Front view 1 Internal microphones 2 2 Motion sensor 3 System status indicator LED ring Copyright Lenovo 2018 1 ...

Page 6: ...n automatically Note The screen will also brighten when you tap it 3 System status indicator The LED ring at the bottom of the hinge shows the system status of the meeting console Off The meeting console is off White light rotates and then is solid on You enter Skype Room System or log in to Skype Room System successfully or exit the meeting Solid white The meeting console is turned on or in the i...

Page 7: ...nnectors 4 8 HDMI in connector 9 Headset connector 10 Ethernet connector 1 Power indicator This indicator is on when the meeting console is on 2 Power button Used to turn on your meeting console When you cannot shut down the meeting console from the operating system press and hold the power button for four or more seconds to turn off the meeting console 3 Internal speaker Used to listen to the hig...

Page 8: ...nals from an external computer with HDMI signals output 9 Headset connector Used to connect a headset to the meeting console To enable the headset function do the following 1 In the Skype mode tap Settings Settings 2 Enter the default administrator password sfb and tap Yes 3 Tap Features and then select Headset Microphone Lenovo Hub500 Audio in the Microphone for Conferencing area 4 Tap Save and E...

Page 9: ...ttery 3 System fan connector 4 Skype board I2C connector 5 Skype board USB 2 0 connector for the motion sensor 6 Skype board USB 2 0 connector for audio signals 7 PCH 8 M 2 Wi Fi card slot 9 Power button board 10 Skype board power connector Chapter 1 Overview 5 ...

Page 10: ...and video capture card 1 3 in 1 connector connected to the integrated microphones the LED board and the motion sensor 2 Internal speaker connector 3 Touch connector 4 Embedded DisplayPort connector 5 USB 2 0 connector for audio signals and the motion sensor 6 I2C connector 7 DisplayPort connector 8 Power connector 9 Video capture module connector 6 Hub 500 User Guide and Hardware Maintenance Manua...

Page 11: ... When you contact Lenovo for help the machine type and model information helps support technicians to identify the meeting console and provide faster service The machine type and model label is attached on the meeting console as shown Figure 6 Machine type and model label Chapter 1 Overview 7 ...

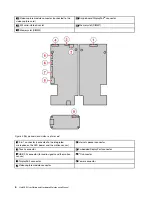
Page 12: ...8 Hub 500 User Guide and Hardware Maintenance Manual ...

Page 13: ...al microphones Internal speaker Input Output I O features Audio connectors headset Display connectors HDMI in and HDMI out Ethernet connector USB 3 1 Gen 1 connector Network features Ethernet LAN Wireless LAN Bluetooth Physical dimensions Width 280 0 mm 11 0 inches Height 180 0 mm 7 1 inches Depth 193 mm 7 6 inches Weight without the package Maximum configuration as shipped 2 5 kg 5 0 lb Copyright...

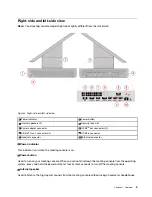
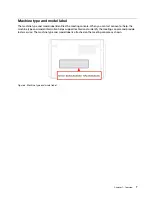
Page 14: ...10 Hub 500 User Guide and Hardware Maintenance Manual ...

Page 15: ...nt fixture The cable lock connects to the security lock slot at the rear of your meeting console Depending on the type selected the cable lock can be operated with a key or combination The cable lock also locks the buttons used to open the system cover This is the same type of lock used with many notebook meeting consoles You can order such a cable lock directly from Lenovo by searching for Kensin...

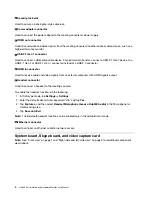
Page 16: ...12 Hub 500 User Guide and Hardware Maintenance Manual ...

Page 17: ...sed circuitry Prevent others from touching the options and other meeting console components Touch the static protective package containing the part to a metal expansion slot cover or other unpainted metal surface on the meeting console for at least two seconds This reduces static electricity from the package and your body before you install or replace a new part When possible remove the new part f...

Page 18: ... only with another FRU of the correct model When you replace an FRU ensure that the model of the machine and the FRU part number are correct An FRU should not be replaced because of a single unreproducible failure Single failures can occur for a variety of reasons that have nothing to do with a hardware defect such as cosmic radiation electrostatic discharge or software errors Consider replacing a...

Page 19: ... board 5 System fan 6 M 2 solid state drive 7 Microprocessor 8 Coin cell battery 9 Memory modules 2 10 Power adapter 11 Power cord 12 Chassis 13 Skype board audio cable 14 Skype board I2C cable 15 Skype board DisplayPort cable 16 Skype board power cable Chapter 4 Replacing hardware 15 ...

Page 20: ...or 31 Embedded DisplayPort cable 32 Touch cable 33 Back cover 34 Wi Fi antennas 35 Internal microphones Replacing the cable management door Attention Do not open your meeting console or attempt any repairs before reading the Important Product Information Guide 1 Remove all connected devices turn off the meeting console and disconnect the power cord from the electrical outlet 2 Unlock the Kensingto...

Page 21: ...Figure 10 Removing the cable management door Figure 11 Installing the cable management door Chapter 4 Replacing hardware 17 ...

Page 22: ...utlet Replacing the internal microphones Attention Do not open your meeting console or attempt any repairs before reading the Important Product Information Guide 1 Remove all connected devices turn off the meeting console and disconnect the power cord from the electrical outlet 2 Unlock the Kensington style cable lock 3 Replace the internal microphones 18 Hub 500 User Guide and Hardware Maintenanc...

Page 23: ...and the back cover without undue force so that the cables connected to the LCD panel will not be broken Figure 13 Separating the LCD panel and the back cover Figure 14 Removing the internal microphones Chapter 4 Replacing hardware 19 ...

Page 24: ...o lock the meeting console 5 Reconnect all devices to the meeting console and the power cord to the electrical outlet Removing the system cover Attention Do not open your meeting console or attempt any repairs before reading the Important Product Information Guide CAUTION Before you open the system cover turn off the meeting console and wait several minutes until the meeting console is cool 20 Hub...

Page 25: ... console and disconnect the power cord from the electrical outlet 2 Unlock the Kensington style cable lock 3 Remove the system cover Figure 17 Removing the screws on the bottom Figure 18 Opening the cable management door Chapter 4 Replacing hardware 21 ...

Page 26: ...bles from the Skype board and the system board except the Wi Fi antenna cables 5 Remove the video capture card For details see Replacing the video capture card on page 23 6 Remove the Skype board For details see Replacing the Skype board on page 24 7 Remove the Wi Fi antenna cables For details see Replacing the Skype board on page 24 8 Remove the system cover completely from the chassis 22 Hub 500...

Page 27: ...sconnect the video capture card cable from the video capture card 2 Replace the video capture card Figure 21 Removing the video capture card Figure 22 Installing the video capture card 3 Connect the video capture card cable to the new video capture card 4 Complete the replacement See Completing the parts replacement on page 56 Chapter 4 Replacing hardware 23 ...

Page 28: ...deo capture card For details see Replacing the video capture card on page 23 2 Record the cable routing and cable connections and then disconnect all cables from the Skype board 3 Replace the Skype board Figure 23 Removing the Skype board with the bracket and holder Figure 24 Removing the Skype board bracket 24 Hub 500 User Guide and Hardware Maintenance Manual ...

Page 29: ...Figure 25 Removing the Skype board holder Figure 26 Installing the Skype board holder Chapter 4 Replacing hardware 25 ...

Page 30: ...kype board 5 Reinstall the removed parts To complete the replacement see Completing the parts replacement on page 56 Replacing the Wi Fi card Attention Do not open your meeting console or attempt any repairs before reading the Important Product Information Guide 1 Remove the system cover For details see Removing the system cover on page 20 2 Replace the Wi Fi card Type 1 26 Hub 500 User Guide and ...

Page 31: ...Figure 29 Removing the Wi Fi card shield Figure 30 Disconnecting the Wi Fi antenna cables Figure 31 Removing the Wi Fi card Chapter 4 Replacing hardware 27 ...

Page 32: ...Figure 32 Installing the Wi Fi card Figure 33 Connecting the Wi Fi antenna cables Figure 34 Installing the Wi Fi card shield Type 2 28 Hub 500 User Guide and Hardware Maintenance Manual ...

Page 33: ...Figure 35 Removing the Wi Fi card shield Figure 36 Disconnecting the Wi Fi antenna cables Figure 37 Removing the Wi Fi card Chapter 4 Replacing hardware 29 ...

Page 34: ... see Completing the parts replacement on page 56 Replacing the system fan Attention Do not open your meeting console or attempt any repairs before reading the Important Product Information Guide 1 Remove the system cover For details see Removing the system cover on page 20 2 Disconnect the system fan cable from the system board 30 Hub 500 User Guide and Hardware Maintenance Manual ...

Page 35: ... the new system fan cable to the system board 5 Complete the replacement See Completing the parts replacement on page 56 Replacing the heat sink Attention Do not open your meeting console or attempt any repairs before reading the Important Product Information Guide CAUTION Chapter 4 Replacing hardware 31 ...

Page 36: ... For details see Replacing the system fan on page 30 3 Replace the heat sink Notes Carefully remove the screws from the system board to avoid any possible damage to the system board The screws cannot be removed from the heat sink You might have to gently twist the heat sink to free it from the microprocessor Do not touch the thermal grease while handling the heat sink Figure 43 Removing the heat s...

Page 37: ...ch as parallel connector assignments configurations A coin cell battery keeps this information active when you turn off the meeting console The coin cell battery normally requires no charging or maintenance throughout its life however no coin cell battery lasts forever If the coin cell battery fails the date time and configuration information including passwords are lost An error message is displa...

Page 38: ...Figure 45 Opening the retainer Figure 46 Removing the coin cell battery 34 Hub 500 User Guide and Hardware Maintenance Manual ...

Page 39: ...sole or attempt any repairs before reading the Important Product Information Guide CAUTION The heat sink and microprocessor might be very hot Before you open the system cover turn off the meeting console and wait several minutes until the meeting console is cool 1 Remove the system cover For details see Removing the system cover on page 20 2 Remove the system fan For details see Replacing the syst...

Page 40: ...cable connections and then disconnect all cables from the system board 5 Replace the microprocessor Note Touch only the edges of the microprocessor Do not touch the gold contacts on the bottom Figure 49 Lifting the handle Figure 50 Opening the retainer 36 Hub 500 User Guide and Hardware Maintenance Manual ...

Page 41: ...Figure 51 Removing the microprocessor Figure 52 Installing the microprocessor Chapter 4 Replacing hardware 37 ...

Page 42: ...54 Locking the retainer 6 Route and reconnect all the cables to the system board 7 Reinstall the removed parts To complete the replacement see Completing the parts replacement on page 56 38 Hub 500 User Guide and Hardware Maintenance Manual ...

Page 43: ... Replacing the system fan on page 30 4 Remove the heat sink For details see Replacing the heat sink on page 31 5 Remove the coin cell battery For details see Replacing the coin cell battery on page 33 6 Remove the microprocessor For details see Replacing the microprocessor on page 35 7 Record the cable routing and cable connections and then disconnect all cables from the system board 8 Replace the...

Page 44: ... The failing system board must be returned with a microprocessor socket cover to protect the pins during shipping and handling Figure 56 Removing the system board Figure 57 Installing the system board 40 Hub 500 User Guide and Hardware Maintenance Manual ...

Page 45: ...our meeting console or attempt any repairs before reading the Important Product Information Guide 1 Remove the system cover For details see Removing the system cover on page 20 2 Remove the system fan For details see Replacing the system fan on page 30 3 Remove the heat sink For details see Replacing the heat sink on page 31 4 Remove the system board For details see Replacing the system board on p...

Page 46: ...Figure 59 Opening the retainer Figure 60 Removing the memory module 42 Hub 500 User Guide and Hardware Maintenance Manual ...

Page 47: ... or attempt any repairs before reading the Important Product Information Guide 1 Remove the system cover For details see Removing the system cover on page 20 2 Remove the system fan For details see Replacing the system fan on page 30 3 Remove the heat sink For details see Replacing the heat sink on page 31 4 Remove the system board For details see Replacing the system board on page 39 5 Replace th...

Page 48: ...Figure 63 Pulling out the stopper Figure 64 Removing the M 2 solid state drive Figure 65 Installing the M 2 solid state drive 44 Hub 500 User Guide and Hardware Maintenance Manual ...

Page 49: ... LED board Attention Do not open your meeting console or attempt any repairs before reading the Important Product Information Guide 1 Remove the system cover For details see Removing the system cover on page 20 2 Disconnect the LED board cable from the LED board 3 Replace the LED board Figure 67 Removing the right cover Chapter 4 Replacing hardware 45 ...

Page 50: ...Figure 68 Removing the LED board and the upper cover Figure 69 Removing the LED board 46 Hub 500 User Guide and Hardware Maintenance Manual ...

Page 51: ...Figure 70 Installing the LED board Figure 71 Installing the LED board and the upper cover Chapter 4 Replacing hardware 47 ...

Page 52: ... 56 Replacing the hinge pipe Attention Do not open your meeting console or attempt any repairs before reading the Important Product Information Guide 1 Remove the system cover For details see Removing the system cover on page 20 2 Replace the hinge pipe Figure 73 Removing the upper cover and the LED board 48 Hub 500 User Guide and Hardware Maintenance Manual ...

Page 53: ... panel and the back cover without undue force so that the cables connected to the LCD panel will not be broken Figure 74 Separating the LCD panel and the back cover Figure 75 Removing the hinge Chapter 4 Replacing hardware 49 ...

Page 54: ...Figure 76 Removing the hinge pipe Figure 77 Installing the hinge pipe 50 Hub 500 User Guide and Hardware Maintenance Manual ...

Page 55: ...Figure 78 Installing the hinge Figure 79 Closing the back cover Chapter 4 Replacing hardware 51 ...

Page 56: ...irs before reading the Important Product Information Guide 1 Remove the system cover For details see Removing the system cover on page 20 2 Remove the hinge pipe For details see Replacing the hinge pipe on page 48 3 Record the cable routing and cable connection and then disconnect the internal speakers cable from the Skype board 4 Replace the internal speakers Figure 81 Removing the internal speak...

Page 57: ...ared board Attention Do not open your meeting console or attempt any repairs before reading the Important Product Information Guide 1 Remove the system cover For details see Removing the system cover on page 20 2 Remove the hinge pipe For details see Replacing the hinge pipe on page 48 3 Disconnect the infrared board cable from the infrared board 4 Replace the infrared board Figure 83 Removing the...

Page 58: ...eplacement on page 56 Replacing the Wi Fi antennas Attention Do not open your meeting console or attempt any repairs before reading the Important Product Information Guide 1 Remove the system cover For details see Removing the system cover on page 20 2 Replace the Wi Fi antennas Figure 85 Removing the upper cover and the LED board 54 Hub 500 User Guide and Hardware Maintenance Manual ...

Page 59: ...r without undue force so that the cables connected to the LCD panel will not be broken Figure 86 Separating the LCD panel and the back cover Figure 87 Removing the Wi Fi antennas Figure 88 Installing the Wi Fi antennas Chapter 4 Replacing hardware 55 ...

Page 60: ...g the parts replacement After completing the replacement for all parts reinstall the system cover and reconnect the cables To reinstall the system cover and reconnect the cables to your meeting console do the following 1 Ensure that all components have been reassembled correctly and that no tools or loose screws are left inside your meeting console 56 Hub 500 User Guide and Hardware Maintenance Ma...

Page 61: ...over Keep cables clear of the hinges and sides of the meeting console chassis to avoid interference when reinstalling the system cover 3 Reinstall the system cover Figure 91 Reinstalling the system cover Figure 92 Reinstalling the screw on the side Chapter 4 Replacing hardware 57 ...

Page 62: ... screws on the bottom 4 Place the meeting console in an upright position 5 Use the Kensington style cable lock to lock the meeting console 6 Reconnect all devices to the meeting console and the power cord to the electrical outlet 58 Hub 500 User Guide and Hardware Maintenance Manual ...

Page 63: ...he publication Lenovo may make improvements and or changes in the products and or the programs described in this publication at any time without notice The products described in this document are not intended for use in implantation or other life support applications where malfunction may result in injury or death to persons The information contained in this document does not affect or change Leno...

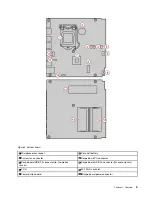
Page 64: ...60 Hub 500 User Guide and Hardware Maintenance Manual ...

Page 65: ... Mini DisplayPort are trademarks of the Video Electronics Standards Association The terms HDMI and HDMI High Definition Multimedia Interface are trademarks or registered trademarks of HDMI Licensing LLC in the United States and other countries Other company product or service names may be trademarks or service marks of others Copyright Lenovo 2018 61 ...

Page 66: ...62 Hub 500 User Guide and Hardware Maintenance Manual ...
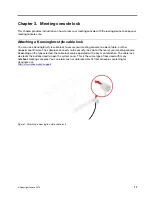
Page 67: ......

Page 68: ......

Reviews: