Microprocessor
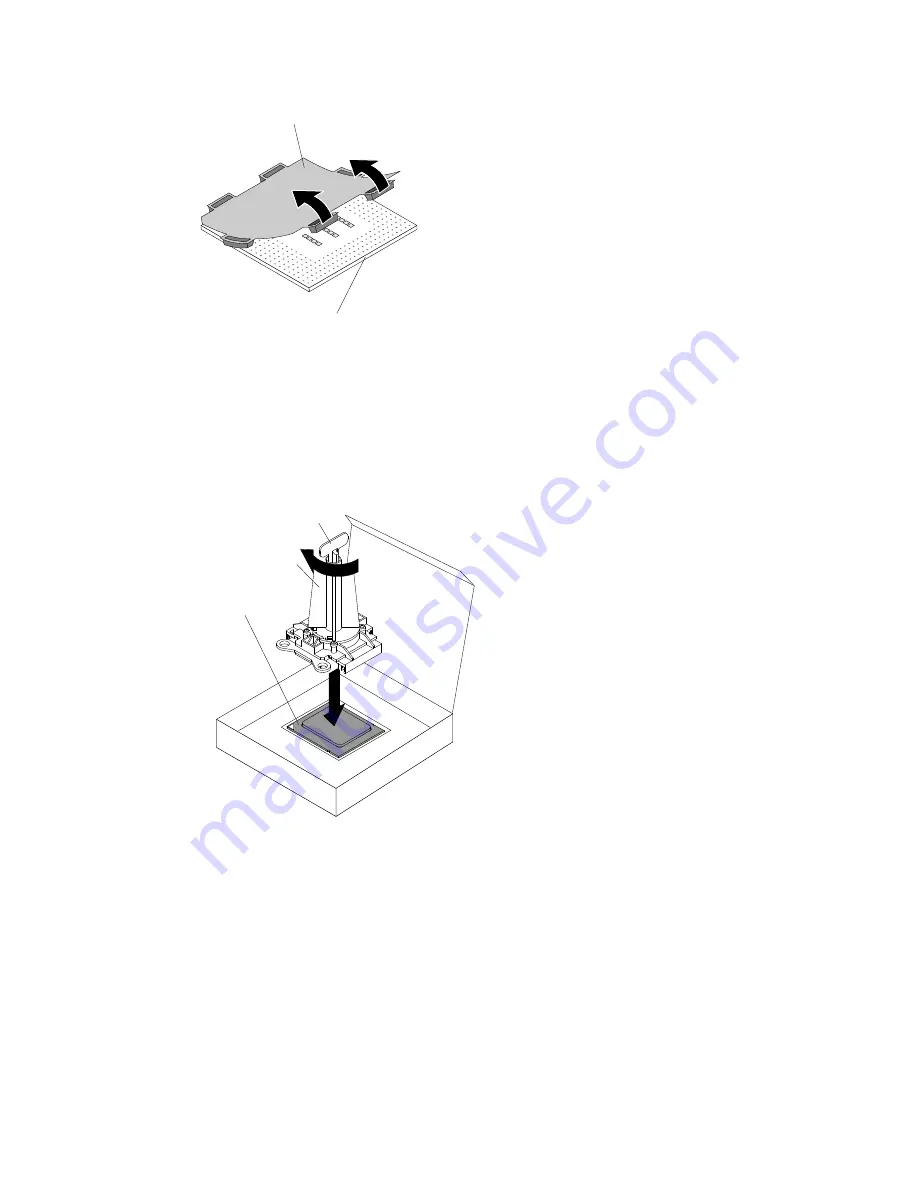
Protective
cover
e. Put the microprocessor back in the box, component side down, on the solid piece of foam.
f.
Twist the handle of the installation tool counterclockwise so that it is in the open position.
g. Using the triangle on the microprocessor to align it with the installation tool, place the
microprocessor on the underside of the tool.
h. Twist the handle of the installation tool clockwise to secure the microprocessor in the tool.
Note:
You can pick up or release the microprocessor by twisting the microprocessor
installation tool handle.
Handle
Installation
tool
Microprocessor
Step 8. Carefully place the microprocessor into the microprocessor socket, using the alignment tabs on the
microprocessor with the alignment notches in the microprocessor socket as a guide.
The alignment holes on the tool will not sit flush on the microprocessor bracket screws. However,
the holes can be used as a guide to ensure the proper alignment between the microprocessor
installation tool and the microprocessor bracket.
Attention:
• Do not press the microprocessor into the socket.
• Do not touch exposed pins of the microprocessor socket.
• Make sure that the microprocessor is oriented and aligned correctly in the socket before you try
to close the microprocessor retainer.
.
55
Summary of Contents for 1909
Page 1: ...BladeCenter HX5 Blade Server Installation and User s Guide Machine Types 7873 7872 1910 1909 ...
Page 80: ...72 BladeCenter HX5 Blade ServerInstallation and User s Guide ...
Page 112: ...104 BladeCenter HX5 Blade ServerInstallation and User s Guide ...
Page 116: ...108 BladeCenter HX5 Blade ServerInstallation and User s Guide ...
Page 120: ...112 BladeCenter HX5 Blade ServerInstallation and User s Guide ...
Page 126: ...118 BladeCenter HX5 Blade ServerInstallation and User s Guide ...
Page 133: ...Taiwan Class A compliance statement Appendix B Notices 125 ...
Page 134: ...126 BladeCenter HX5 Blade ServerInstallation and User s Guide ...
Page 139: ......
Page 140: ...Part Number 00V9872 Printed in China 1P P N 00V9872 ...
Page 141: ... 1P00V9872 ...

